
本教程适用于以下操作系统版本
- Debian 12(Bookworm)
- Debian 11(Bullseye)
本页内容
- 前置条件
- 第 1 步 - 配置防火墙
- 第 2 步 - 准备系统
- 第 3 步 - 安装 OpenSearch
- 第 4 步 - 测试 OpenSearch
- 第 5 步 - 配置 OpenSearch
- 第 6 步 - 为 OpenSearch 配置 TLS 生成根证书 生成管理员证书 生成节点证书 准备用于安装证书
- 第 7 步 - 为 OpenSearch 安装 TLS
- 第 8 步 - 创建 OpenSearch 用户
- 第 9 步 - 安装 OpenSearch Dashboards
- 第 10 步 - 配置 OpenSearch Dashboards
- 第 11 步 - 安装 Nginx
- 第 12 步 - 安装 SSL
- 第 13 步 - 配置 Nginx
- 第 14 步 - 访问并使用 OpenSearch Dashboards
- 总结
- 生成根证书
- 生成管理员证书
- 生成节点证书
- 准备用于安装证书
OpenSearch 是 Amazon 开发的开源 Elasticsearch 和 Kibana 分支版本。它是一个实时、分布式且可扩展的搜索引擎,支持全文检索以及分析功能。它用于对海量数据进行索引和搜索。它通常与 OpenSearch Dashboards(Kibana 的分支版本)一起部署,后者是一个功能强大的 OpenSearch 数据可视化面板。OpenSearch Dashboards 允许你探索 OpenSearch 日志数据,并构建面板和查询,从而深入了解你的应用程序。
本教程将向你展示如何在 Debian 12 服务器上安装 OpenSearch。你还将学习如何使用自定义 TLS 证书来保护你的安装,并在 OpenSearch 上启用身份验证。
前置条件
- 一台运行 Debian 12、至少配备 4GB 内存的服务器。
- 一个具有 sudo 权限的非 root 用户。
- 已启用并运行 uncomplicated Firewall(UFW)。
- 一个指向你服务器的完全限定域名(FQDN),例如 opensearch.example.com。如果你想通过代理服务器使用 SSL 提供 OpenSearch Dashboards 服务,这会很有用。
- 已更新所有软件包。$ sudo apt update && sudo apt upgrade
一台运行 Debian 12、至少配备 4GB 内存的服务器。
一个具有 sudo 权限的非 root 用户。
已启用并运行 uncomplicated Firewall(UFW)。
一个指向你服务器的完全限定域名(FQDN),例如 opensearch.example.com。如果你想通过代理服务器使用 SSL 提供 OpenSearch Dashboards 服务,这会很有用。
已更新所有软件包。
$ sudo apt update && sudo apt upgrade
- 运行本教程和 Craft CMS 需要一些基本软件包。其中部分软件包可能已经安装在你的服务器上。$ sudo apt install curl wget nano software-properties-common dirmngr apt-transport-https ca-certificates lsb-release debian-archive-keyring gnupg2 ufw unzip -y
运行本教程和 Craft CMS 需要一些基本软件包。其中部分软件包可能已经安装在你的服务器上。
$ sudo apt install curl wget nano software-properties-common dirmngr apt-transport-https ca-certificates lsb-release debian-archive-keyring gnupg2 ufw unzip -y
第 1 步 - 配置防火墙
在安装任何软件包之前,第一步是配置防火墙以允许 HTTP 和 HTTPS 连接。
检查防火墙的状态。
$ sudo ufw status
你应该会看到类似下面的输出。
Status: active

To                         Action      From
--                         ------      ----
OpenSSH                    ALLOW       Anywhere
OpenSSH (v6)               ALLOW       Anywhere (v6)
允许 HTTP 和 HTTPS 端口。
$ sudo ufw allow http
$ sudo ufw allow https
再次检查状态以确认。
$ sudo ufw status
Status: active

To                         Action      From
--                         ------      ----
OpenSSH                    ALLOW       Anywhere
80/tcp                     ALLOW       Anywhere
443/tcp                    ALLOW       Anywhere
OpenSSH (v6)               ALLOW       Anywhere (v6)
80/tcp (v6)                ALLOW       Anywhere (v6)
443/tcp (v6)               ALLOW       Anywhere (v6)
第 2 步 - 准备系统
在安装 OpenSearch 之前,我们需要为它准备并优化系统。这涉及多个步骤,包括:如果有交换内存则禁用它、设置系统的内存映射数量,以及设置系统主机名。
首先,检查是否已启用交换内存。
$ free -m
如果启用了交换内存,你应该会看到类似的输出。
               total        used        free      shared  buff/cache   available
Mem:            7945        1083        6492          34         636        6861
Swap:           4242           0        4242
运行以下命令以永久禁用交换空间。
$ sudo swapoff -a
$ sudo sed -i '/ swap / s/^\(.*\)$/#\1/g' /etc/fstab
再次检查交换内存,应该会显示以下内容。
               total        used        free      shared  buff/cache   available
Mem:            7945        1113        6449          37         651        6831
Swap:              0           0           0
OpenSearch 默认使用一个 mapfs 目录来存储其索引。操作系统对 nmap 计数的默认限制过低,可能会导致内存不足错误。
检查 vm.max_map_count 变量的当前值。
$ sysctl -n vm.max_map_count
65530
要增加每个进程使用的内存映射数量,请运行以下命令。
$ sudo sysctl -w vm.max_map_count=262144
这只会在系统重启之前生效。要使该值永久生效,请使用以下命令将 vm.max_map_count=262144 这一行添加到 /etc/sysctl.conf 文件中。
$ echo "vm.max_map_count=262144" | sudo tee -a /etc/sysctl.conf
你可以通过重启系统或运行以下命令来使更改永久生效。
$ sudo sysctl -p
最后一步是设置主机名。根据你托管服务器的位置不同,部分云服务商允许你通过其控制面板直接设置主机名。不过,通过终端来设置会更好。
运行以下命令来设置主机名。
$ sudo hostnamectl set-hostname opensearch
将 FQDN(完全限定域名)添加到 /etc/hosts 文件中。在这里,我们将主机名 opensearch 映射到域名 opensearch.example.com,并将其指向服务器 IP 地址。请将下面命令中的
$ echo "<serverIPaddress> opensearch.example.com opensearch" | sudo tee -a /etc/hosts
使用以下命令检查主机名和 FQDN。
$ hostname
opensearch
$ hostname -f
opensearch.example.com
至此,我们完成了为配合 OpenSearch 运行而优化系统的过程。
第 3 步 - 安装 OpenSearch
导入用于对安装包进行签名的 OpenSearch GPG 密钥。
$ curl -o- https://artifacts.opensearch.org/publickeys/opensearch.pgp | sudo gpg --dearmor --batch --yes -o /usr/share/keyrings/opensearch-keyring
创建 OpenSearch 的 APT 仓库文件。
$ echo "deb [signed-by=/usr/share/keyrings/opensearch-keyring] https://artifacts.opensearch.org/releases/bundle/opensearch/2.x/apt stable main" | sudo tee /etc/apt/sources.list.d/opensearch-2.x.list
更新系统仓库列表。
$ sudo apt update
查看所有可用的 OpenSearch 版本。
$ sudo apt list -a opensearch
Listing... Done
opensearch/stable 2.12.0 amd64
opensearch/stable 2.11.1 amd64
opensearch/stable 2.11.0 amd64
opensearch/stable 2.10.0 amd64
opensearch/stable 2.9.0 amd64
opensearch/stable 2.8.0 amd64
opensearch/stable 2.7.0 amd64
opensearch/stable 2.6.0 amd64
opensearch/stable 2.5.0 amd64
最新版本的 OpenSearch v2.12.0 要求你在安装之前设置管理员演示密码,否则安装将失败。
你可以使用以下命令安装最新版本的 OpenSearch。我们可以通过安装命令本身中的环境变量来设置管理员演示密码。请选择一个强密码。
$ sudo env OPENSEARCH_INITIAL_ADMIN_PASSWORD=<custom-admin-password> apt install opensearch
如果在安装过程中看到以下警告,你可以放心地忽略它。
......
chown: warning: '.' should be ':': ‘opensearch.opensearch’
chown: warning: '.' should be ':': ‘opensearch.opensearch’
chown: warning: '.' should be ':': ‘opensearch.opensearch’
chown: warning: '.' should be ':': ‘opensearch.opensearch’
chown: warning: '.' should be ':': ‘opensearch.opensearch’
......
或者你也可以安装特定版本。
$ sudo apt install opensearch=2.11.1
重新加载服务守护进程。
$ sudo systemctl daemon-reload
启用 OpenSearch 服务。
$ sudo systemctl enable opensearch
启动 OpenSearch 服务。
$ sudo systemctl start opensearch
验证 OpenSearch 服务的状态。
$ sudo systemctl status opensearch
你应该会得到以下输出。
? opensearch.service - OpenSearch
     Loaded: loaded (/lib/systemd/system/opensearch.service; enabled; preset: enabled)
     Active: active (running) since Sat 2024-03-02 06:37:01 UTC; 5s ago
       Docs: https://opensearch.org/
   Main PID: 31109 (java)
      Tasks: 75 (limit: 4652)
     Memory: 1.3G
        CPU: 1min 3.128s
     CGroup: /system.slice/opensearch.service
             ??31109 /usr/share/opensearch/jdk/bin/java -Xshare:auto -Dopensearch.networkaddress.cache.ttl=60 -Dopensearch.networkaddress.cache.negative.ttl=10 -XX:+AlwaysPreTouch -Xss1m -Djava.awt.headless=true...
第 4 步 - 测试 OpenSearch
在继续之前,我们先检查安装是否正常运行。运行以下命令来验证 OpenSearch 是否按预期运行。
$ curl -X GET https://localhost:9200 -u 'admin:<custom-admin-password>' --insecure
你应该会得到类似的输出。
{
  "name" : "opensearch",
  "cluster_name" : "opensearch",
  "cluster_uuid" : "3oFvYn96St2MOpDP3Sf29g",
  "version" : {
    "distribution" : "opensearch",
    "number" : "2.12.0",
    "build_type" : "deb",
    "build_hash" : "2c355ce1a427e4a528778d4054436b5c4b756221",
    "build_date" : "2024-02-20T02:18:31.541484890Z",
    "build_snapshot" : false,
    "lucene_version" : "9.9.2",
    "minimum_wire_compatibility_version" : "7.10.0",
    "minimum_index_compatibility_version" : "7.0.0"
  },
  "tagline" : "The OpenSearch Project: https://opensearch.org/"
}
查询 OpenSearch 插件端点以查看可用插件列表。
$ curl -X GET https://localhost:9200/_cat/plugins?v -u 'admin:<custom-admin-password>' --insecure
你也可以使用以下命令来实现同样的目的。
$ /usr/share/opensearch/bin/opensearch-plugin list
你应该会得到类似的输出。
name       component                            version
opensearch opensearch-alerting                  2.12.0.0
opensearch opensearch-anomaly-detection         2.12.0.0
opensearch opensearch-asynchronous-search       2.12.0.0
opensearch opensearch-cross-cluster-replication 2.12.0.0
opensearch opensearch-custom-codecs             2.12.0.0
opensearch opensearch-flow-framework            2.12.0.0
opensearch opensearch-geospatial                2.12.0.0
opensearch opensearch-index-management          2.12.0.0
opensearch opensearch-job-scheduler             2.12.0.0
opensearch opensearch-knn                       2.12.0.0
opensearch opensearch-ml                        2.12.0.0
opensearch opensearch-neural-search             2.12.0.0
opensearch opensearch-notifications             2.12.0.0
opensearch opensearch-notifications-core        2.12.0.0
opensearch opensearch-observability             2.12.0.0
opensearch opensearch-performance-analyzer      2.12.0.0
opensearch opensearch-reports-scheduler         2.12.0.0
opensearch opensearch-security                  2.12.0.0
opensearch opensearch-security-analytics        2.12.0.0
opensearch opensearch-skills                    2.12.0.0
opensearch opensearch-sql                       2.12.0.0
你可以使用以下命令安装额外的插件。
$ /usr/share/opensearch/bin/opensearch-plugin install <plugin-name>
你可以在其官方网站上找到可用 OpenSearch 插件的列表。
第 5 步 - 配置 OpenSearch
OpenSearch 的默认设置并不适合生产环境。默认情况下,OpenSearch 没有绑定到任何网络接口,无法从外部访问。此外,它使用的是默认用户名和密码,如果直接用于生产环境,可能会引发安全问题。
OpenSearch 将其配置存储在 /etc/opensearch/opensearch.yml 文件中。打开该文件进行编辑。
$ sudo nano /etc/opensearch/opensearch.yml
找到 #network.host: 192.168.0.1 这一行,去掉前面的井号(#)取消注释,并按图示修改其值。这会将 OpenSearch 绑定到所有可用接口。你也可以选择输入特定的 IP 以将其绑定到特定接口。
# Set the bind address to a specific IP (IPv4 or IPv6):
#
network.host: 0.0.0.0
在文件末尾添加以下行。
# Unless you have already configured a cluster, you should set
# discovery.type to single-node, or the bootstrap checks will
# fail when you try to start the service.
discovery.type: single-node

# If you previously disabled the Security plugin in opensearch.yml,
# be sure to re-enable it. Otherwise you can skip this setting.
plugins.security.disabled: false
由于我们是安装在单台服务器上,我们将 discovery.type 设置为 single-node。将 plugins.security.disabled 设置为 false 可启用 OpenSearch 安全插件。
按 Ctrl + X 保存文件,并在提示时输入 Y。
我们还需要指定 JVM(Java 虚拟机)堆的初始和最大大小。该设置取决于你服务器的内存大小。例如,我们使用的是一台配备 4GB 内存的服务器,因此将堆大小设置为 3GB。
在 /etc/opensearch/jvm.options.d 目录中创建并打开 heapsize.options 进行编辑。它将覆盖 /etc/opensearch/jvm.options 文件中设置的默认值。
$ sudo nano /etc/opensearch/jvm.options.d/heapsize.options
向其中添加以下行。
-Xms3g
-Xmx3g
按 Ctrl + X 保存文件,并在提示时输入 Y。
重启 OpenSearch 服务以使更改生效。
$ sudo systemctl restart opensearch
你可以使用以下命令检查当前的堆大小和最大内存。
$ curl -sS "https://localhost:9200/_cat/nodes?h=heap*&v" -u 'admin:<custom-admin-password>' --insecure
你应该会得到以下输出。
heap.current heap.percent heap.max
     345.5mb           11      3gb
第 6 步 - 为 OpenSearch 配置 TLS
在这里,我们将生成证书以保护 OpenSearch。TLS 证书通过允许客户端确认主机身份并加密客户端与主机之间的流量来提供安全性。我们将生成以下证书
- 根 CA 证书 - 这些是用于对所有其他证书进行签名的主要证书。
- 管理员证书 - 这些证书用于获取执行与安全插件相关的管理任务所需的提升权限。
- 节点证书 - 这些证书用于节点与客户端之间的通信。
所有 OpenSearch 证书都存储在 /etc/opensearch 目录中。第一步是移除 OpenSearch 安装过程中设置的默认证书。
切换到 OpenSearch 目录。
$ cd /etc/opensearch
移除默认证书。
$ sudo rm -f *.pem
打开 OpenSearch 配置文件进行编辑。
$ sudo nano opensearch.yml
通过在该文件底部的 OpenSearch Security Demo Configuration(OpenSearch 安全演示配置)部分中每一行前面加上井号,将以下代码注释掉,如下所示。
######## Start OpenSearch Security Demo Configuration ########
# WARNING: revise all the lines below before you go into production
#plugins.security.ssl.transport.pemcert_filepath: esnode.pem
#plugins.security.ssl.transport.pemkey_filepath: esnode-key.pem
#plugins.security.ssl.transport.pemtrustedcas_filepath: root-ca.pem
#plugins.security.ssl.transport.enforce_hostname_verification: false
#plugins.security.ssl.http.enabled: true
#plugins.security.ssl.http.pemcert_filepath: esnode.pem
#plugins.security.ssl.http.pemkey_filepath: esnode-key.pem
#plugins.security.ssl.http.pemtrustedcas_filepath: root-ca.pem
#plugins.security.allow_unsafe_democertificates: true
#plugins.security.allow_default_init_securityindex: true
#plugins.security.authcz.admin_dn: ['CN=kirk,OU=client,O=client,L=test,C=de']
#plugins.security.audit.type: internal_opensearch
#plugins.security.enable_snapshot_restore_privilege: true
#plugins.security.check_snapshot_restore_write_privileges: true
#plugins.security.restapi.roles_enabled: [all_access, security_rest_api_access]
#plugins.security.system_indices.enabled: true
#plugins.security.system_indices.indices: [.plugins-ml-config, .plugins-ml-connector,
#  .plugins-ml-model-group, .plugins-ml-model, .plugins-ml-task, .plugins-ml-conversation-meta,
#  .plugins-ml-conversation-interactions, .plugins-ml-memory-meta, .plugins-ml-memory-message,
#  .opendistro-alerting-config, .opendistro-alerting-alert*, .opendistro-anomaly-results*,
#  .opendistro-anomaly-detector*, .opendistro-anomaly-checkpoints, .opendistro-anomaly-detection-state,
#  .opendistro-reports-*, .opensearch-notifications-*, .opensearch-notebooks, .opensearch-observability,
#  .ql-datasources, .opendistro-asynchronous-search-response*, .replication-metadata-store,
#  .opensearch-knn-models, .geospatial-ip2geo-data*, .plugins-flow-framework-config,
#  .plugins-flow-framework-templates, .plugins-flow-framework-state]
#node.max_local_storage_nodes: 3
######## End OpenSearch Security Demo Configuration ########
按 Ctrl + X 保存文件,并在提示时输入 Y。
接下来,在 /etc/opensearch 目录中创建一个用于存储证书的目录。
$ sudo mkdir /etc/opensearch/certs
将目录的权限更改为当前登录用户,以避免在生成证书时使用 sudo。
$ sudo chown $USER:$USER /etc/opensearch/certs -R
切换到证书目录。
$ cd /etc/opensearch/certs
生成根证书
为根证书生成私钥。
$ openssl genrsa -out root-ca-key.pem 2048
生成一个自签名根 CA 证书。我们使用 -subj 参数来提供嵌入证书中的信息。如果不使用 -subj 标志,系统会要求你输入所有这些信息的。
$ openssl req -new -x509 -sha256 -key root-ca-key.pem -subj "/C=CA/ST=ONTARIO/L=TORONTO/O=ORG/OU=UNIT/CN=ROOT" -out root-ca.pem -days 730
你可以更改这些信息以适配你的特定主机。
-subj 参数中的变量含义如下。
C = 国家名称(2 字母代码),ST = 州或省名称(全称),L = 地区名称(例如城市),O = 组织名称,OU = 组织单位名称(例如部门),CN = 通用名称(例如服务器 FQDN)
你的根证书现在已生效。
生成管理员证书
使用以下命令生成管理员证书的私钥。
$ openssl genrsa -out admin-key-temp.pem 2048
使用兼容 PKCS#12 的算法(3DES)将私钥转换为 PKCS#8 格式,以便在 Java 中使用。
$ openssl pkcs8 -inform PEM -outform PEM -in admin-key-temp.pem -topk8 -nocrypt -v1 PBE-SHA1-3DES -out admin-key.pem
从私钥生成管理员 CSR(证书签名请求)。由于此证书不绑定到任何主机,并且用于验证提升的访问权限,因此我们将通用名称(CN)的值设置为 A。
$ openssl req -new -key admin-key.pem -subj "/C=CA/ST=ONTARIO/L=TORONTO/O=ORG/OU=UNIT/CN=A" -out admin.csr
使用你刚创建的根证书和私钥为管理员 CSR 签名。
$ openssl x509 -req -in admin.csr -CA root-ca.pem -CAkey root-ca-key.pem -CAcreateserial -sha256 -out admin.pem -days 730
Certificate request self-signature ok
subject=C = CA, ST = ONTARIO, L = TORONTO, O = ORG, OU = UNIT, CN = A
生成节点证书
为节点证书生成私钥。
$ openssl genrsa -out node1-key-temp.pem 2048
将节点私钥转换为 PKCS#8 格式。
$ openssl pkcs8 -inform PEM -outform PEM -in node1-key-temp.pem -topk8 -nocrypt -v1 PBE-SHA1-3DES -out node1-key.pem
从私钥为节点证书创建一个新的 CSR。请务必将 CN 变量的值更改为你的节点主机名。此证书与你的主机绑定,应与节点的主机名或 IP 地址相匹配。
$ openssl req -new -key node1-key.pem -subj "/C=CA/ST=ONTARIO/L=TORONTO/O=ORG/OU=UNIT/CN=opensearch.example.com" -out node1.csr
创建一个包含节点主机名、FQDN 或 IP 地址的 SAN(主题备用名称)扩展文件。
$ sh -c 'echo subjectAltName=DNS:opensearch.example.com > node1.ext'
使用你刚创建的根证书和私钥为节点证书 CSR 签名。
$ openssl x509 -req -in node1.csr -CA root-ca.pem -CAkey root-ca-key.pem -CAcreateserial -sha256 -out node1.pem -days 730 -extfile node1.ext
Certificate request self-signature ok
subject=C = CA, ST = ONTARIO, L = TORONTO, O = ORG, OU = UNIT, CN = opensearch.example.com
准备用于安装证书
移除所有临时证书、CSR 以及 SAN 扩展文件。
$ rm -f *temp.pem *csr *ext
接下来,我们将在服务器上安装根 CA 证书。为此,请将根 CA 证书转换为 .crt 格式。
$ openssl x509 -outform der -in root-ca.pem -out root-ca.crt
将 root-ca.crt 文件复制到 /usr/local/share/ca-certificates/ 目录。
$ sudo cp root-ca.crt /usr/local/share/ca-certificates/
使用以下命令将根 CA 证书添加到你的 Debian 服务器。
$ sudo update-ca-certificates
你应该会看到以下输出(1 added),确认根 CA 证书已添加到你的系统。
Updating certificates in /etc/ssl/certs...
rehash: warning: skipping ca-certificates.crt,it does not contain exactly one certificate or CRL
rehash: warning: skipping root-ca.pem,it does not contain exactly one certificate or CRL
1 added, 0 removed; done.
Running hooks in /etc/ca-certificates/update.d...
done.
将目录的所有权改回 opensearch 用户。
$ sudo chown opensearch:opensearch /etc/opensearch/certs -R
将目录的权限更改为 0700。
$ sudo chmod 0700 /etc/opensearch/certs
将证书的权限更改为 0600。
$ sudo chmod 0600 /etc/opensearch/certs/{admin-key,admin,node1-key,node1,root-ca-key,root-ca}.pem
$ sudo chmod 0600 /etc/opensearch/certs/root-ca.crt
第 7 步 - 为 OpenSearch 安装 TLS
现在所有证书都已生成并配置完毕,是时候将证书安装并添加到你的 OpenSearch 安装中了。
第一步是创建一个 bash 脚本,它会将所有已创建的证书和 TLS 安全插件设置添加到 OpenSearch 配置文件(/etc/opensearch/opensearch.yml)中。
创建一个名为 add-opensearch-tls.sh 的文件并打开进行编辑。
$ cd ~
$ nano add-opensearch-tls.sh
将以下代码粘贴到其中。
#! /bin/bash

# Before running this script, make sure to replace the CN in the
# node's distinguished name with a real DNS A record.

echo "plugins.security.ssl.transport.pemcert_filepath: /etc/opensearch/certs/node1.pem" | sudo tee -a /etc/opensearch/opensearch.yml
echo "plugins.security.ssl.transport.pemkey_filepath: /etc/opensearch/certs/node1-key.pem" | sudo tee -a /etc/opensearch/opensearch.yml
echo "plugins.security.ssl.transport.pemtrustedcas_filepath: /etc/opensearch/certs/root-ca.pem" | sudo tee -a /etc/opensearch/opensearch.yml
echo "plugins.security.ssl.http.enabled: true" | sudo tee -a /etc/opensearch/opensearch.yml
echo "plugins.security.ssl.http.pemcert_filepath: /etc/opensearch/certs/node1.pem" | sudo tee -a /etc/opensearch/opensearch.yml
echo "plugins.security.ssl.http.pemkey_filepath: /etc/opensearch/certs/node1-key.pem" | sudo tee -a /etc/opensearch/opensearch.yml
echo "plugins.security.ssl.http.pemtrustedcas_filepath: /etc/opensearch/certs/root-ca.pem" | sudo tee -a /etc/opensearch/opensearch.yml
echo "plugins.security.allow_default_init_securityindex: true" | sudo tee -a /etc/opensearch/opensearch.yml
echo "plugins.security.authcz.admin_dn:" | sudo tee -a /etc/opensearch/opensearch.yml
echo "  - 'CN=A,OU=UNIT,O=ORG,L=TORONTO,ST=ONTARIO,C=CA'" | sudo tee -a /etc/opensearch/opensearch.yml
echo "plugins.security.nodes_dn:" | sudo tee -a /etc/opensearch/opensearch.yml
echo "  - 'CN=opensearch.example.com,OU=UNIT,O=ORG,L=TORONTO,ST=ONTARIO,C=CA'" | sudo tee -a /etc/opensearch/opensearch.yml
echo "plugins.security.audit.type: internal_opensearch" | sudo tee -a /etc/opensearch/opensearch.yml
echo "plugins.security.enable_snapshot_restore_privilege: true" | sudo tee -a /etc/opensearch/opensearch.yml
echo "plugins.security.check_snapshot_restore_write_privileges: true" | sudo tee -a /etc/opensearch/opensearch.yml
echo "plugins.security.restapi.roles_enabled: [\"all_access\", \"security_rest_api_access\"]" | sudo tee -a /etc/opensearch/opensearch.yml
按 Ctrl + X 保存文件,并在提示时输入 Y。
使该文件可执行。
$ chmod +x add-opensearch-tls.sh
运行该脚本。
$ ./add-opensearch-tls.sh
你应该会得到以下输出。
plugins.security.ssl.transport.pemcert_filepath: /etc/opensearch/certs/node1.pem
plugins.security.ssl.transport.pemkey_filepath: /etc/opensearch/certs/node1-key.pem
plugins.security.ssl.transport.pemtrustedcas_filepath: /etc/opensearch/certs/root-ca.pem
plugins.security.ssl.http.enabled: true
plugins.security.ssl.http.pemcert_filepath: /etc/opensearch/certs/node1.pem
plugins.security.ssl.http.pemkey_filepath: /etc/opensearch/certs/node1-key.pem
plugins.security.ssl.http.pemtrustedcas_filepath: /etc/opensearch/certs/root-ca.pem
plugins.security.allow_default_init_securityindex: true
plugins.security.authcz.admin_dn:
  - 'CN=A,OU=UNIT,O=ORG,L=TORONTO,ST=ONTARIO,C=CA'
plugins.security.nodes_dn:
  - 'CN=opensearch.example.com,OU=UNIT,O=ORG,L=TORONTO,ST=ONTARIO,C=CA'
plugins.security.audit.type: internal_opensearch
plugins.security.enable_snapshot_restore_privilege: true
plugins.security.check_snapshot_restore_write_privileges: true
plugins.security.restapi.roles_enabled: ["all_access", "security_rest_api_access"]
打开 /etc/opensearch/opensearch.yml 文件,检查你的设置是否已应用。
$ sudo nano /etc/opensearch/opensearch.yml
滚动到文件底部,你应该会看到以下内容。
# If you previously disabled the Security plugin in opensearch.yml,
# be sure to re-enable it. Otherwise you can skip this setting.
plugins.security.disabled: false
....
plugins.security.ssl.transport.pemcert_filepath: /etc/opensearch/certs/node1.pem
plugins.security.ssl.transport.pemkey_filepath: /etc/opensearch/certs/node1-key.pem
plugins.security.ssl.transport.pemtrustedcas_filepath: /etc/opensearch/certs/root-ca.pem
plugins.security.ssl.http.enabled: true
plugins.security.ssl.http.pemcert_filepath: /etc/opensearch/certs/node1.pem
plugins.security.ssl.http.pemkey_filepath: /etc/opensearch/certs/node1-key.pem
plugins.security.ssl.http.pemtrustedcas_filepath: /etc/opensearch/certs/root-ca.pem
plugins.security.allow_default_init_securityindex: true
plugins.security.authcz.admin_dn:
  - 'CN=A,OU=UNIT,O=ORG,L=TORONTO,ST=ONTARIO,C=CA'
plugins.security.nodes_dn:
  - 'CN=opensearch.example.com,OU=UNIT,O=ORG,L=TORONTO,ST=ONTARIO,C=CA'
plugins.security.audit.type: internal_opensearch
plugins.security.enable_snapshot_restore_privilege: true
plugins.security.check_snapshot_restore_write_privileges: true
plugins.security.restapi.roles_enabled: ["all_access", "security_rest_api_access"]
确认无误后,按 Ctrl + X 保存文件。
第 8 步 - 创建 OpenSearch 用户
在此步骤中,我们将移除除管理员用户以外的所有演示用户,并使用脚本替换默认的管理员密码。
切换到 OpenSearch 安全插件工具目录。
$ cd /usr/share/opensearch/plugins/opensearch-security/tools
运行 hash.sh 脚本以生成新密码。
$ ./hash
该脚本会失败,并出现以下错误,因为尚未定义 Java 可执行文件(JDK)的路径。
**************************************************************************
** This tool will be deprecated in the next major release of OpenSearch **
** https://github.com/opensearch-project/security/issues/1755           **
**************************************************************************
WARNING: nor OPENSEARCH_JAVA_HOME nor JAVA_HOME is set, will use
./hash.sh: line 35: java: command not found
通过声明环境变量 OPENSEARCH_JAVA_HOME 并指定 JDK 的位置,再次运行该命令。
$ OPENSEARCH_JAVA_HOME=/usr/share/opensearch/jdk ./hash.sh
你会得到类似的输出。
**************************************************************************
** This tool will be deprecated in the next major release of OpenSearch **
** https://github.com/opensearch-project/security/issues/1755           **
**************************************************************************
[Password:]
$2y$12$4NL0LqEnN4FXaUdQQC.gOupeCQT2IuMo9gN0b5d3nxdMVbLX088f2
它会生成我们稍后需要的密码哈希值。
在 /etc/opensearch/opensearch-security/ 目录中打开 OpenSearch 用户配置文件 internal_users.yml 进行编辑。
$ sudo nano /etc/opensearch/opensearch-security/internal_users.yml
通过在所有演示用户前面添加井号将其注释掉,如下所示。
---
# This is the internal user database
# The hash value is a bcrypt hash and can be generated with plugin/tools/hash.sh

_meta:
  type: "internalusers"
  config_version: 2

# Define your internal users here

## Demo users

#admin:
#  hash: "$2y$12$Twy84uxOX0SQ1QMQ68og8O/i1MvqWItt/phZX3DiJMjpBoT9u9KX6"
#  reserved: true
#  backend_roles:
#  - "admin"
#  description: "Demo admin user"

#anomalyadmin:
按图示添加使用你上面生成的哈希值的管理员用户。
---
# This is the internal user database
# The hash value is a bcrypt hash and can be generated with plugin/tools/hash.sh

_meta:
  type: "internalusers"
  config_version: 2

# Define your internal users here

admin:
  hash: "$2y$12$4NL0LqEnN4FXaUdQQC.gOupeCQT2IuMo9gN0b5d3nxdMVbLX088f2"
  reserved: true
  backend_roles:
  - "admin"
  description: "Admin user"

## Demo users

#admin:
完成后,按 Ctrl + X 保存文件,并在提示时输入 Y。
现在 TLS 证书已安装,演示用户也已移除或分配了新密码,是时候应用配置更改了。为了应用更改,我们将调用 /usr/share/opensearch/plugins/opensearch-security/tools 目录中的 securityadmin.sh 脚本。该脚本需要 OpenSearch 服务处于运行状态。
重启 OpenSearch 服务。
$ sudo systemctl restart opensearch
切换到 /usr/share/opensearch/plugins/opensearch-security/tools 目录。
$ cd /usr/share/opensearch/plugins/opensearch-security/tools
使用以下命令运行该脚本。
$ sudo OPENSEARCH_JAVA_HOME=/usr/share/opensearch/jdk ./securityadmin.sh -h opensearch.nspeaks.com -p 9200 -cd /etc/opensearch/opensearch-security/ -cacert /etc/opensearch/certs/root-ca.pem -cert /etc/opensearch/certs/admin.pem -key /etc/opensearch/certs/admin-key.pem -icl -nhnv
安全插件将其配置(包括用户、权限、角色和后端设置)存储在 OpenSearch 集群的系统索引中。将这些设置存储在集群中,使你能够在不重启集群的情况下更改设置,并且无需在每个节点上编辑配置文件。这是通过运行 securityadmin.sh 脚本来实现的。
- -cd 选项指定安全插件配置文件所在的位置。
- -icl(--ignore-clustername)选项告诉安全插件无论集群名称如何都上传配置。你也可以指定集群名称,而不使用 -cn(--clustername)选项。
- 由于证书是自签名的,我们使用 -nhnv(--disable-host-name-verification)选项。
- --cacert、--cert 和 --key 选项分别定义根证书、管理员证书以及管理员证书私钥的位置。如果私钥有密码,你可以使用 -keypass 选项来定义它。
你可以在 OpenSearch 文档中了解有关安全插件配置的更多信息。
你使用上述命令应该会得到如下所示类似的输出。
**************************************************************************
** This tool will be deprecated in the next major release of OpenSearch **
** https://github.com/opensearch-project/security/issues/1755           **
**************************************************************************
Security Admin v7
Will connect to opensearch:9200 ... done
Connected as "CN=A,OU=UNIT,O=ORG,L=TORONTO,ST=ONTARIO,C=CA"
OpenSearch Version: 2.12.0
Contacting opensearch cluster 'opensearch' and wait for YELLOW clusterstate ...
Clustername: opensearch
Clusterstate: GREEN
Number of nodes: 1
Number of data nodes: 1
.opendistro_security index already exists, so we do not need to create one.
Populate config from /etc/opensearch/opensearch-security/
Will update '/config' with /etc/opensearch/opensearch-security/config.yml
   SUCC: Configuration for 'config' created or updated
Will update '/roles' with /etc/opensearch/opensearch-security/roles.yml
   SUCC: Configuration for 'roles' created or updated
Will update '/rolesmapping' with /etc/opensearch/opensearch-security/roles_mapping.yml
   SUCC: Configuration for 'rolesmapping' created or updated
Will update '/internalusers' with /etc/opensearch/opensearch-security/internal_users.yml
   SUCC: Configuration for 'internalusers' created or updated
Will update '/actiongroups' with /etc/opensearch/opensearch-security/action_groups.yml
   SUCC: Configuration for 'actiongroups' created or updated
Will update '/tenants' with /etc/opensearch/opensearch-security/tenants.yml
   SUCC: Configuration for 'tenants' created or updated
Will update '/nodesdn' with /etc/opensearch/opensearch-security/nodes_dn.yml
   SUCC: Configuration for 'nodesdn' created or updated
Will update '/whitelist' with /etc/opensearch/opensearch-security/whitelist.yml
   SUCC: Configuration for 'whitelist' created or updated
Will update '/audit' with /etc/opensearch/opensearch-security/audit.yml
   SUCC: Configuration for 'audit' created or updated
Will update '/allowlist' with /etc/opensearch/opensearch-security/allowlist.yml
   SUCC: Configuration for 'allowlist' created or updated
SUCC: Expected 10 config types for node {"updated_config_types":["allowlist","tenants","rolesmapping","nodesdn","audit","roles","whitelist","internalusers","actiongroups","config"],"updated_config_size":10,"message":null} is 10 (["allowlist","tenants","rolesmapping","nodesdn","audit","roles","whitelist","internalusers","actiongroups","config"]) due to: null
Done with success
使用以下命令验证新凭据。
在之前的测试中,我们将请求指向 localhost。现在 TLS 证书已设置完毕,且新证书引用了主机的实际 DNS 记录,因此对 localhost 的请求将无法通过 CN 检查,证书也会被视为无效。因此,请在下面的命令中添加你的实际 DNS 记录进行验证。
$ curl https://your.host.address:9200 -u admin:yournewpassword -k
你应该会看到以下响应。
{
  "name" : "opensearch",
  "cluster_name" : "opensearch",
  "cluster_uuid" : "3oFvYn96St2MOpDP3Sf29g",
  "version" : {
    "distribution" : "opensearch",
    "number" : "2.12.0",
    "build_type" : "deb",
    "build_hash" : "2c355ce1a427e4a528778d4054436b5c4b756221",
    "build_date" : "2024-02-20T02:18:31.541484890Z",
    "build_snapshot" : false,
    "lucene_version" : "9.9.2",
    "minimum_wire_compatibility_version" : "7.10.0",
    "minimum_index_compatibility_version" : "7.0.0"
  },
  "tagline" : "The OpenSearch Project: https://opensearch.org/"
}
第 9 步 - 安装 OpenSearch Dashboards
由于我们已经安装了 OpenSearch,因此可以跳过导入 OpenSearch GPG 密钥这一步骤。
要安装 OpenSearch Dashboards,请运行以下命令为其创建一个 APT 仓库。
$ echo "deb [signed-by=/usr/share/keyrings/opensearch-keyring] https://artifacts.opensearch.org/releases/bundle/opensearch-dashboards/2.x/apt stable main" | sudo tee /etc/apt/sources.list.d/opensearch-dashboards-2.x.list
更新系统仓库列表。
$ sudo apt update
列出所有可用的 OpenSearch Dashboards 版本。
$ sudo apt list -a opensearch-dashboards
你应该会得到类似的输出。
Listing... Done
opensearch-dashboards/stable 2.12.0 amd64
opensearch-dashboards/stable 2.11.1 amd64
opensearch-dashboards/stable 2.11.0 amd64
opensearch-dashboards/stable 2.10.0 amd64
opensearch-dashboards/stable 2.9.0 amd64
opensearch-dashboards/stable 2.8.0 amd64
opensearch-dashboards/stable 2.7.0 amd64
opensearch-dashboards/stable 2.6.0 amd64
opensearch-dashboards/stable 2.5.0 amd64
安装最新版本的 OpenSearch Dashboards。
$ sudo apt install opensearch-dashboards
或者安装特定版本的 OpenSearch Dashboards。
$ sudo apt install opensearch-dashboards=2.12.0
OpenSearch Dashboards 与 OpenSearch 的版本应保持一致,否则你可能会遇到多种问题。
重新加载服务守护进程。
$ sudo systemctl daemon-reload
启用 OpenSearch Dashboards 服务。
$ sudo systemctl enable opensearch-dashboards
启动 OpenSearch Dashboards 服务。
$ sudo systemctl start opensearch-dashboards
验证 OpenSearch Dashboards 服务的状态。
$ sudo systemctl status opensearch-dashboards
你应该会看到以下输出。
? opensearch-dashboards.service - "OpenSearch Dashboards"
     Loaded: loaded (/lib/systemd/system/opensearch-dashboards.service; enabled; preset: enabled)
     Active: active (running) since Sat 2024-03-02 16:01:25 UTC; 4s ago
   Main PID: 7098 (node)
      Tasks: 11 (limit: 9484)
     Memory: 175.4M
        CPU: 5.389s
     CGroup: /system.slice/opensearch-dashboards.service
             ??7098 /usr/share/opensearch-dashboards/node/bin/node /usr/share/opensearch-dashboards/src/cli/dist

Mar 02 16:01:25 opensearch systemd[1]: Started opensearch-dashboards.service - "OpenSearch Dashboards".
第 10 步 - 配置 OpenSearch Dashboards
OpenSearch Dashboards 将其配置存储在 /etc/opensearch-dashboards/opensearch_dashboards.yml 文件中。打开它进行编辑。
$ sudo nano /etc/opensearch-dashboards/opensearch_dashboards.yml
找到 # server.host: "localhost" 这一行,去掉前面的井号取消注释,并按图示修改其值。
# Specifies the address to which the OpenSearch Dashboards server will bind. IP addresses and host names are both valid values.
# The default is 'localhost', which usually means remote machines will not be able to connect.
# To allow connections from remote users, set this parameter to a non-loopback address.
server.host: 0.0.0.0
将 server.host 的值设置为 0.0.0.0 会将 OpenSearch Dashboards 绑定到任何外部 IP,从而使其可以通过万维网访问。如果你想通过反向代理使用 SSL 提供 Dashboards 服务,则保持该值不变。
向下滚动以找到以下部分。
opensearch.hosts: [https://localhost:9200]
opensearch.ssl.verificationMode: none
opensearch.username: kibanaserver
opensearch.password: kibanaserver
opensearch.requestHeadersWhitelist: [authorization, securitytenant]
按照我们为 OpenSearch 安装所做的配置修改这些值。
opensearch.hosts: [https://opensearch:9200]
opensearch.ssl.verificationMode: none
opensearch.username: admin
opensearch.password: <custom-admin-password>
opensearch.requestHeadersWhitelist: [authorization, securitytenant]
完成后,按 Ctrl + X 保存文件,并在提示时输入 Y。
重启 OpenSearch Dashboards 服务。
$ sudo systemctl restart opensearch-dashboards
在 UFW 防火墙中开放 5601 端口。
$ sudo ufw allow 5601
打开 URL http://
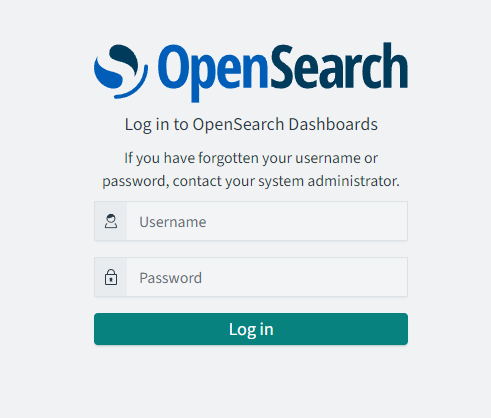
如果你满足于通过 HTTP 并带端口号的方式访问 OpenSearch Dashboards,你可以到此为止。不过,通过 SSL 提供 Dashboards 服务会更好。为此,我们将安装 Nginx 作为反向代理,并在其上提供 SSL。
第 11 步 - 安装 Nginx
Debian 12 自带较旧版本的 Nginx。你需要下载官方 Nginx 仓库以安装最新版本。
导入 Nginx 的签名密钥。
$ curl https://nginx.org/keys/nginx_signing.key | gpg --dearmor \
    | sudo tee /usr/share/keyrings/nginx-archive-keyring.gpg >/dev/null
添加 Nginx 主线版本的仓库。
$ echo "deb [signed-by=/usr/share/keyrings/nginx-archive-keyring.gpg] \
http://nginx.org/packages/mainline/debian `lsb_release -cs` nginx" \
    | sudo tee /etc/apt/sources.list.d/nginx.list
更新系统仓库。
$ sudo apt update
安装 Nginx。
$ sudo apt install nginx
验证安装。在 Debian 系统上,以下命令只能配合 sudo 使用。
$ sudo nginx -v
nginx version: nginx/1.25.4
启动 Nginx 服务器。
$ sudo systemctl start nginx
检查服务状态。
$ sudo systemctl status nginx
? nginx.service - nginx - high performance web server
     Loaded: loaded (/lib/systemd/system/nginx.service; enabled; preset: enabled)
     Active: active (running) since Sat 2024-03-02 12:53:57 UTC; 4s ago
       Docs: https://nginx.org/en/docs/
    Process: 3976 ExecStart=/usr/sbin/nginx -c /etc/nginx/nginx.conf (code=exited, status=0/SUCCESS)
   Main PID: 3977 (nginx)
      Tasks: 3 (limit: 9484)
     Memory: 2.7M
        CPU: 9ms
     CGroup: /system.slice/nginx.service
             ??3977 "nginx: master process /usr/sbin/nginx -c /etc/nginx/nginx.conf"
             ??3978 "nginx: worker process"
             ??3979 "nginx: worker process"

Mar 02 12:53:57 opensearch systemd[1]: Starting nginx.service - nginx - high performance web server...
Mar 02 12:53:57 opensearch systemd[1]: Started nginx.service - nginx - high performance web server.
第 12 步 - 安装 SSL
我们需要安装 Certbot 来生成 SSL 证书。你可以使用 Debian 的仓库安装 Certbot,或者使用 Snapd 工具获取最新版本。我们将使用 Snapd 版本。
Debian 12 默认未安装 Snapd。请安装 Snapd 软件包。
$ sudo apt install snapd
运行以下命令以确保你的 Snapd 版本是最新的。
$ sudo snap install core && sudo snap refresh core
安装 Certbot。
$ sudo snap install --classic certbot
使用以下命令,通过创建指向 /usr/bin 目录的符号链接,确保 Certbot 命令可以运行。
$ sudo ln -s /snap/bin/certbot /usr/bin/certbot
验证 Certbot 是否正常运行。
$ certbot --version
certbot 2.9.0
运行以下命令以生成 SSL 证书。
$ sudo certbot certonly --nginx --agree-tos --no-eff-email --staple-ocsp --preferred-challenges http -m
[email protected]
 -d craftcms.example.com
上述命令会将证书下载到你服务器上的 /etc/letsencrypt/live/craftcms.example.com 目录。
生成 Diffie-Hellman 组证书。
$ sudo openssl dhparam -dsaparam -out /etc/ssl/certs/dhparam.pem 4096
检查 Certbot 续期调度服务。
$ sudo systemctl list-timers
你会发现 snap.certbot.renew.service 是计划运行的服务之一。
NEXT                        LEFT           LAST                        PASSED    UNIT                         ACTIVATES                   ---------------------------------------------------------------------------------------------------------------------------------------
Sat 2024-03-02 16:25:00 UTC 3h 27min left  -                           -         snap.certbot.renew.timer     snap.certbot.renew.service
Sat 2024-03-02 23:00:51 UTC 10h left       Sat 2024-03-02 06:29:02 UTC 6h ago    apt-daily.timer              apt-daily.service
Sun 2024-03-03 00:00:00 UTC 11h left       -                           -         dpkg-db-backup.timer         dpkg-db-backup.service
.....
对该流程进行一次空运行,以检查 SSL 续期是否正常工作。
$ sudo certbot renew --dry-run
如果你没有看到任何错误,说明一切就绪。你的证书将自动续期。
第 13 步 - 配置 Nginx
打开文件 /etc/nginx/nginx.conf 进行编辑。
$ sudo nano /etc/nginx/nginx.conf
在 include /etc/nginx/conf.d/*.conf; 这一行之前添加以下行。
server_names_hash_bucket_size 64;
按 Ctrl + X 保存文件,并在提示时输入 Y。
创建并打开文件 /etc/nginx/conf.d/opensearch.conf 进行编辑。
$ sudo nano /etc/nginx/conf.d/opensearch.conf
将以下代码粘贴到其中。请将 opensearch.example.com 替换为你的域名。
server {

    listen 443 ssl;
    listen [::]:443 ssl;

    http2 on;
    http3 on;
    quic_retry on;

    server_name opensearch.example.com;

    access_log  /var/log/nginx/opensearch.access.log;
    error_log   /var/log/nginx/opensearch.error.log;

    ssl_certificate      /etc/letsencrypt/live/opensearch.example.com/fullchain.pem;
    ssl_certificate_key  /etc/letsencrypt/live/opensearch.example.com/privkey.pem;
    ssl_trusted_certificate /etc/letsencrypt/live/opensearch.example.com/chain.pem;

    ssl_session_timeout  5m;
    ssl_session_cache shared:MozSSL:10m;
    ssl_session_tickets off;
    ssl_early_data on;

    ssl_protocols TLSv1.2 TLSv1.3;
    ssl_prefer_server_ciphers on;
    ssl_ciphers ECDHE-ECDSA-AES128-GCM-SHA256:ECDHE-RSA-AES128-GCM-SHA256:ECDHE-ECDSA-AES256-GCM-SHA384:ECDHE-RSA-AES256-GCM-SHA384:ECDHE-ECDSA-CHACHA20-POLY1305:ECDHE-RSA-CHACHA20-POLY1305:DHE-RSA-AES128-GCM-SHA256:DHE-RSA-AES256-GCM-SHA384;
    ssl_ecdh_curve X25519:prime256v1:secp384r1:secp521r1;
    ssl_stapling on;
    ssl_stapling_verify on;
    ssl_dhparam /etc/ssl/certs/dhparam.pem;

    location / {
        proxy_pass http://localhost:5601;
        proxy_set_header Host $host;
        proxy_set_header X-Real-IP $remote_addr;
        proxy_set_header X-Forwarded-For $proxy_add_x_forwarded_for;
        proxy_set_header X-Forwarded-Proto $scheme;
    }
}
# enforce HTTPS
server {
    listen 80;
    listen [::]:80;
    server_name  opensearch.example.com;
    return 301   https://$host$request_uri;
}
按 Ctrl + X 保存文件,并在提示时输入 Y。
验证你的 Nginx 配置。
$ sudo nginx -t
重启 Nginx 服务器。
$ sudo systemctl restart nginx
在浏览器中访问 https://opensearch.example.com 以启动 OpenSearch Dashboards。
第 14 步 - 访问并使用 OpenSearch Dashboards
如果你使用了 Nginx,则通过 URL https://opensearch.example.com 访问 Dashboards,或者使用 http://opensearch.example.com:5601,你应该会看到登录页面。
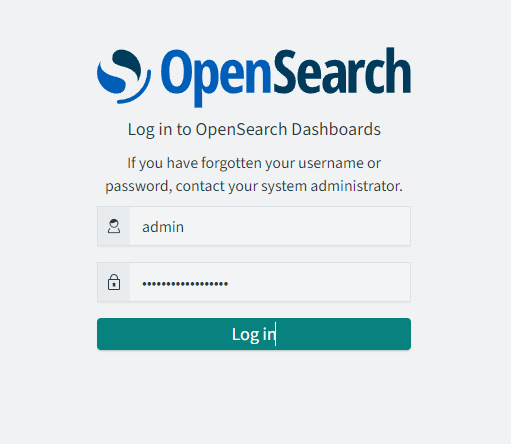
输入 admin 以及你在第 4 步为 OpenSearch 配置的自定义管理员密码,然后点击“登录”按钮继续。

点击“添加数据(Add data)”按钮可直接开始添加数据;如果你想先浏览,则点击“自行探索(Explore on my own)”链接。我们将先浏览,这会带你进入一个关于 OpenSearch Dashboards 深色模式的弹窗。

点击“关闭(Dismiss)”按钮继续。接下来,系统会要求你选择一个租户。
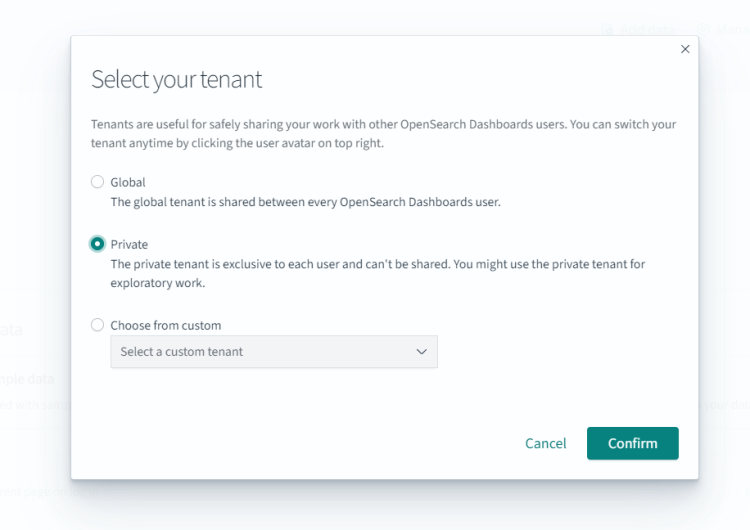
OpenSearch Dashboards 中的租户是用于保存索引模式、可视化图表、仪表板以及其他 OpenSearch Dashboards 对象的空间。每个用户可以创建多个租户以满足不同用途。租户有助于你安全地与其他 OpenSearch Dashboards 用户共享你的工作。OpenSearch 为你提供了在三种选项之间进行选择的功能。
- Global(全局)- 该租户在所有 OpenSearch Dashboards 用户之间共享。
- Private(私有)- 该租户仅供每个用户独占使用,无法共享。
- Custom(自定义)- 管理员可以创建自定义租户,并将其分配给特定角色。创建后,你可以使用这些租户为特定的一组用户提供空间。
目前,我们将保持默认的 Private(私有)租户选项。点击“确认(Confirm)”按钮继续。你会看到以下页面。
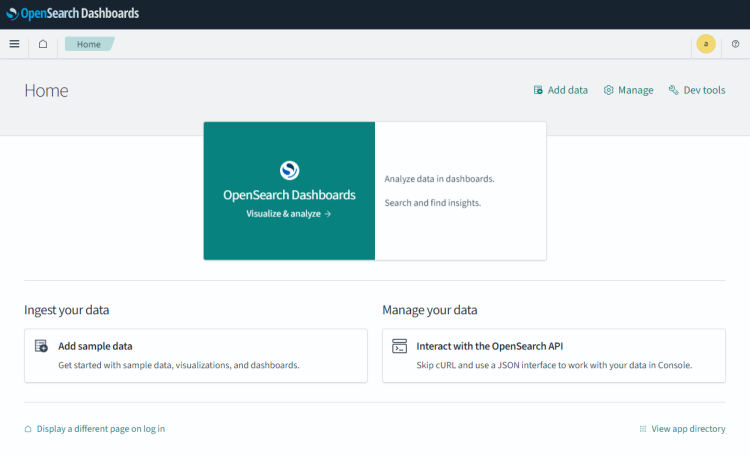
接下来,我们将验证 OpenSearch 与 OpenSearch Dashboards 之间的连接。
点击右上角的“开发工具(Dev Tools)”按钮,系统会显示一个关于 OpenSearch Dashboards 控制台 UI 的迷你弹窗。
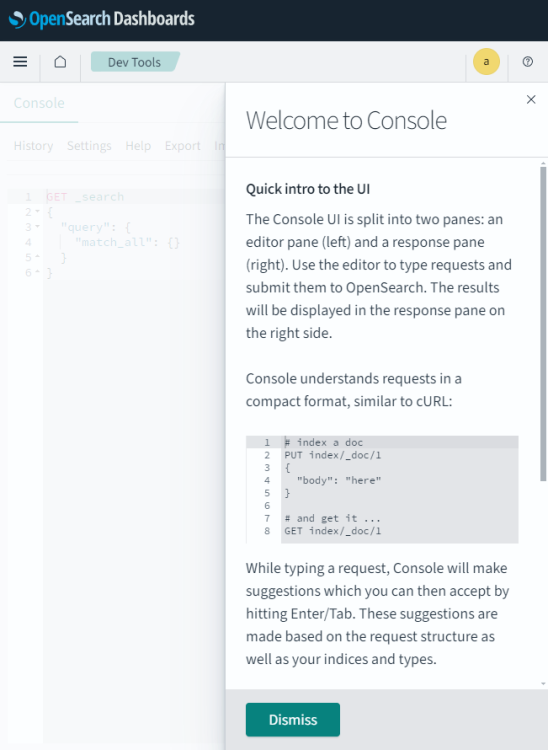
点击“关闭(Dismiss)”按钮,在左侧控制台中输入查询 GET /,然后点击中间的小播放按钮。你应该会在右侧看到以下输出。
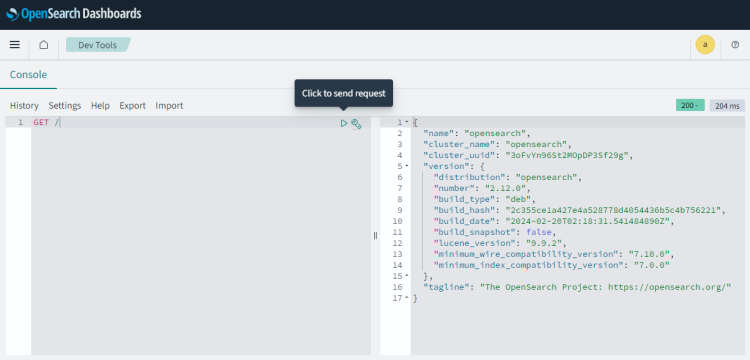
这确认了 OpenSearch Dashboards 正在接收来自 OpenSearch 的数据,且两者都运行正常。从这里开始,你就可以添加数据了。
总结
至此,本篇关于在 Debian 12 服务器上安装 OpenSearch 的教程就结束了。如果你有任何问题,请在下方评论中留言。