
本页内容
- 准备工作
- 步骤 1 - 配置防火墙
- 步骤 2 - 安装并配置 PostgreSQL
- 步骤 3 - 安装 Matrix Synapse
- 步骤 4 - 安装 Nginx
- 步骤 5 - 安装 SSL
- 步骤 6 - 配置 SELinux
- 步骤 7 - 创建 Matrix Systemd 服务
- 步骤 8 - 配置 Matrix Synapse
- 步骤 9 - 配置 Nginx
- 步骤 10 - 安装 Coturn
- 步骤 11 - 访问 Matrix
- 步骤 12 - 安装 Element
- 步骤 13 - 配置 Element
- 总结
Matrix 是一种用于去中心化和端到端加密通信的开放标准。它由一系列服务器和服务组成,这些服务器和服务通过标准化的 API 相互通信并实时同步。它使用 homeserver(家庭服务器)来存储账户信息和聊天记录。如果某个家庭服务器宕机,由于去中心化的特性,其他服务器仍可继续通信而不受影响。你可以使用他人托管的 Matrix 家庭服务器,也可以自己托管,从而保持对自己数据的控制。
在本教程中,你将学习如何使用 Synapse(Matrix 的家庭服务器实现)安装并搭建一个聊天服务器。Element 是一个使用 Matrix React SDK 构建的 Matrix Web 客户端。这将让你能够在 Web 上提供 Matrix 聊天服务。你也可以将该服务器与任何其他 Matrix 客户端配合使用。我们还会安装 Coturn 服务器,以启用语音和视频通话功能。如果你对此不感兴趣,Coturn 服务是可选的。
准备工作
- 一台运行 Debian 12 的服务器。
- 一个拥有 root 权限的非 sudo 用户。
- 已启用并运行的 UFW(uncomplicated Firewall)防火墙。
- 指向你服务器的 Matrix、Element 和 Coturn 的完全限定域名(FQDN)。三个服务我们将分别使用 matrix.example.com、element.example.com 和 coturn.example.com。
- 确保所有软件包都已更新。$ sudo dnf update
一台运行 Debian 12 的服务器。
一个拥有 root 权限的非 sudo 用户。
已启用并运行的 UFW(uncomplicated Firewall)防火墙。
指向你服务器的 Matrix、Element 和 Coturn 的完全限定域名(FQDN)。三个服务我们将分别使用 matrix.example.com、element.example.com 和 coturn.example.com。
确保所有软件包都已更新。
$ sudo dnf update
- 系统所需的一些软件包。$ sudo dnf install wget curl nano unzip yum-utils policycoreutils-python-utils -y 其中部分软件包可能已在你的系统上安装。
系统所需的一些软件包。
$ sudo dnf install wget curl nano unzip yum-utils policycoreutils-python-utils -y
其中部分软件包可能已在你的系统上安装。
步骤 1 - 配置防火墙
在安装任何软件包之前,第一步是配置防火墙,开放 HTTP、HTTPS 和 Synapse 所需的端口。Rocky Linux 使用 Firewalld 防火墙。请检查防火墙的状态。
$ sudo firewall-cmd --state
running
防火墙采用不同的区域(zone)工作,我们将使用默认的 public 区域。列出防火墙当前启用的所有服务和端口。
$ sudo firewall-cmd --zone=public --list-all
它应显示如下输出。
public
  target: default
  icmp-block-inversion: no
  interfaces: enp1s0
  sources:
  services: cockpit dhcpv6-client ssh
  ports:
  protocols:
  forward: yes
  masquerade: no
  forward-ports:
  source-ports:
  icmp-blocks:
  rich rules:
在防火墙中开放 HTTP、HTTPS 和 Synapse 端口。
$ sudo firewall-cmd --zone=public --add-port=8448/tcp
$ sudo firewall-cmd --zone=public --add-service=http
$ sudo firewall-cmd --zone=public --add-service=https
再次检查防火墙的状态。
$ sudo firewall-cmd --zone=public --list-all
你应该会看到类似的输出。
public
  target: default
  icmp-block-inversion: no
  interfaces: enp1s0
  sources:
  services: cockpit dhcpv6-client http https ssh
  ports: 8448/tcp
  protocols:
  forward: yes
  masquerade: no
  forward-ports:
  source-ports:
  icmp-blocks:
  rich rules:
将所有更改设为永久生效,并重新加载防火墙以使更改生效。
$ sudo firewall-cmd --runtime-to-permanent
$ sudo firewall-cmd --reload
步骤 2 - 安装并配置 PostgreSQL
Rocky Linux 9 默认随附 PostgreSQL 13。我们将使用其官方仓库中的 PostgreSQL 16。
安装 PostgreSQL 的 RPM 仓库。
$ sudo dnf install -y https://download.postgresql.org/pub/repos/yum/reporpms/EL-9-x86_64/pgdg-redhat-repo-latest.noarch.rpm
禁用系统内置的 PostgreSQL 模块。
$ sudo dnf -qy module disable postgresql
现在,你可以使用以下命令安装 PostgreSQL。
$ sudo dnf install -y postgresql16-server postgresql16-contrib postgresql16-devel
sudo dnf install postgresql16-devel
export PATH=$PATH:/usr/pgsql-16/bin
postgresql-contrib 软件包包含一些额外的实用工具。
验证版本。
$ psql --version
psql (PostgreSQL) 16.1
初始化 PostgreSQL 数据库。
$ sudo /usr/pgsql-16/bin/postgresql-16-setup initdb
Initializing database ... OK
启用 PostgreSQL 服务。
$ sudo systemctl enable postgresql-16
启动 PostgreSQL 服务。
$ sudo systemctl start postgresql-16
检查 PostgreSQL 服务的状态。
$ sudo systemctl status postgresql-16
? postgresql-16.service - PostgreSQL 16 database server
     Loaded: loaded (/usr/lib/systemd/system/postgresql-16.service; enabled; preset: disabled)
     Active: active (running) since Tue 2024-01-30 11:55:26 UTC; 10s ago
       Docs: https://www.postgresql.org/docs/16/static/
    Process: 9610 ExecStartPre=/usr/pgsql-16/bin/postgresql-16-check-db-dir ${PGDATA} (code=exited, status=0/SUCCESS)
   Main PID: 9615 (postgres)
      Tasks: 7 (limit: 12225)
     Memory: 17.4M
        CPU: 98ms
     CGroup: /system.slice/postgresql-16.service
             ??9615 /usr/pgsql-16/bin/postgres -D /var/lib/pgsql/16/data/
             ??9616 "postgres: logger "
             ??9617 "postgres: checkpointer "
             ??9618 "postgres: background writer "
             ??9620 "postgres: walwriter "
             ??9621 "postgres: autovacuum launcher "
             ??9622 "postgres: logical replication launcher "

Jan 30 11:55:26 matrix.example.com systemd[1]: Starting PostgreSQL 16 database server...
Jan 30 11:55:26 matrix.example.com postgres[9615]: 2024-01-30 11:55:26.482 UTC [9615] LOG:  redirecting log output to logging collector process
Jan 30 11:55:26 matrix.example.com postgres[9615]: 2024-01-30 11:55:26.482 UTC [9615] HINT:  Future log output will appear in directory "log".
Jan 30 11:55:26 matrix.example.com systemd[1]: Started PostgreSQL 16 database server.
你可以看到该服务默认已启用并正在运行。
登录到 postgres 系统账户。
$ sudo -su postgres
为 PostgreSQL 创建一个新的数据库用户和数据库。创建用户时会提示你输入密码。
$ createuser --pwprompt synapse
$ createdb --encoding=UTF8 --locale=C --template=template0 --owner=synapse synapsedb
退出 postgres 账户。
$ exit
步骤 3 - 安装 Matrix Synapse
Matrix Synapse 没有针对 Rocky Linux 等基于 CentOS 的发行版提供的预编译软件包。因此,我们将以 Python 模块的形式从 PyPI 安装它。
第一步是安装 Synapse 运行所需的依赖项。我们还需要包含 python3-virtualenv 软件包的 EPEL 仓库。
$ sudo dnf install epel-release
$ sudo dnf install --enablerepo=crb libtiff-devel libjpeg-devel libzip-devel \
                 freetype-devel libwebp-devel libxml2-devel libxslt-devel \
                 libpq-devel  python3-virtualenv libffi-devel openssl-devel \
                 python3-devel libicu-devel
$ sudo dnf groupinstall "Development Tools"
$ sudo dnf install postgresql16-devel
为 Synapse 创建一个目录。
$ mkdir -p ~/synapse
在上述目录中创建 Python 虚拟环境。
$ virtualenv -p python3 ~/synapse/env
激活虚拟环境。
$ source ~/synapse/env/bin/activate
确保你拥有最新版本的 pip 和 setuptools。
(env) $ pip install --upgrade pip
(env) $ pip install --upgrade setuptools
安装 Matrix Synapse。
(env) $ pip install "matrix-synapse[postgres]"
这将从 PyPI 下载 Synapse 并将其安装,同时将它所依赖的 Python 库安装到 ~/synapse/env 目录下的虚拟环境中。它还会安装 Synapse 连接 PostgreSQL 服务器所需的 PostgreSQL Python 库。上述命令相当于 pip install matrix-synapse 与 pip install psycopg2 两条命令的组合。
下一步是生成一个包含基本设置的配置文件。切换到 Synapse 目录。
(env) $ cd ~/synapse
运行以下命令生成配置文件。
(env) $ python -m synapse.app.homeserver \
    --server-name matrix.example.com \
    --config-path homeserver.yaml \
    --generate-config \
    --report-stats=[yes|no]
--server-name 变量的值会构成你 Matrix ID 的一部分。请将其值设为你的 Matrix 域名。它将作为你的 homeserver 地址。
你可以通过 --report-stats 变量选择是否将你 homeserver 的匿名统计数据发送回 Matrix。根据自己的意愿选择 yes 或 no。
你将得到如下输出。
Generating config file homeserver.yaml
Generating log config file /home/navjot/synapse/matrix.example.com.log.config which will log to /home/navjot/synapse/homeserver.log
Generating signing key file /home/navjot/synapse/matrix.example.com.signing.key
A config file has been generated in 'homeserver.yaml' for server name 'matrix.example.com'. Please review this file and customise it to your needs.
稍后你可以在 ~/synapse/homeserver.yaml 或 /home/
是时候运行 Matrix 服务器了。请确保你位于 Synapse 目录内,并且虚拟环境已激活。
启动 homeserver。
(env) $ synctl start
你应该会看到类似的输出。
This server is configured to use 'matrix.org' as its trusted key server via the
'trusted_key_servers' config option. 'matrix.org' is a good choice for a key
server since it is long-lived, stable and trusted. However, some admins may
wish to use another server for this purpose.

To suppress this warning and continue using 'matrix.org', admins should set
'suppress_key_server_warning' to 'true' in homeserver.yaml.
--------------------------------------------------------------------------------
started synapse.app.homeserver(homeserver.yaml)
要停止服务器,运行以下命令。
(env) $ synctl stop
退出虚拟环境。
(env) $ deactivate
步骤 4 - 安装 Nginx
对于生产环境,建议使用 Nginx 代理来运行 Synapse 服务器。
Rocky Linux 9 随附的 Nginx 版本较旧。你需要使用 Nginx 官方仓库来安装最新版本。
创建并打开文件 /etc/yum.repos.d/nginx.repo 进行编辑。
$ sudo nano /etc/yum.repos.d/nginx.repo
在其中粘贴以下代码。
[nginx-stable]
name=nginx stable repo
baseurl=http://nginx.org/packages/centos/$releasever/$basearch/
gpgcheck=1
enabled=1
gpgkey=https://nginx.org/keys/nginx_signing.key
module_hotfixes=true

[nginx-mainline]
name=nginx mainline repo
baseurl=http://nginx.org/packages/mainline/centos/$releasever/$basearch/
gpgcheck=1
enabled=0
gpgkey=https://nginx.org/keys/nginx_signing.key
module_hotfixes=true
完成后,按 Ctrl + X 并在提示时输入 Y 保存文件。
我们将安装 Nginx 主线(mainline)版本,因此需要启用对应的软件包。
$ sudo dnf config-manager --enable nginx-mainline
安装 Nginx。
$ sudo dnf install nginx -y
验证安装。
$ nginx -v
nginx version: nginx/1.25.3
启用并启动 Nginx 服务。
$ sudo systemctl enable nginx --now
检查服务状态。
$ sudo systemctl status nginx
? nginx.service - nginx - high performance web server
     Loaded: loaded (/usr/lib/systemd/system/nginx.service; enabled; preset: disabled)
     Active: active (running) since Tue 2024-01-30 12:50:34 UTC; 4s ago
       Docs: http://nginx.org/en/docs/
    Process: 10810 ExecStart=/usr/sbin/nginx -c /etc/nginx/nginx.conf (code=exited, status=0/SUCCESS)
   Main PID: 10811 (nginx)
      Tasks: 3 (limit: 12225)
     Memory: 3.1M
        CPU: 24ms
     CGroup: /system.slice/nginx.service
             ??10811 "nginx: master process /usr/sbin/nginx -c /etc/nginx/nginx.conf"
             ??10812 "nginx: worker process"
             ??10813 "nginx: worker process"
步骤 5 - 安装 SSL
我们需要安装 Certbot 来生成 SSL 证书。我们将使用 Snapd 软件包安装工具来完成。由于 Rocky Linux 没有自带 Snapd,需要安装 Snapd 安装器。它依赖 EPEL(Extra Packages for Enterprise Linux)仓库才能工作。但由于我们在步骤 3 中已经安装过,因此可以直接继续。
安装 Snapd 软件包。
$ sudo dnf install snapd -y
启用并启动 Snap 服务。
$ sudo systemctl enable snapd --now
安装 Snap core 软件包,并确保你的 Snapd 版本为最新。
$ sudo snap install core
$ sudo snap refresh core
创建 Snapd 工作所需的链接。
$ sudo ln -s /var/lib/snapd/snap /snap
$ echo 'export PATH=$PATH:/var/lib/snapd/snap/bin' | sudo tee -a /etc/profile.d/snapd.sh
安装 Certbot。
$ sudo snap install --classic certbot
使用以下命令,通过创建指向 /usr/bin 目录的符号链接,确保 Certbot 命令可以运行。
$ sudo ln -s /snap/bin/certbot /usr/bin/certbot
检查 Certbot 版本。
$ certbot --version
certbot 2.8.0
运行以下命令生成 SSL 证书。
$ sudo certbot certonly --nginx --agree-tos --no-eff-email --staple-ocsp --preferred-challenges http -m
[email protected]
 -d matrix.example.com
上述命令会将证书下载到你服务器上的 /etc/letsencrypt/live/matrix.example.com 目录。
生成 Diffie-Hellman 组证书。
$ sudo openssl dhparam -dsaparam -out /etc/ssl/certs/dhparam.pem 4096
检查 Certbot 续期调度服务。
$ systemctl list-timers
你会发现 snap.certbot.renew.service 是已调度运行的服务之一。
NEXT                        LEFT         LAST                        PASSED      UNIT                         ACTIVATES                   ----------------------------------------------------------------------------------------------------------------------------------
Tue 2024-01-30 14:37:50 UTC 29min left   Tue 2024-01-30 13:05:13 UTC 1h 3min ago dnf-makecache.timer          dnf-makecache.service
Tue 2024-01-30 15:13:00 UTC 1h 4min left -                           -           snap.certbot.renew.timer     snap.certbot.renew.service
Wed 2024-01-31 00:00:00 UTC 9h left      Tue 2024-01-30 06:35:44 UTC 7h ago      logrotate.timer              logrotate.service
对该过程进行一次空运行(dry run),以检查 SSL 续期是否正常工作。
$ sudo certbot renew --dry-run
如果没有看到错误,说明一切就绪。你的证书将自动续期。
步骤 6 - 配置 SELinux
SELinux 会阻止你运行二进制文件位于用户主目录中的系统服务。因此,如果我们为 Synapse 创建服务文件,它会被 SELinux 阻止。要解决此问题,我们需要运行以下命令,以允许将 Python 二进制文件作为系统服务运行。
$ sudo chcon -R -t bin_t /home/username/synapse/env/bin/python
应用策略以允许向外部主机建立连接。
$ sudo setsebool -P httpd_can_network_connect 1
应用策略以允许 Nginx 访问 PostgreSQL。
$ sudo setsebool -P httpd_can_network_connect_db 1
步骤 7 - 创建 Matrix Systemd 服务
Synapse 服务的状态在重启后不会保留,这意味着如果你重启服务器,需要手动启动该服务。为了解决此问题,我们需要为其创建 Systemd 文件。
在进行此操作之前,请确保 Synapse 服务已停止。
$ cd ~/synapse
$ source env/bin/activate
(env) $ synctl stop
(env) $ deactivate
在 /etc/systemd/system/ 目录中创建并打开 matrix-synapse.service 文件进行编辑。
$ sudo nano /etc/systemd/system/matrix-synapse.service
在其中粘贴以下代码。将 username 变量替换为你安装 Synapse 时使用的 Linux 系统用户。
# This assumes that Synapse has been installed by a user named username.
# This assumes that Synapse has been installed in a virtualenv in
# the user's home directory: `/home/username/synapse/env`.

[Unit]
Description=Synapse Matrix homeserver
After=postgresql-16.service

[Service]
Type=notify
NotifyAccess=main
ExecReload=/bin/kill -HUP $MAINPID
Restart=on-abort

WorkingDirectory=/home/username/synapse
ExecStart=/home/username/synapse/env/bin/python -m synapse.app.homeserver --config-path=/home/username/synapse/homeserver.yaml
SyslogIdentifier=matrix-synapse

# adjust the cache factor if necessary
# Environment=SYNAPSE_CACHE_FACTOR=2.0

[Install]
WantedBy=multi-user.target
完成后,按 Ctrl + X 并在提示时输入 Y 保存文件。
重新加载服务守护进程。
$ sudo systemctl daemon-reload
启用 Matrix Synapse 服务。
$ sudo systemctl enable matrix-synapse
启动 Matrix Synapse 服务。
$ sudo systemctl start matrix-synapse
检查服务状态。
$ sudo systemctl status matrix-synapse
你应该会看到如下输出。
? matrix-synapse.service - Synapse Matrix homeserver
     Loaded: loaded (/etc/systemd/system/matrix-synapse.service; enabled; preset: disabled)
     Active: active (running) since Tue 2024-01-30 14:20:20 UTC; 5s ago
   Main PID: 14687 (python)
      Tasks: 8 (limit: 12225)
     Memory: 77.6M
        CPU: 3.527s
     CGroup: /system.slice/matrix-synapse.service
             ??14687 /home/navjot/synapse/env/bin/python -m synapse.app.homeserver --config-path=/home/navjot/synapse/homeserver.yaml

Jan 30 14:20:16 matrix.example.com systemd[1]: Starting Synapse Matrix homeserver...
Jan 30 14:20:19 matrix.example.com matrix-synapse[14687]: This server is configured to use 'matrix.org' as its trusted key server via the
Jan 30 14:20:19 matrix.example.com matrix-synapse[14687]: 'trusted_key_servers' config option. 'matrix.org' is a good choice for a key
Jan 30 14:20:19 matrix.example.com matrix-synapse[14687]: server since it is long-lived, stable and trusted. However, some admins may
Jan 30 14:20:19 matrix.example.com matrix-synapse[14687]: wish to use another server for this purpose.
Jan 30 14:20:19 matrix.example.com matrix-synapse[14687]: To suppress this warning and continue using 'matrix.org', admins should set
Jan 30 14:20:19 matrix.example.com matrix-synapse[14687]: 'suppress_key_server_warning' to 'true' in homeserver.yaml.
Jan 30 14:20:19 matrix.example.com matrix-synapse[14687]: --------------------------------------------------------------------------------
Jan 30 14:20:20 matrix.example.com systemd[1]: Started Synapse Matrix homeserver.
步骤 8 - 配置 Matrix Synapse
在继续之前,先创建一个保密的注册密钥。该密钥应当妥善保管,因为即使已禁用注册,持有它也能注册新用户。
$ echo "registration_shared_secret: '$(cat /dev/urandom | tr -cd '[:alnum:]' | fold -w 256 | head -n 1)'"
registration_shared_secret: '1y75ja0RUxvbWcS6SdZhakenukUwHHEjOXWC9Mu3FpO0QenOnpKRsc6NBZSxuzPcHYsOEuIQziwVjSZcP87dlWK4ZkIGYniurMqNsCYL4xg5xXs4bJDuTJH2CUXab4U9liv399lmkIZFaMpJCLxV9lVWB9mKHILYsjeLgGY5wAARv1SiK07bFsQOwKJGFqIvsUXmxymx5QCNDzTHw8R4ShqZ7elnnZrbdYk4r2f7qogERNHvQaRV7IEYUIOtMhVP'
复制上一行命令的输出并保存。
你可以通过 /home/username/synapse/homeserver.yaml 文件配置 Matrix 服务器。打开它进行编辑。
$ nano ~/synapse/homeserver.yaml
将注册密钥命令的输出粘贴到文件末尾。
默认情况下,Synapse 配置为使用 SQLite 数据库。我们需要编辑它,添加 PostgreSQL 凭据。
在文件中找到以下部分,并按所示将其注释掉。
#database:
#  name: sqlite3
#  args:
#    database: /home/navjot/synapse/homeserver.db
在其下方添加以下部分。将 your-password 字段替换为你在步骤 3 中创建的 PostgreSQL 用户密码。如果你将数据库托管在其他位置,请将 localhost 替换为你的服务器 IP 地址。
database:
  name: psycopg2
  args:
    user: synapse
    password: 'your-password'
    database: synapsedb
    host: localhost
    cp_min: 5
    cp_max: 10
默认情况下,Synapse 启用了在线状态指示(显示某人是否在线)。这可能会导致较高的 CPU 占用,因此你可以将其禁用。在文件末尾粘贴以下行。
presence:
  enabled: false
完成后,按 Ctrl + X 并在提示时输入 Y 保存文件。
创建一个新 Matrix 用户。系统会提示你输入用户名和密码。由于我们创建的是第一个用户,当被问及是否将该用户设为管理员时,请输入 yes。你需要先激活虚拟环境才能创建该用户。
$ cd ~/synapse
$ source env/bin/activate
(env) $ register_new_matrix_user -c homeserver.yaml http://localhost:8008
New user localpart [navjot]: navjot
Password:
Confirm password:
Make admin [no]: yes
Sending registration request...
Success!
(env) $ deactivate
你可以看到我们在上面的命令中使用了 8008 端口。这是因为它是 Matrix Synapse 默认监听的端口。
默认情况下,新用户的注册是关闭的,这意味着你需要像上面那样手动注册每个用户。如果你希望开放公开注册,可以通过编辑 homeserver.yaml 文件来实现。
再次打开它进行编辑。
$ nano ~/synapse/homeserver.yaml
在文件末尾粘贴以下行。
enable_registration: true
默认情况下,Synapse 不允许未经邮箱验证的注册。要启用邮箱验证,请粘贴以下行。
registrations_require_3pid:
  - email

email:
  smtp_host: mail.example.com
  smtp_port: 587

  # If mail server has no authentication, skip these 2 lines
  smtp_user: '
[email protected]
'
  smtp_pass: 'password'

  # Optional, require encryption with STARTTLS
  require_transport_security: true

  app_name: 'HowtoForge Example Chat'  # defines value for %(app)s in notif_from and email subject
  notif_from: "%(app)s <
[email protected]
>"
要禁用邮箱验证,请改为粘贴以下行。
enable_registration_without_verification: true
完成后,按 Ctrl + X 并在提示时输入 Y 保存文件。
重启 Synapse 以使配置生效。
$ sudo systemctl restart matrix-synapse
步骤 9 - 配置 Nginx
打开文件 /etc/nginx/nginx.conf 进行编辑。
$ sudo nano /etc/nginx/nginx.conf
在 include /etc/nginx/conf.d/*.conf; 这一行之前添加以下行。
server_names_hash_bucket_size 64;
按 Ctrl + X 并在提示时输入 Y 保存文件。
创建并打开文件 /etc/nginx/conf.d/synapse.conf 进行编辑。
$ sudo nano /etc/nginx/conf.d/synapse.conf
在其中粘贴以下代码。
# enforce HTTPS
server {
    # Client port
    listen 80;
    listen [::]:80;
    server_name matrix.example.com;
    return 301 https://$host$request_uri;
}

server {
    server_name matrix.example.com;

    # Client port
    listen 443 ssl;
    listen [::]:443 ssl;
    http2 on;

    # Federation port
    listen 8448 ssl default_server;
    listen [::]:8448 ssl default_server;

    access_log  /var/log/nginx/synapse.access.log;
    error_log   /var/log/nginx/synapse.error.log;

    # TLS configuration
    ssl_certificate /etc/letsencrypt/live/matrix.example.com/fullchain.pem;
    ssl_certificate_key /etc/letsencrypt/live/matrix.example.com/privkey.pem;
    ssl_trusted_certificate /etc/letsencrypt/live/matrix.example.com/chain.pem;
    ssl_session_timeout 1d;
    ssl_session_cache shared:MozSSL:10m;
    ssl_session_tickets off;
    ssl_prefer_server_ciphers on;
    ssl_stapling on;
    ssl_stapling_verify on;
    ssl_dhparam /etc/ssl/certs/dhparam.pem;
    resolver 1.1.1.1 1.0.0.1 [2606:4700:4700::1111] [2606:4700:4700::1001] 8.8.8.8 8.8.4.4 [2001:4860:4860::8888] [2001:4860:4860::8844] valid=60s;
    resolver_timeout 2s;

    ssl_protocols TLSv1.2 TLSv1.3;
    ssl_ciphers ECDHE-ECDSA-AES128-GCM-SHA256:ECDHE-RSA-AES128-GCM-SHA256:ECDHE-ECDSA-AES256-GCM-SHA384:ECDHE-RSA-AES256-GCM-SHA384:ECDHE-ECDSA-CHACHA20-POLY1305:ECDHE-RSA-CHACHA20-POLY1305:DHE-RSA-AES128-GCM-SHA256:DHE-RSA-AES256-GCM-SHA384;

    tcp_nopush on;
    gzip on;

    location ~ ^(/_matrix|/_synapse/client) {
            proxy_pass http://localhost:8008;
            proxy_http_version 1.1;

            proxy_set_header X-Forwarded-For $remote_addr;
            proxy_set_header X-Forwarded-Proto $scheme;
            proxy_set_header Host $host;

            # Nginx by default only allows file uploads up to 1M in size
            # Increase client_max_body_size to match max_upload_size defined in homeserver.yaml
            client_max_body_size 50M;
    }
}
完成后按 Ctrl + X 并在提示时输入 Y 保存文件。上述配置的前提是 example.com 和 matrix.example.com 这两个域名的 IP 地址指向同一台服务器。如果不是,则对 example.com 服务器使用以下配置文件。
server {
    server_name example.com;

    listen 443 ssl http2;
    listen [::]:443 ssl http2;

    # TLS configuration
    ssl_certificate /etc/letsencrypt/live/matrix.example.com/fullchain.pem;
    ssl_certificate_key /etc/letsencrypt/live/matrix.example.com/privkey.pem;
    ssl_trusted_certificate /etc/letsencrypt/live/matrix.example.com/chain.pem;
    ssl_session_timeout 1d;
    ssl_session_cache shared:MozSSL:10m;
    ssl_session_tickets off;
    ssl_prefer_server_ciphers on;
    ssl_stapling on;
    ssl_stapling_verify on;
    ssl_dhparam /etc/ssl/certs/dhparam.pem;
    resolver 1.1.1.1 1.0.0.1 [2606:4700:4700::1111] [2606:4700:4700::1001] 8.8.8.8 8.8.4.4 [2001:4860:4860::8888] [2001:4860:4860::8844] valid=60s;
    resolver_timeout 2s;

    ssl_protocols TLSv1.2 TLSv1.3;
    ssl_ciphers ECDHE-ECDSA-AES128-GCM-SHA256:ECDHE-RSA-AES128-GCM-SHA256:ECDHE-ECDSA-AES256-GCM-SHA384:ECDHE-RSA-AES256-GCM-SHA384:ECDHE-ECDSA-CHACHA20-POLY1305:ECDHE-RSA-CHACHA20-POLY1305:DHE-RSA-AES128-GCM-SHA256:DHE-RSA-AES256-GCM-SHA384;

    # Redirect
    location ~ ^(/_matrix|/_synapse/client) {
            return 301 "https://matrix.example.com$request_uri";
    }

    # Client homeserver autodiscovery
    location /.well-known/matrix/client {
        default_type application/json;
        add_header Access-Control-Allow-Origin *;

        return 200 '{ "m.homeserver": { "base_url": "https://matrix.example.com" } }';
    }

    # Domain delegation
    location /.well-known/matrix/server {
        default_type application/json;
        add_header Access-Control-Allow-Origin *;

        return 200 '{ "m.server": "matrix.example.com" }';
    }
}
检查 Nginx 配置文件语法。
$ sudo nginx -t
nginx: the configuration file /etc/nginx/nginx.conf syntax is ok
nginx: configuration file /etc/nginx/nginx.conf test is successful
重启 Nginx 服务。
$ sudo systemctl restart nginx
步骤 10 - 安装 Coturn
要启用语音和视频通话,你需要安装一个 TURN(Traversal Using Relays around NAT,NAT 穿透中继)服务器。为此,我们将安装 Coturn 软件包。如果你不需要此功能,可以跳过本步骤。
安装 Coturn。
$ sudo dnf install coturn
开放 TURN 和 UDP 端口。
$ sudo firewall-cmd --zone=public --add-port=3478/{tcp,udp}
$ sudo firewall-cmd --zone=public --add-port=5349/{tcp,udp}
$ sudo firewall-cmd --zone=public --add-port=49152-65535/udp
$ sudo firewall-cmd --runtime-to-permanent
$ sudo firewall-cmd --reload
为 Turn 生成 SSL 证书(coturn.example.com)。
$ sudo certbot certonly --nginx --agree-tos --no-eff-email --staple-ocsp --preferred-challenges http -m
[email protected]
 -d coturn.example.com
为 Coturn 生成身份验证密钥(secret)。
$ echo "static-auth-secret=$(cat /dev/urandom | tr -cd '[:alnum:]' | fold -w 256 | head -n 1)"
static-auth-secret=u3ksgJ9X876sFMO00A8KabXwZvzVwCmV30wWvZ7DzGiepRwNRYSCTYzf2E8olNzdDHu7oO3XpT3l5bv5mVdhXEQ3pnoTWBquSVPFFBJtyD6y9gBxiMaD2TYTD2WohQLE9s7OKJVpkDeKTnZQnkmjrFadE3M9DRxPL1W5Lgdg6XLLKABgb5XGkutRgkJOV0JRH4sBYsot63fWq9mcGTm6nAMdIycvDVDOs7vhoeqRzcTbMF0wsfAHVJNhXpGGFDyZ
打开配置文件进行编辑。
$ sudo nano /etc/coturn/turnserver.conf
我们将通读该文件并启用所需的设置。首先,通过取消 use-auth-secret 行的注释来启用身份验证方法。
# Be aware that use-auth-secret overrides some parts of lt-cred-mech.
# The use-auth-secret feature depends internally on lt-cred-mech, so if you set
# this option then it automatically enables lt-cred-mech internally
# as if you had enabled both.
#
# Note that you can use only one auth mechanism at the same time! This is because,
# both mechanisms conduct username and password validation in different ways.
#
# Use either lt-cred-mech or use-auth-secret in the conf
# to avoid any confusion.
#
use-auth-secret
接下来,我们将 static-auth-secret 变量配置为上面生成的值。稍后配置 Synapse 时我们也需要用到这个密钥。
# 'Static' authentication secret value (a string) for TURN REST API only.
# If not set, then the turn server
# will try to use the 'dynamic' value in the turn_secret table
# in the user database (if present). The database-stored  value can be changed on-the-fly
# by a separate program, so this is why that mode is considered 'dynamic'.
#
static-auth-secret=u3ksgJ9X876sFMO00A8KabXwZvzVwCmV30wWvZ7DzGiepRwNRYSCTYzf2E8olNzdDHu7oO3XpT3l5bv5mVdhXEQ3pnoTWBquSVPFFBJtyD6y9gBxiMaD2TYTD2WohQLE9s7OKJVpkDeKTnZQnkmjrFadE3M9DRxPL1W5Lgdg6XLLKABgb5XGkutRgkJOV0JRH4sBYsot63fWq9mcGTm6nAMdIycvDVDOs7vhoeqRzcTbMF0wsfAHVJNhXpGGFDyZ
接下来需要修改的值是 realm。它指的是我们为 Coturn 选择的域名。
# The default realm to be used for the users when no explicit
# origin/realm relationship is found in the database, or if the TURN
# server is not using any database (just the commands-line settings
# and the userdb file). Must be used with long-term credentials
# mechanism or with TURN REST API.
#
# Note: If the default realm is not specified, then realm falls back to the host domain name.
#       If the domain name string is empty, or set to '(None)', then it is initialized as an empty string.
#
realm=coturn.example.com
接下来,定义会话总数和每个用户的会话数。选择一个适合你服务器的数值。
# Per-user allocation quota.
# default value is 0 (no quota, unlimited number of sessions per user).
# This option can also be set through the database, for a particular realm.
#
user-quota=12

# Total allocation quota.
# default value is 0 (no quota).
# This option can also be set through the database, for a particular realm.
#
total-quota=1200
接下来,我们需要禁用 TCP,因为 VOIP 使用的是 UDP。
# Uncomment if no TCP relay endpoints are allowed.
# By default TCP relay endpoints are enabled (like in RFC 6062).
#
no-tcp-relay
我们还需要配置为 Coturn 创建的证书的位置。
# Certificate file.
# Use an absolute path or path relative to the
# configuration file.
# Use PEM file format.
#
cert=/etc/letsencrypt/live/coturn.example.com/fullchain.pem

# Private key file.
# Use an absolute path or path relative to the
# configuration file.
# Use PEM file format.
#
pkey=/etc/letsencrypt/live/coturn.example.com/privkey.pem
接下来,我们需要禁用流向私有 IP 段的流量,并禁止多播地址上的对等节点,以提高安全性。
# Flag that can be used to disallow peers on well-known broadcast addresses (224.0.0.0 and above, and FFXX:*).
# This is an extra security measure.
#
no-multicast-peers

...............

# Option to allow or ban specific ip addresses or ranges of ip addresses.
# If an ip address is specified as both allowed and denied, then the ip address is
# considered to be allowed. This is useful when you wish to ban a range of ip
# addresses, except for a few specific ips within that range.
#
# This can be used when you do not want users of the turn server to be able to access
# machines reachable by the turn server, but would otherwise be unreachable from the
# internet (e.g. when the turn server is sitting behind a NAT)
#
# Examples:
# denied-peer-ip=83.166.64.0-83.166.95.255
# allowed-peer-ip=83.166.68.45
denied-peer-ip=0.0.0.0-0.255.255.255
denied-peer-ip=10.0.0.0-10.255.255.255
denied-peer-ip=100.64.0.0-100.127.255.255
denied-peer-ip=127.0.0.0-127.255.255.255
denied-peer-ip=169.254.0.0-169.254.255.255
denied-peer-ip=172.16.0.0-172.31.255.255
denied-peer-ip=192.0.0.0-192.0.0.255
denied-peer-ip=192.0.2.0-192.0.2.255
denied-peer-ip=192.88.99.0-192.88.99.255
denied-peer-ip=192.168.0.0-192.168.255.255
denied-peer-ip=198.18.0.0-198.19.255.255
denied-peer-ip=198.51.100.0-198.51.100.255
denied-peer-ip=203.0.113.0-203.0.113.255
denied-peer-ip=240.0.0.0-255.255.255.255
denied-peer-ip=::1
denied-peer-ip=64:ff9b::-64:ff9b::ffff:ffff
denied-peer-ip=::ffff:0.0.0.0-::ffff:255.255.255.255
denied-peer-ip=100::-100::ffff:ffff:ffff:ffff
denied-peer-ip=2001::-2001:1ff:ffff:ffff:ffff:ffff:ffff:ffff
denied-peer-ip=2002::-2002:ffff:ffff:ffff:ffff:ffff:ffff:ffff
denied-peer-ip=fc00::-fdff:ffff:ffff:ffff:ffff:ffff:ffff:ffff
denied-peer-ip=fe80::-febf:ffff:ffff:ffff:ffff:ffff:ffff:ffff
完成后,按 Ctrl + X 并在提示时输入 Y 保存文件。
重启 Coturn 以使配置生效。
$ sudo systemctl restart coturn
打开 Synapse 配置文件(homeserver.yaml)以添加 Coturn 设置。
$ nano ~/synapse/homeserver.yaml
在其中粘贴以下行。将 turn_shared_secret 的值替换为 \etc\coturn\turnserver.conf 文件中 static-auth-secret 的值。
turn_uris: [ "turn:coturn.example.com?transport=udp", "turn:coturn.example.com?transport=tcp" ]
turn_shared_secret: 'static-auth-secret'
turn_user_lifetime: 86400000
turn_allow_guests: True

# vim:ft=yaml
按 Ctrl + X 并在提示时输入 Y 保存文件。
重启 Synapse 以使更改生效。
$ sudo systemctl restart matrix-synapse
步骤 11 - 访问 Matrix
你可以通过 https://app.element.io 上的 Element Web 客户端访问 Matrix 聊天。点击 Sign in(登录)按钮继续。
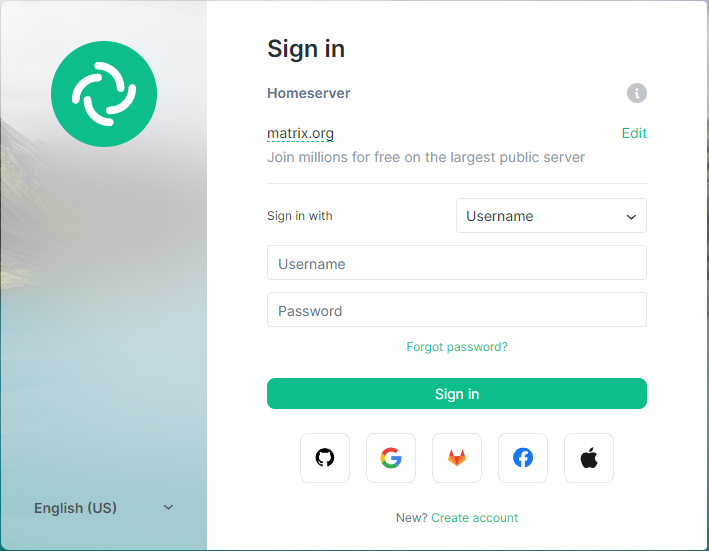
点击 Homeserver(家庭服务器)下方的 Edit(编辑)链接。输入 matrix.example.com 作为你的 homeserver。
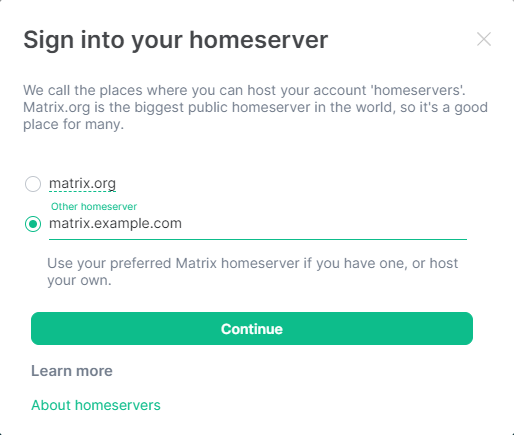
如果客户端正确检测到你的 homeserver,边框和文字会变为绿色,否则会显示为红色。点击 Continue(继续)按钮。
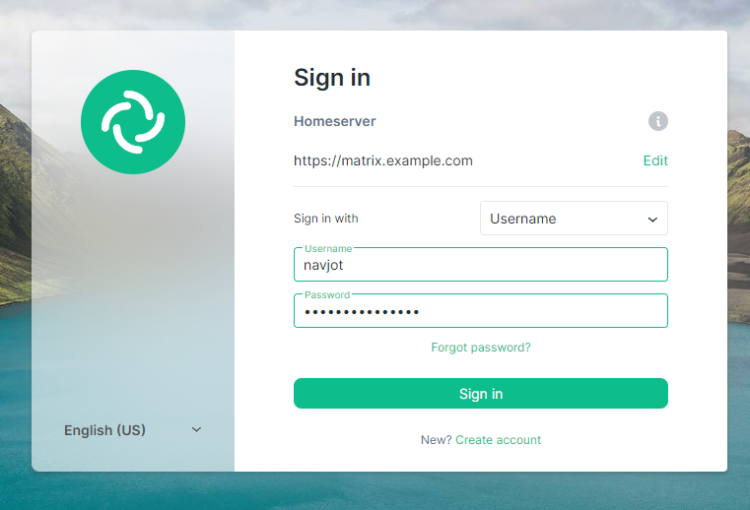
输入你在步骤 8 配置 Synapse 时创建的用户名和密码。点击 Sign in 按钮登录。系统会要求你创建一个安全的加密备份。
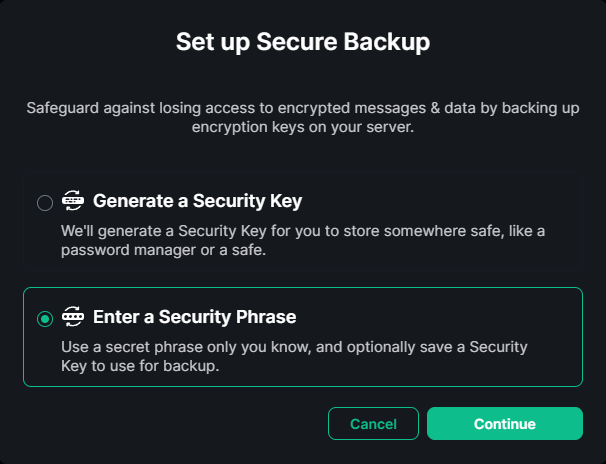
选择 Enter a Security Phrase(输入安全口令)选项,创建一个每次登录时都需要的安全口令。点击 Continue 继续。
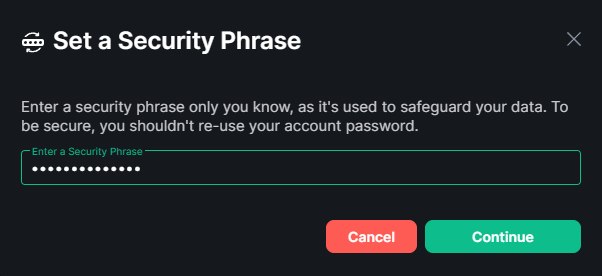
输入一个安全口令并点击 Continue 按钮继续。下一屏会要求你再次确认。
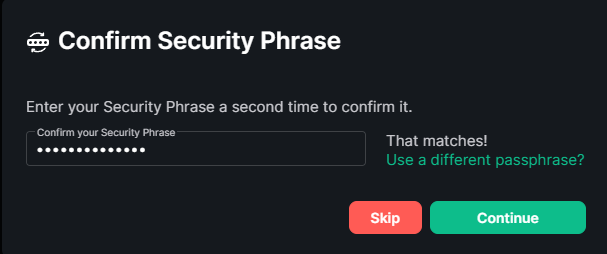
再次输入该口令并点击 Continue 继续。
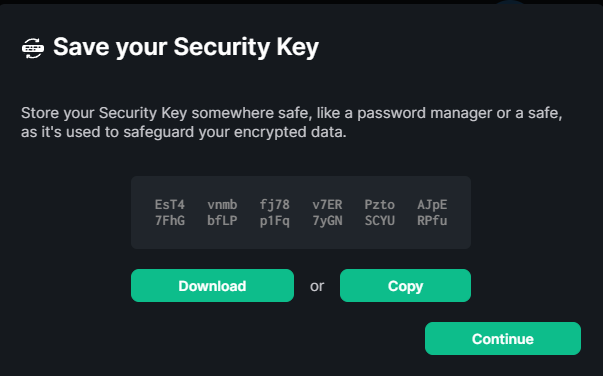
系统会提供一组安全密钥,在你忘记安全口令时可以使用。点击 Download(下载)按钮将其保存。
点击 Continue 按钮继续。
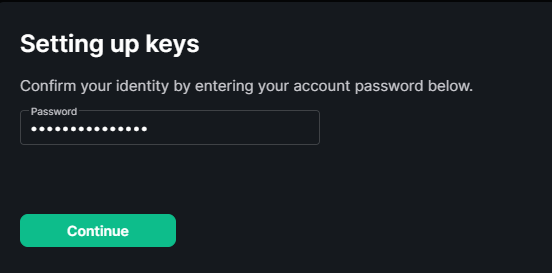
系统会要求你输入账户密码。输入密码并点击 Continue 按钮,完成加密备份的设置。
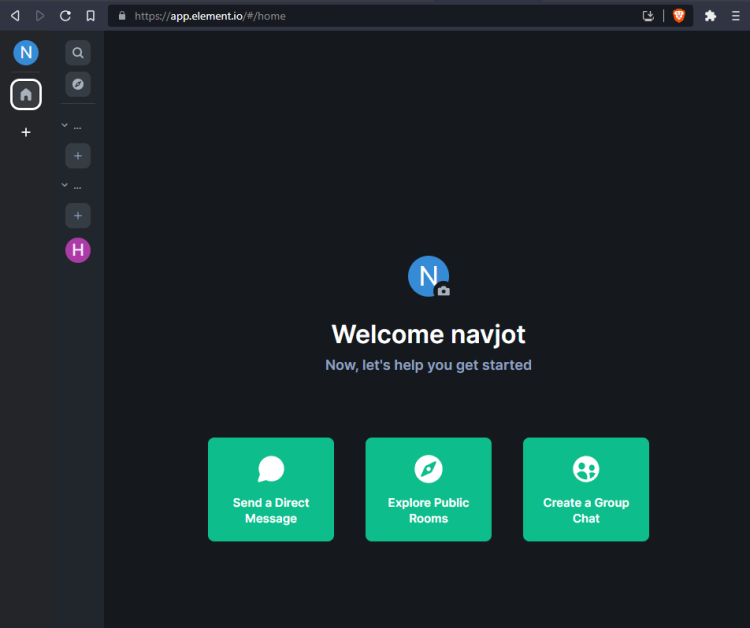
我们使用首页上的 Create a Group Chat(创建群聊)按钮创建了一个名为 HowtoForge 的群聊房间。点击该按钮时,你会看到如下弹窗。
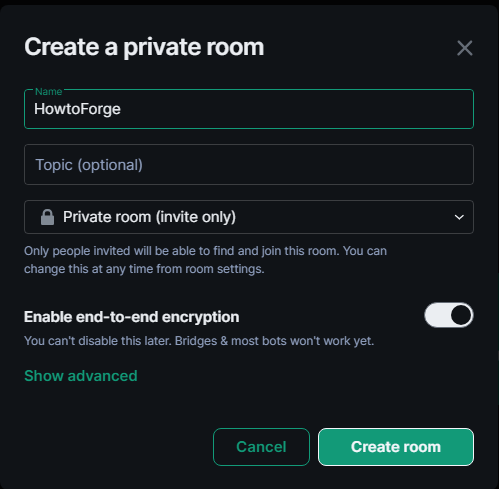
你可以展开高级菜单并选择相应选项,将成员限制在指定域名内。点击 Create room(创建房间)按钮完成房间创建。
步骤 12 - 安装 Element
为 Element 创建一个目录。
$ sudo mkdir -p /var/www/html/element
创建一个新文件用于获取最新的 Element 版本。
$ sudo nano /var/www/html/element/update.sh
在其中添加以下行。
#!/bin/sh
set -e

install_location="/var/www/html/element"
latest="$(curl -I https://github.com/element-hq/element-web/releases/latest | awk -F '/' '/^location/ {print  substr($NF, 1, length($NF)-1)}')"

cd "$install_location"

[ ! -d "archive" ] && mkdir -p "archive"
[ -d "archive/element-${latest}" ] && rm -r "archive/element-${latest}"
[ -f "archive/element-${latest}.tar.gz" ] && rm "archive/element-${latest}.tar.gz"

wget "https://github.com/element-hq/element-web/releases/download/${latest}/element-${latest}.tar.gz" -P "archive"
tar xf "archive/element-${latest}.tar.gz" -C "archive"

[ -L "${install_location}/current" ] && rm "${install_location}/current"
ln -sf "${install_location}/archive/element-${latest}" "${install_location}/current"
ln -sf "${install_location}/config.json" "${install_location}/current/config.json"
按 Ctrl + X 并在提示时输入 Y 保存文件。
使该文件可执行。
$ sudo chmod +x /var/www/html/element/update.sh
运行该脚本以下载 Element。
$ sudo /var/www/html/element/update.sh
步骤 13 - 配置 Element
复制同一个 Element 配置文件。
$ sudo cp /var/www/html/element/current/config.sample.json /var/www/html/element/config.json
打开配置文件进行编辑。
$ sudo nano /var/www/html/element/config.json
找到以下行。
"m.homeserver": {
    "base_url": "https://matrix-client.matrix.org",
    "server_name": "matrix.org"
},
将默认的 Matrix homeserver 地址更改为你的 homeserver,并删除 server_name 变量。
"m.homeserver": {
    "base_url": "https://matrix.example.com",
    "server_name": "example.com"
},
如果你想在网站标题中使用自己的名称而不是 Element,可以修改品牌名称(brand name)。
"brand": "HowtoForge Example Chat",
将 disable_guests 变量设为 true,以禁止访客(Guests)使用 Element。
"disable_guests": true,
按 Ctrl + X 并在提示时输入 Y 保存文件。
为 Element 客户端生成 SSL 证书。
$ sudo certbot certonly --nginx --agree-tos --no-eff-email --staple-ocsp --preferred-challenges http -m
[email protected]
 -d element.example.com
创建并打开文件 /etc/nginx/conf.d/element.conf 进行编辑。
$ sudo nano /etc/nginx/conf.d/element.conf
在其中粘贴以下行。
server {
    listen 80;
    listen [::]:80;
    server_name element.example.com;
    return 301 https://$host$request_uri;
}

server {
    listen 443 ssl;
    listen [::]:443 ssl;
    http2 on;

    server_name element.example.com;

    root /var/www/html/element/current;
    index index.html;

    access_log  /var/log/nginx/element.access.log;
    error_log   /var/log/nginx/element.error.log;

    add_header Referrer-Policy "strict-origin" always;
    add_header X-Content-Type-Options "nosniff" always;
    add_header X-Frame-Options "SAMEORIGIN" always;

    # TLS configuration
    ssl_certificate /etc/letsencrypt/live/element.example.com/fullchain.pem;
    ssl_certificate_key /etc/letsencrypt/live/element.example.com/privkey.pem;
    ssl_trusted_certificate /etc/letsencrypt/live/element.example.com/chain.pem;
    ssl_session_timeout 1d;
    ssl_session_cache shared:MozSSL:10m;
    ssl_session_tickets off;
    ssl_prefer_server_ciphers on;
    ssl_stapling on;
    ssl_stapling_verify on;
    ssl_dhparam /etc/ssl/certs/dhparam.pem;
    resolver 1.1.1.1 1.0.0.1 [2606:4700:4700::1111] [2606:4700:4700::1001] 8.8.8.8 8.8.4.4 [2001:4860:4860::8888] [2001:4860:4860::8844] valid=60s;
    resolver_timeout 2s;

    ssl_protocols TLSv1.2 TLSv1.3;
    ssl_ciphers ECDHE-ECDSA-AES128-GCM-SHA256:ECDHE-RSA-AES128-GCM-SHA256:ECDHE-ECDSA-AES256-GCM-SHA384:ECDHE-RSA-AES256-GCM-SHA384:ECDHE-ECDSA-CHACHA20-POLY1305:ECDHE-RSA-CHACHA20-POLY1305:DHE-RSA-AES128-GCM-SHA256:DHE-RSA-AES256-GCM-SHA384;
}
按 Ctrl + X 并在提示时输入 Y 保存文件。
检查 Nginx 配置文件语法。
$ sudo nginx -t
nginx: the configuration file /etc/nginx/nginx.conf syntax is ok
nginx: configuration file /etc/nginx/nginx.conf test is successful
重启 Nginx 服务。
$ sudo systemctl restart nginx
在访问 Element 之前,我们需要配置 SELinux 设置。运行以下命令以允许 Element 运行。
$ sudo semanage fcontext -a -t httpd_sys_rw_content_t "/var/www/html/element(/.*)?"
$ sudo restorecon -Rv /var/www/html/element/
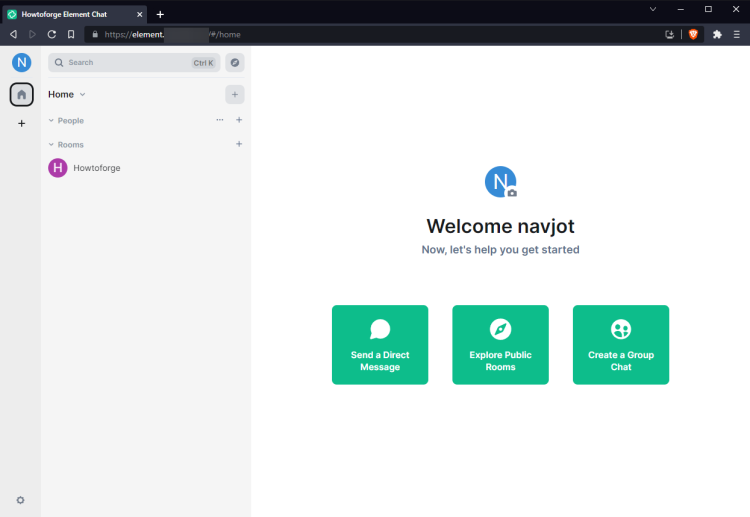
你可以通过浏览器访问 https://element.example.com 来使用 Element 客户端。登录后,你会进入应用仪表盘。系统会要求你先用 https://app.element.io 验证该应用,请确保你已在原始 Element 应用中登录,并且会被要求匹配表情符号。验证通过后,你会看到如下仪表盘。
总结
至此,本教程关于在 Debian 12 机器上以 Nginx 作为代理服务器,安装 Matrix Synapse 聊天服务器以及 Coturn 和 Element Web 客户端的内容就结束了。如果你有任何问题,请在下方评论区留言。