
本页内容
- 准备工作
- 第 1 步 - 配置防火墙
- 第 2 步 - 安装 Nginx
- 第 3 步 - 安装 PHP 及扩展
- 第 4 步 - 安装 Percona MySQL 服务器
- 第 5 步 - 配置 Percona MySQL 服务器
- 第 6 步 - 下载 PrestaShop
- 第 7 步 - 安装 SSL
- 第 8 步 - 配置 SELinux
- 第 9 步 - 配置 PHP-FPM
- 第 10 步 - 配置 Nginx
- 第 11 步 - 安装 PrestaShop
- 第 12 步 - 更新 PrestaShop
- 总结
PrestaShop 是一款基于 Symfony PHP 框架开发的开源电子商务 Web 应用程序。它允许你设计、搭建并托管在线商店,用于销售商品、接收付款以及管理相关的一切事务。目前已有 30 多万个网站在使用它,使其成为最流行的电子商务平台之一。它支持通过模块来进一步扩展功能,你还可以使用各种高质量的主题对其进行自定义。它提供了可定制的模板、安全的支付网关、库存管理以及利于搜索引擎优化(SEO)的工具,帮助提升搜索引擎排名。
在本教程中,你将学习如何在 Rocky Linux 9 服务器上安装 PrestaShop。
准备工作
- 一台运行 Rocky Linux 9 的服务器,至少配备 1 GB 内存。
- 一个拥有 sudo 权限的非 root 用户。
- 一个指向你服务器的完整域名(FQDN),例如 prestashop.example.com。
- 一个邮件服务(如 Amazon SES 或 Mailgun)的 SMTP 账户。
- 所有软件包均已更新。$ sudo dnf update
- 教程和 PrestaShop 运行需要一些基础软件包。其中部分可能已安装在你的服务器上。$ sudo dnf install wget curl nano unzip yum-utils policycoreutils-python-utils -y
一台运行 Rocky Linux 9 的服务器,至少配备 1 GB 内存。
一个拥有 sudo 权限的非 root 用户。
一个指向你服务器的完整域名(FQDN),例如 prestashop.example.com。
一个邮件服务(如 Amazon SES 或 Mailgun)的 SMTP 账户。
所有软件包均已更新。
$ sudo dnf update
教程和 PrestaShop 运行需要一些基础软件包。其中部分可能已安装在你的服务器上。
$ sudo dnf install wget curl nano unzip yum-utils policycoreutils-python-utils -y
第 1 步 - 配置防火墙
第一步是配置防火墙。Rocky Linux 使用 Firewalld 防火墙。请检查防火墙的状态。
$ sudo firewall-cmd --state
running
防火墙按不同的区域(zone)工作,我们将使用默认的 public(公共)区域。列出防火墙当前启用的所有服务和端口。
$ sudo firewall-cmd --permanent --list-services
它应当显示如下输出。
cockpit dhcpv6-client ssh
允许 HTTP 和 HTTPS 端口。
$ sudo firewall-cmd --permanent --add-service=http
$ sudo firewall-cmd --permanent --add-service=https
再次检查防火墙的状态。
$ sudo firewall-cmd --permanent --list-services
你应该会看到类似的输出。
cockpit dhcpv6-client http https ssh
重新加载防火墙以使更改生效。
$ sudo firewall-cmd --reload
第 2 步 - 安装 Nginx
Rocky Linux 9 自带的是较旧版本的 Nginx。要安装最新版本,你需要下载官方的 Nginx 仓库。
创建并打开文件 /etc/yum.repos.d/nginx.repo 进行编辑。
$ sudo nano /etc/yum.repos.d/nginx.repo
在其中粘贴以下代码。
[nginx-stable]
name=nginx stable repo
baseurl=http://nginx.org/packages/centos/$releasever/$basearch/
gpgcheck=1
enabled=1
gpgkey=https://nginx.org/keys/nginx_signing.key
module_hotfixes=true

[nginx-mainline]
name=nginx mainline repo
baseurl=http://nginx.org/packages/mainline/centos/$releasever/$basearch/
gpgcheck=1
enabled=0
gpgkey=https://nginx.org/keys/nginx_signing.key
module_hotfixes=true
完成后,按 Ctrl + X 并在提示时输入 Y 保存文件。
安装 Nginx。
$ sudo dnf install nginx -y
验证安装。
$ nginx -v
nginx version: nginx/1.24.0
启用并启动 Nginx 服务。
$ sudo systemctl enable nginx --now
检查服务状态。
$ sudo systemctl status nginx
? nginx.service - nginx - high performance web server
     Loaded: loaded (/usr/lib/systemd/system/nginx.service; enabled; preset: disabled)
     Active: active (running) since Sat 2023-11-25 10:58:03 UTC; 5s ago
       Docs: http://nginx.org/en/docs/
    Process: 4220 ExecStart=/usr/sbin/nginx -c /etc/nginx/nginx.conf (code=exited, status=0/SUCCESS)
   Main PID: 4222 (nginx)
      Tasks: 2 (limit: 10841)
     Memory: 1.9M
        CPU: 9ms
     CGroup: /system.slice/nginx.service
             ??4222 "nginx: master process /usr/sbin/nginx -c /etc/nginx/nginx.conf"
             ??4223 "nginx: worker process"
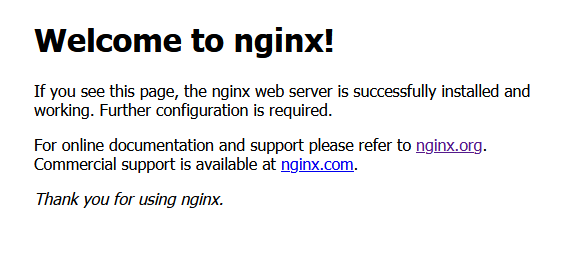
在你的浏览器中打开服务器的 IP 地址。你应该会看到如下页面,这表明你的服务器已正常运行。
第 3 步 - 安装 PHP 及扩展
Rocky Linux 9 默认自带 PHP 8.1。为了始终使用最新版本的 PHP,或如果你希望安装多个版本的 PHP,我们需要使用 REMI 仓库。
第一步是获取 EPEL 仓库。
$ sudo dnf install epel-release -y
接着,安装 Remi 仓库。
$ sudo dnf install https://rpms.remirepo.net/enterprise/remi-release-9.rpm
查看可用的 PHP 软件流(stream)。
$ dnf module list php -y
Name    Stream              Profiles                                      Summary
php     8.1                 common [d], devel, minimal                    PHP scripting language

Remi's Modular repository for Enterprise Linux 9 - x86_64
Name    Stream              Profiles                                      Summary
php     remi-7.4            common [d], devel, minimal                    PHP scripting language
php     remi-8.0            common [d], devel, minimal                    PHP scripting language
php     remi-8.1            common [d], devel, minimal                    PHP scripting language
php     remi-8.2            common [d], devel, minimal                    PHP scripting language
php     remi-8.3            common [d], devel, minimal                    PHP scripting language

Hint: [d]efault, [e]nabled, [x]disabled, [i]nstalled
默认版本为 8.1。在撰写本教程时,PrestaShop 兼容 PHP 8.1。因此,启用 Remi 的 PHP 8.1 仓库。
$ sudo dnf module reset php -y
$ sudo dnf module enable php:remi-8.1
安装 PrestaShop 所需的 PHP 及其扩展。
$ sudo dnf install php php-bcmath php-cli php-curl php-common \
    php-fpm php-gd php-gmp php-intl php-mbstring \
    php-mysql php-opcache php-xml php-zip -y
检查已安装的 PHP 版本。
$ php --version
PHP 8.1.26 (cli) (built: Nov 21 2023 21:53:48) (NTS gcc x86_64)
Copyright (c) The PHP Group
Zend Engine v4.1.26, Copyright (c) Zend Technologies
    with Zend OPcache v8.1.26, Copyright (c), by Zend Technologies
启用并启动 PHP-FPM 服务。
$ sudo systemctl enable php-fpm --now
检查服务状态。
$ sudo systemctl status php-fpm
? php-fpm.service - The PHP FastCGI Process Manager
     Loaded: loaded (/usr/lib/systemd/system/php-fpm.service; enabled; preset: disabled)
     Active: active (running) since Sat 2023-11-25 12:54:31 UTC; 2s ago
   Main PID: 6160 (php-fpm)
     Status: "Ready to handle connections"
      Tasks: 6 (limit: 10841)
     Memory: 15.2M
        CPU: 56ms
     CGroup: /system.slice/php-fpm.service
             ??6160 "php-fpm: master process (/etc/php-fpm.conf)"
             ??6161 "php-fpm: pool www"
             ??6162 "php-fpm: pool www"
             ??6163 "php-fpm: pool www"
             ??6164 "php-fpm: pool www"
             ??6165 "php-fpm: pool www"
第 4 步 - 安装 Percona MySQL 服务器
PrestaShop 需要一个 MySQL 数据库服务器来存储数据。但我们不直接安装 MySQL,而是安装 Percona MySQL 服务器。它可以作为 MySQL 的替代方案(drop-in replacement),并提供更多功能与更高的安全性。
第一步是安装适用于 Rocky Linux 的 Percona 发布仓库。
$ sudo dnf install -y https://repo.percona.com/yum/percona-release-latest.noarch.rpm
如果遇到如下错误,可以放心忽略并继续,这不会影响安装。GPG 密钥稍后仍会被导入。
error: can't create transaction lock on /var/lib/rpm/.rpm.lock (Resource temporarily unavailable)
error: /etc/pki/rpm-gpg/RPM-GPG-KEY-Percona: key 1 import failed.
仓库安装完成后,执行以下命令来配置 MySQL 8.0 的 Percona Server 仓库。
$ percona-release setup ps80
上述命令会询问你是否要禁用默认的 MySQL 模块。输入 y 继续。它会禁用 MySQL 安装模块并启用 Percona MySQL 模块。
安装 MySQL 8.0 的 Percona Server。
$ sudo dnf -y install percona-server-server
这将安装 Percona Server 和 MySQL 客户端,这些是目前所需的基础软件包。
验证安装。
$ mysql --version
mysql  Ver 8.0.34-26 for Linux on x86_64 (Percona Server (GPL), Release 26, Revision 0fe62c85)
启动 MySQL 服务。
$ sudo systemctl start mysqld
检查 MySQL 服务状态。
$ sudo systemctl status mysqld
? mysqld.service - MySQL Server
     Loaded: loaded (/usr/lib/systemd/system/mysqld.service; enabled; preset: disabled)
     Active: active (running) since Sun 2023-11-26 06:25:37 UTC; 7s ago
       Docs: man:mysqld(8)
             http://dev.mysql.com/doc/refman/en/using-systemd.html
    Process: 6522 ExecStartPre=/usr/bin/mysqld_pre_systemd (code=exited, status=0/SUCCESS)
   Main PID: 6598 (mysqld)
     Status: "Server is operational"
      Tasks: 39 (limit: 10841)
     Memory: 486.8M
        CPU: 8.131s
     CGroup: /system.slice/mysqld.service
             ??6598 /usr/sbin/mysqld

Nov 26 06:25:28 prestashop.example.com systemd[1]: Starting MySQL Server...
Nov 26 06:25:37 prestashop.example.com systemd[1]: Started MySQL Server.
Percona 会在安装过程中生成一个临时的 root 密码。使用以下命令获取该密码。
$ sudo grep "temporary password" /var/log/mysqld.log
2023-11-26T06:25:33.316696Z 6 [Note] [MY-010454] [Server] A temporary password is generated for root@localhost: (sDeLSgjs7pI
登录 MySQL 命令行。
$ sudo mysql -u root -p
运行 MySQL 安全配置向导。
$ sudo mysql_secure_installation
在提示时输入 root 密码。
Securing the MySQL server deployment.

Enter password for user root:
由于该临时密码已过期,系统会提示你设置一个新的 root 密码。请为 root 账户选择一个强密码。你的密码应满足当前的密码策略要求,即必须包含一个小写字母、一个大写字母、一个数字以及一个特殊字符。
The existing password for the user account root has expired. Please set a new password.

New password:

Re-enter new password:
接下来会显示密码强度,并询问你是否要更改密码。输入 N 继续。
The 'validate_password' component is installed on the server.
The subsequent steps will run with the existing configuration
of the component.
Using existing password for root.

Estimated strength of the password: 100
Change the password for root ? ((Press y|Y for Yes, any other key for No) : N

 ... skipping.
输入 Y 删除匿名用户。
By default, a MySQL installation has an anonymous user,
allowing anyone to log into MySQL without having to have
a user account created for them. This is intended only for
testing, and to make the installation go a bit smoother.
You should remove them before moving into a production
environment.

Remove anonymous users? (Press y|Y for Yes, any other key for No) : Y
Success.
输入 Y 禁止 root 用户远程登录。
Normally, root should only be allowed to connect from
'localhost'. This ensures that someone cannot guess at
the root password from the network.

Disallow root login remotely? (Press y|Y for Yes, any other key for No) : Y
Success.
输入 Y 删除测试数据库。
By default, MySQL comes with a database named 'test' that
anyone can access. This is also intended only for testing,
and should be removed before moving into a production
environment.


Remove test database and access to it? (Press y|Y for Yes, any other key for No) : Y
 - Dropping test database...
Success.

 - Removing privileges on test database...
Success.
最后,输入 N 重新加载权限表。
Reloading the privilege tables will ensure that all changes
made so far will take effect immediately.

Reload privilege tables now? (Press y|Y for Yes, any other key for No) : Y
Success.

All done!
这样就完成了。下次你想登录 MySQL 命令行时,请使用以下命令,并在提示时输入 root 密码。
$ sudo mysql -u root -p
你会看到如下 MySQL 命令行提示符。
Welcome to the MySQL monitor.  Commands end with ; or \g.
Your MySQL connection id is 16
Server version: 8.0.34-26 Percona Server (GPL), Release 26, Revision 0fe62c85

Copyright (c) 2009-2023 Percona LLC and/or its affiliates
Copyright (c) 2000, 2023, Oracle and/or its affiliates.

Oracle is a registered trademark of Oracle Corporation and/or its
affiliates. Other names may be trademarks of their respective
owners.

Type 'help;' or '\h' for help. Type '\c' to clear the current input statement.

mysql>
输入 exit 退出命令行。
第 5 步 - 配置 Percona MySQL 服务器
登录 MySQL 命令行。
$ sudo mysql -u root -p
为你的 PrestaShop 安装创建一个新的 MySQL 数据库、数据库用户和密码。
mysql> CREATE DATABASE prestashop COLLATE utf8mb4_general_ci;
mysql> CREATE USER 'prestauser'@'localhost' IDENTIFIED BY 'Your_password2';
mysql> GRANT ALL PRIVILEGES ON prestashop.* TO 'prestauser'@'localhost';
将 prestashop、prestauser 和 yourpassword 替换为你自己设定的凭据。请选择一个强密码,并确保其符合上述密码策略。
刷新权限,确保它们已保存到当前会话。
mysql> FLUSH PRIVILEGES;
退出 MySQL 命令行。
mysql> exit
第 6 步 - 下载 PrestaShop
为 PrestaShop 创建一个目录。
$ sudo mkdir /var/www/html/prestashop -p
PrestaShop 提供两个版本——带品牌的 Basic 版本和无品牌版本。带品牌版本可从 PrestaShop 官网获取,而无品牌版本可从 GitHub 仓库获取。两个版本的区别在于,带品牌版本包含额外的模块,包括支付处理器、用于推广与 SEO 的 Facebook 和 Google 模块,以及用于连接 PrestaShop 和分析的其他各类模块。
基础版本在无品牌版本之后发布。因此,在撰写本教程时,可用的基础版本最新为 8.1.1,无品牌版本为 8.1.2。在本教程中我们将使用带品牌的基础版本。如果你愿意,也可以使用无品牌版本。两种版本的安装过程完全相同。
使用以下命令下载最新版本。
$ cd /tmp
$ wget https://assets.prestashop3.com/dst/edition/corporate/8.1.1/prestashop_edition_basic_version_8.1.1.zip
你可以访问 PrestaShop 下载页面,填写邮箱并下载文件来获取链接。无品牌版本可从 PrestaShop 的 GitHub 发布页面获取。
解压下载的压缩包。
$ unzip prestashop_*.zip
该压缩包内还包含一个名为 prestashop.zip 的压缩文件,其中含有所有文件。将这些文件解压到 PrestaShop 目录。
$ sudo unzip prestashop.zip -d /var/www/html/prestashop
将 PrestaShop 目录的属主更改为 nginx 用户。
$ sudo chown -R nginx: /var/www/html/prestashop
第 7 步 - 安装 SSL
我们需要安装 Certbot 来生成 SSL 证书。为此我们将使用 Snapd 包安装器。由于 Rocky Linux 默认未自带它,需要安装 Snapd 安装器。它需要 EPEL(Extra Packages for Enterprise Linux,企业版 Linux 附加软件包)仓库才能工作。但由于我们在第 3 步中已经安装过,可直接继续。
安装 Snapd。
$ sudo dnf install -y snapd
启用并启动 Snap 服务。
$ sudo systemctl enable snapd --now
安装 Snap core 软件包,并确保你的 Snapd 版本是最新的。
$ sudo snap install core && sudo snap refresh core
创建 Snapd 工作所需的链接。
$ sudo ln -s /var/lib/snapd/snap /snap
$ echo 'export PATH=$PATH:/var/lib/snapd/snap/bin' | sudo tee -a /etc/profile.d/snapd.sh
安装 Certbot。
$ sudo snap install --classic certbot
使用以下命令,通过创建指向 /usr/bin 目录的符号链接,确保 Certbot 命令可以运行。
$ sudo ln -s /snap/bin/certbot /usr/bin/certbot
验证 Certbot 是否正常工作。
$ certbot --version
certbot 2.7.4
运行以下命令生成 SSL 证书。
$ sudo certbot certonly --nginx --agree-tos --no-eff-email --staple-ocsp --preferred-challenges http -m
[email protected]
 -d prestashop.example.com
上述命令会将证书下载到服务器上的 /etc/letsencrypt/live/prestashop.example.com 目录。
生成 Diffie-Hellman 组证书。
$ sudo openssl dhparam -dsaparam -out /etc/ssl/certs/dhparam.pem 4096
检查 Certbot 续期调度服务。
$ sudo systemctl list-timers
你会发现 snap.certbot.renew.service 是计划运行的服务之一。
NEXT                        LEFT           LAST                        PASSED      UNIT                      ACTIVATES
---------------------------------------------------------------------------------------------------------------------------
Sun 2023-11-26 17:12:40 UTC 1h 34min left Sun 2023-11-26 15:25:36 UTC 12min ago    dnf-makecache.timer       dnf-makecache.service
Sun 2023-11-26 17:48:00 UTC 2h 10min left -                           -            snap.certbot.renew.timer  snap.certbot.renew.service
Mon 2023-11-27 00:00:00 UTC 8h left       Sun 2023-11-26 00:00:00 UTC 15h ago      logrotate.timer           logrotate.service
对流程进行一次试运行(dry run),检查 SSL 续期是否正常工作。
$ sudo certbot renew --dry-run
如果没有看到错误,说明一切就绪。你的证书将自动续期。
第 8 步 - 配置 SELinux
更改 PrestaShop 的文件安全上下文。
$ sudo semanage fcontext -a -t httpd_sys_rw_content_t "/var/www/html/prestashop(/.*)?"
应用该策略。
$ sudo restorecon -Rv /var/www/html/prestashop/
应用策略以允许 Nginx 访问 MariaDB。
$ sudo setsebool -P httpd_can_network_connect_db 1
应用策略以允许连接到外部主机。发送邮件需要此配置。
$ sudo setsebool -P httpd_can_network_connect 1
在 MariaDB 10.11 上,你会遇到另一个问题:SELinux 会阻止 PHP-FPM 连接 MariaDB。这可以通过安装一个 SELinux 模块来解决。第一步是创建一个类型强制(type enforcement)文件。
在你的主目录中创建文件 my-phpfpm.te 并打开进行编辑。
$ cd ~
$ nano my-phpfpm.te
在其中粘贴以下代码。
module my-phpfpm 1.0;

require {
        type unconfined_service_t;
        type httpd_t;
        type httpd_sys_content_t;
        class dir write;
        class unix_stream_socket connectto;
}

#============= httpd_t ==============

#!!!! This avc is allowed in the current policy
allow httpd_t httpd_sys_content_t:dir write;

#!!!! This avc is allowed in the current policy
allow httpd_t unconfined_service_t:unix_stream_socket connectto;
按 Ctrl + X 并在提示时输入 Y 保存文件。
下一步是使用以下命令将其转换为策略模块。不要修改命令中的文件名,否则将无法生效。模块名为 my-phpfpm,文件名应与模块名相同。
$ sudo checkmodule -M -m -o my-phpfpm.mod my-phpfpm.te
接下来,我们需要编译该策略模块以生成策略包。
$ sudo semodule_package -o my-phpfpm.pp -m my-phpfpm.mod
最后一步是使用 semodule 命令加载策略包,该命令会安装要使用的策略。
$ sudo semodule -i my-phpfpm.pp
第 9 步 - 配置 PHP-FPM
打开 php.ini 进行编辑。
$ sudo nano /etc/php.ini
要设置文件上传大小,请修改 upload_max_filesize 和 post_max_size 变量的值。该值决定了你可上传到 PrestaShop 的文件大小。默认设置为 10MB,这也是我们将在 PHP 中配置的值。
$ sudo sed -i 's/upload_max_filesize = 2M/upload_max_filesize = 16M/' /etc/php.ini
$ sudo sed -i 's/post_max_size = 8M/post_max_size = 16M/' /etc/php.ini
根据你的服务器资源和需求配置 PHP 的内存限制(memory_limit)。
$ sudo sed -i 's/memory_limit = 128M/memory_limit = 256M/' /etc/php.ini
打开文件 /etc/php-fpm.d/www.conf。
$ sudo nano /etc/php-fpm.d/www.conf
我们需要将 PHP 进程的 Unix 用户/组设置为 nginx。请在文件中找到 user=apache 和 group=apache 这两行,并将它们改为 nginx。
...
; Unix user/group of processes
; Note: The user is mandatory. If the group is not set, the default user's group
;       will be used.
; RPM: apache user chosen to provide access to the same directories as httpd
user = nginx
; RPM: Keep a group allowed to write in log dir.
group = nginx
...
在文件中找到 listen.owner = nobody、listen.group = nobody、listen.mode = 0660 这几行,取消注释后按如下方式修改。
; Set permissions for unix socket, if one is used. In Linux, read/write
; permissions must be set in order to allow connections from a web server. Many
; BSD-derived systems allow connections regardless of permissions. The owner
; and group can be specified either by name or by their numeric IDs.
; Default Values: user and group are set as the running user
;                 mode is set to 0660
listen.owner = nginx
listen.group = nginx
listen.mode = 0660
按 Ctrl + X 并在提示时输入 Y 保存文件。
重启 PHP-FPM 进程。在重启 PHP 服务前,请确保已安装 Nginx,否则由于找不到 nginx 组而导致失败。
$ sudo systemctl restart php-fpm
将 PHP 会话目录的属组更改为 nginx。
$ sudo chgrp -R nginx /var/lib/php/session
第 10 步 - 配置 Nginx
打开文件 /etc/nginx/nginx.conf 进行编辑。
$ sudo nano /etc/nginx/nginx.conf
在 include /etc/nginx/conf.d/*.conf; 这一行之前添加以下内容。
server_names_hash_bucket_size 64;
按 Ctrl + X 并在提示时输入 Y 保存文件。
创建并打开文件 /etc/nginx/conf.d/prestashop.conf 进行编辑。
$ sudo nano /etc/nginx/conf.d/prestashop.conf
在其中粘贴以下代码。请将 prestashop.example.com 替换为你的域名。请确保 client_max_body_size 的值设置为 10MB,这与 PrestaShop 中文件上传的默认大小一致,也就是我们之前在 PHP 中配置的值。
server {
    listen 443 ssl http2;
    listen [::]:443 ssl http2;

    # [EDIT] Your domain name(s) go here.
    server_name prestashop.example.com;

    # [EDIT] Path to your domain Nginx logs.
    access_log /var/log/nginx/prestashop.access.log;
    error_log /var/log/nginx/prestashop.error.log;

    # [EDIT] Path to your SSL certificates (take a look at Certbot https://certbot.eff.org).
    ssl_certificate      /etc/letsencrypt/live/prestashop.example.com/fullchain.pem;
    ssl_certificate_key  /etc/letsencrypt/live/prestashop.example.com/privkey.pem;
    ssl_trusted_certificate /etc/letsencrypt/live/prestashop.example.com/chain.pem;

    ssl_session_timeout  5m;
    ssl_session_cache shared:MozSSL:10m;
    ssl_session_tickets off;

    ssl_protocols TLSv1.2 TLSv1.3;
    ssl_prefer_server_ciphers on;
    ssl_ciphers ECDHE-ECDSA-AES128-GCM-SHA256:ECDHE-RSA-AES128-GCM-SHA256:ECDHE-ECDSA-AES256-GCM-SHA384:ECDHE-RSA-AES256-GCM-SHA384:ECDHE-ECDSA-CHACHA20-POLY1305:ECDHE-RSA-CHACHA20-POLY1305:DHE-RSA-AES128-GCM-SHA256:DHE-RSA-AES256-GCM-SHA384;
    ssl_ecdh_curve X25519:prime256v1:secp384r1:secp521r1;
    ssl_stapling on;
    ssl_stapling_verify on;
    ssl_dhparam /etc/ssl/certs/dhparam.pem;

    # [EDIT] Path to your PrestaShop directory.
    root /var/www/html/prestashop;

    index index.php;

    # This should match the `post_max_size` and/or `upload_max_filesize` settings
    # in your php.ini.
    client_max_body_size 16M;

    # Redirect 404 errors to PrestaShop.
    error_page 404 /index.php?controller=404;

    # HSTS (Force clients to interact with your website using HTTPS only).
    # For enhanced security, register your site here: https://hstspreload.org/.
    # WARNING: Don't use this if your site is not fully on HTTPS!
    # add_header Strict-Transport-Security "max-age=63072000; includeSubDomains" preload; always;

    # [EDIT] If you are using multiple languages.
    # rewrite ^/fr$ /fr/ redirect;
    # rewrite ^/fr/(.*) /$1;

    # Images.
    rewrite ^/(\d)(-[\w-]+)?/.+\.jpg$ /img/p/$1/$1$2.jpg last;
    rewrite ^/(\d)(\d)(-[\w-]+)?/.+\.jpg$ /img/p/$1/$2/$1$2$3.jpg last;
    rewrite ^/(\d)(\d)(\d)(-[\w-]+)?/.+\.jpg$ /img/p/$1/$2/$3/$1$2$3$4.jpg last;
    rewrite ^/(\d)(\d)(\d)(\d)(-[\w-]+)?/.+\.jpg$ /img/p/$1/$2/$3/$4/$1$2$3$4$5.jpg last;
    rewrite ^/(\d)(\d)(\d)(\d)(\d)(-[\w-]+)?/.+\.jpg$ /img/p/$1/$2/$3/$4/$5/$1$2$3$4$5$6.jpg last;
    rewrite ^/(\d)(\d)(\d)(\d)(\d)(\d)(-[\w-]+)?/.+\.jpg$ /img/p/$1/$2/$3/$4/$5/$6/$1$2$3$4$5$6$7.jpg last;
    rewrite ^/(\d)(\d)(\d)(\d)(\d)(\d)(\d)(-[\w-]+)?/.+\.jpg$ /img/p/$1/$2/$3/$4/$5/$6/$7/$1$2$3$4$5$6$7$8.jpg last;
    rewrite ^/(\d)(\d)(\d)(\d)(\d)(\d)(\d)(\d)(-[\w-]+)?/.+\.jpg$ /img/p/$1/$2/$3/$4/$5/$6/$7/$8/$1$2$3$4$5$6$7$8$9.jpg last;
    rewrite ^/c/([\w.-]+)/.+\.jpg$ /img/c/$1.jpg last;

    # AlphaImageLoader for IE and FancyBox.
    rewrite ^images_ie/?([^/]+)\.(gif|jpe?g|png)$ js/jquery/plugins/fancybox/images/$1.$2 last;

    # Web service API.
    rewrite ^/api/?(.*)$ /webservice/dispatcher.php?url=$1 last;

    # Installation sandbox.
    rewrite ^(/install(?:-dev)?/sandbox)/.* /$1/test.php last;

    location / {
        try_files $uri $uri/ /index.php$is_args$args;
    }

    # [EDIT] Replace 'admin-dev' in this block with the name of your admin directory.
    location /admin-dev/ {
        if (!-e $request_filename) {
            rewrite ^ /admin-dev/index.php last;
        }
    }

    # .htaccess, .DS_Store, .htpasswd, etc.
    location ~ /\. {
        deny all;
    }

    # Source code directories.
    location ~ ^/(app|bin|cache|classes|config|controllers|docs|localization|override|src|tests|tools|translations|var|vendor)/ {
        deny all;
    }

    # vendor in modules directory.
    location ~ ^/modules/.*/vendor/ {
        deny all;
    }

    # Prevent exposing other sensitive files.
    location ~ \.(log|tpl|twig|sass|yml)$ {
        deny all;
    }

    # Prevent injection of PHP files.
    location /img {
        location ~ \.php$
        { deny all; }
    }

    location /upload {
        location ~ \.php$
        { deny all; }
    }

    # enable browser caching
    location ~* \.(?:css|eot|gif|ico|jpe?g|otf|png|ttf|woff2?)$ {
        expires 1M;
        add_header Cache-Control "public";
    }

    location ~ [^/]\.php(/|$) {
        # Split $uri to $fastcgi_script_name and $fastcgi_path_info.
        fastcgi_split_path_info ^(.+?\.php)(/.*)$;

        # Ensure that the requested PHP script exists before passing it
        # to the PHP-FPM.
        try_files $fastcgi_script_name =404;

        # Environment variables for PHP.
        include fastcgi_params;
        fastcgi_param SCRIPT_FILENAME $request_filename;

        fastcgi_index index.php;

        fastcgi_keep_conn on;
        fastcgi_read_timeout 30s;
        fastcgi_send_timeout 30s;

        # Uncomment these in case of long loading or 502/504 errors.
        # fastcgi_buffer_size 256k;
        # fastcgi_buffers 256 16k;
        # fastcgi_busy_buffers_size 256k;

        # [EDIT] Connection to PHP-FPM unix domain socket.
        fastcgi_pass unix:/run/php-fpm/www.sock;
    }

    # enable gzip compression
    gzip on;
    gzip_disable "msie6";

    gzip_vary on;
    gzip_proxied any;
    gzip_comp_level 6;
    gzip_min_length 1000;
    gzip_types
        application/atom+xml
        application/geo+json
        application/javascript
        application/json
        application/ld+json
        application/manifest+json
        application/rdf+xml
        application/rss+xml
        application/x-javascript
        application/xhtml+xml
        application/xml
        font/eot
        font/otf
        font/ttf
        image/svg+xml
        text/css
        text/javascript
        text/plain
        text/xml;
}

# enforce HTTPS
server {
    listen 80;
    listen [::]:80;
    server_name  prestashop.example.com;
    return 301   https://$host$request_uri;
}
按 Ctrl + X 并在提示时输入 Y 保存文件。
验证你的 Nginx 配置。
$ sudo nginx -t
重启 Nginx 服务器。
$ sudo systemctl restart nginx
第 11 步 - 安装 PrestaShop
在浏览器中访问 URL https://prestashop.example.com,你将看到如下安装界面。
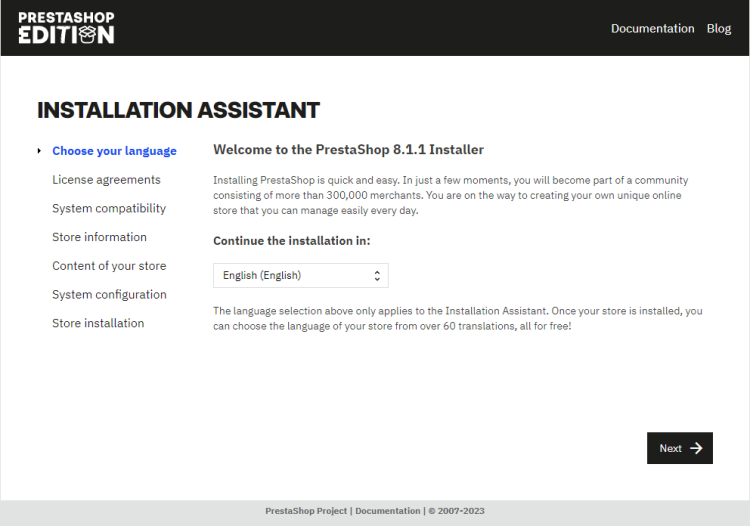
点击“下一步(Next)”进入下一页。
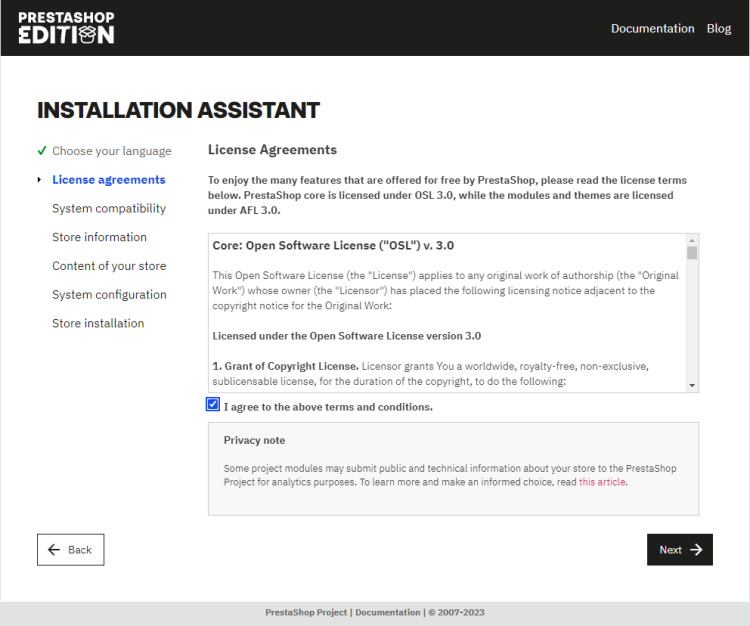
系统会显示 PrestaShop 许可证。勾选“我同意上述条款和条件(I agree to the above terms and conditions)”按钮以同意许可协议,然后点击“下一步(Next)”继续。
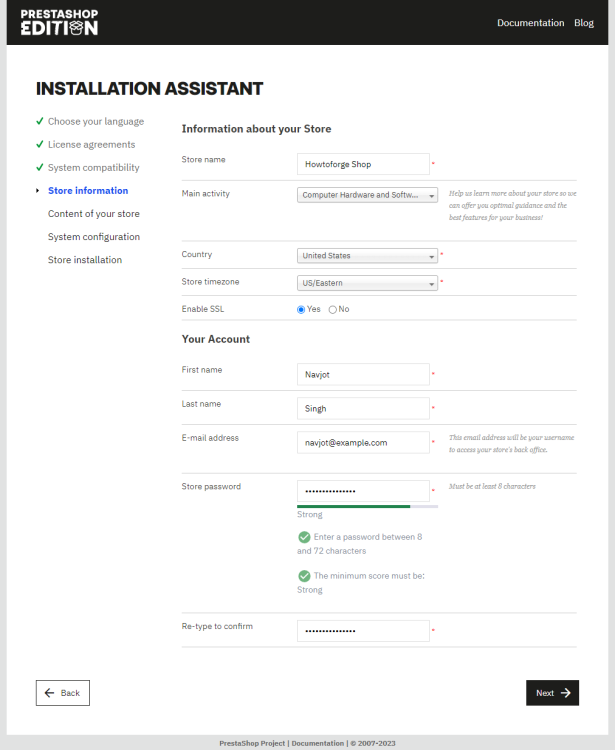
接下来,系统会要求你填写店铺信息。为你的店铺设置名称、国家/地区、时区和店铺类型,并启用 SSL 选项。同时输入用于登录店铺的账户名、邮箱地址和密码。填写完成后点击“下一步(Next)”。
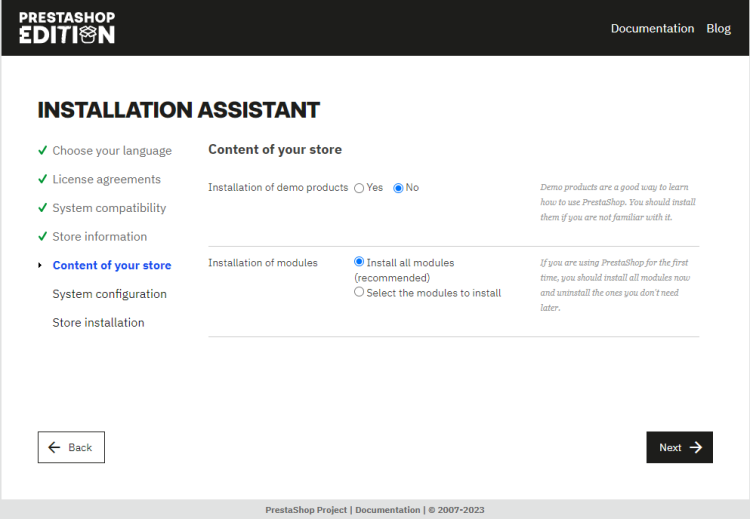
接下来,系统会询问你是否要向店铺添加一些演示商品。如果不需要,请选择“否”。同时,选择“安装所有模块(Install all modules)”选项,或者你也可以自行选择要安装的模块。完成后点击“下一步(Next)”。
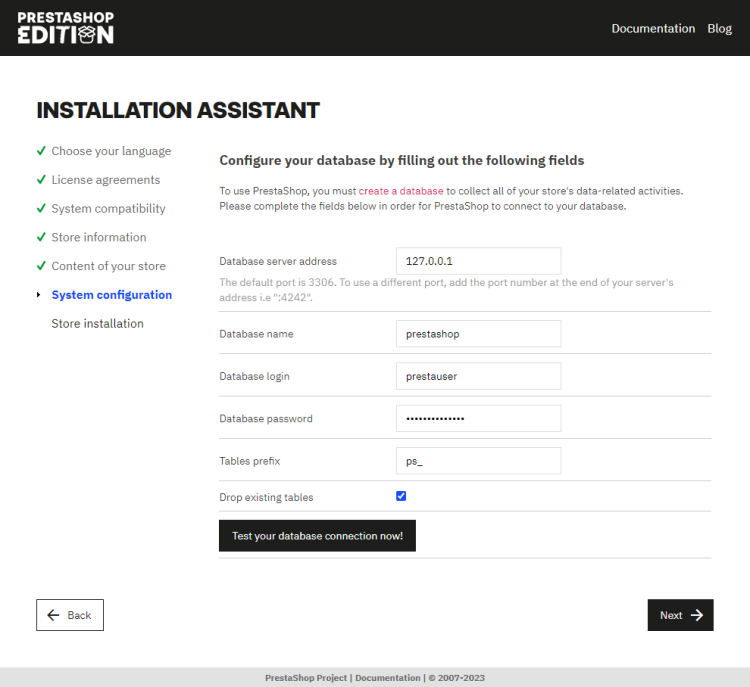
接下来,输入我们在第 5 步创建的数据库凭据。其他选项保持默认。点击“测试数据库(Test database)”选项以验证连接。
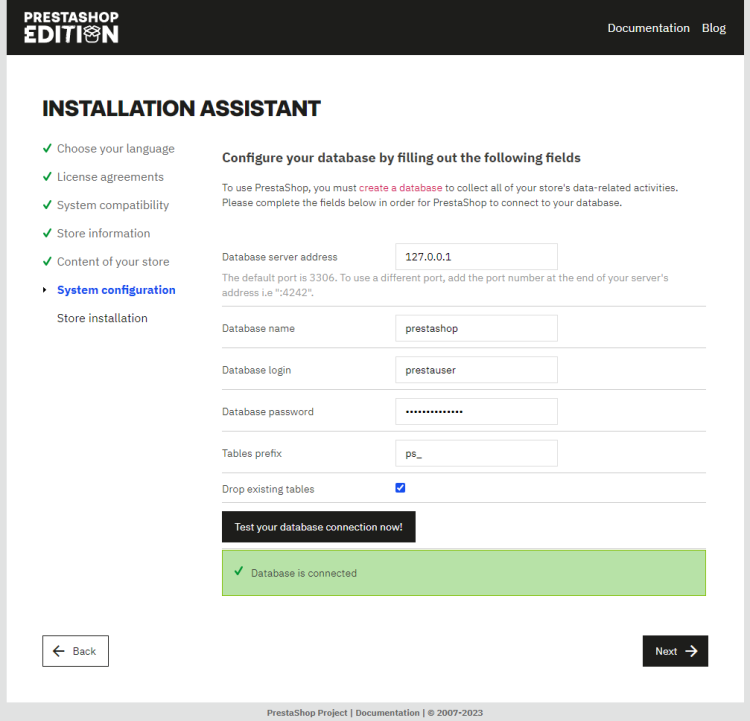
数据库连接成功后,点击“下一步(Next)”进入下一页。
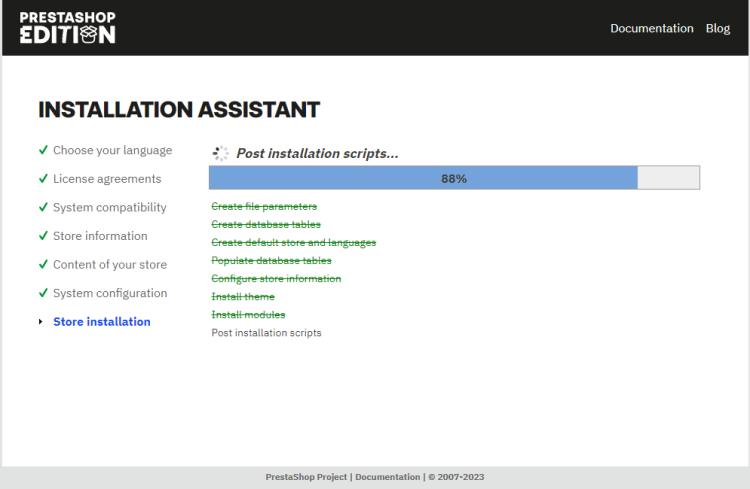
在此你将看到 PrestaShop 的安装进度。完成后,它会自动打开如下页面。
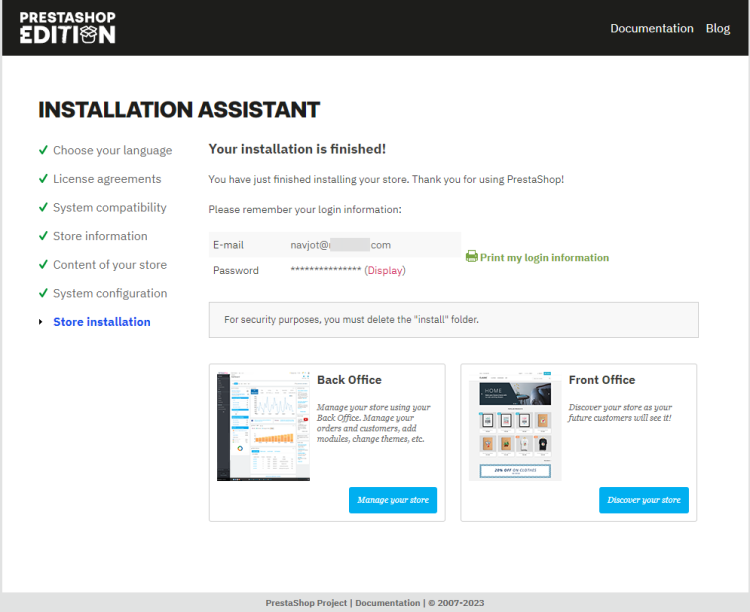
点击“管理你的店铺(Manage your store)”按钮,打开管理后台以设置你的店铺。
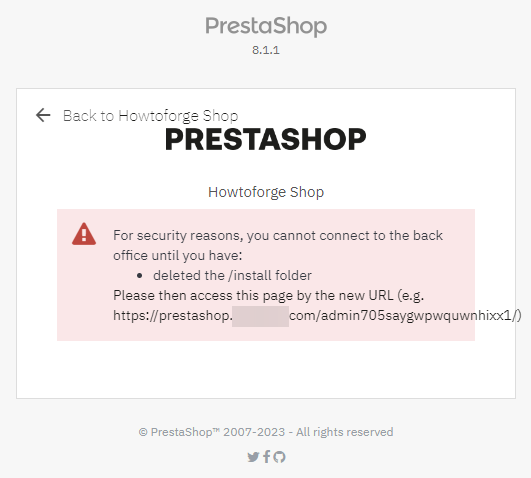
在此你会收到一条安全警告,提示在管理店铺前应先删除 install 目录以提升安全性。请通过 SSH 重新登录你的服务器并运行以下命令。
$ sudo rm -rf /var/www/html/petrashop/install
返回安装程序的最后一页并再次打开该 URL。你会发现,管理页面的 URL 是随机生成的。这样做是为了提升安全性。每次 PrestaShop 安装都会获得一个不同的管理员 URL。在本教程中,生成的链接为 https://prestashop.example.com/admin705saygwpwquwnhixx1。你将看到如下登录页面。
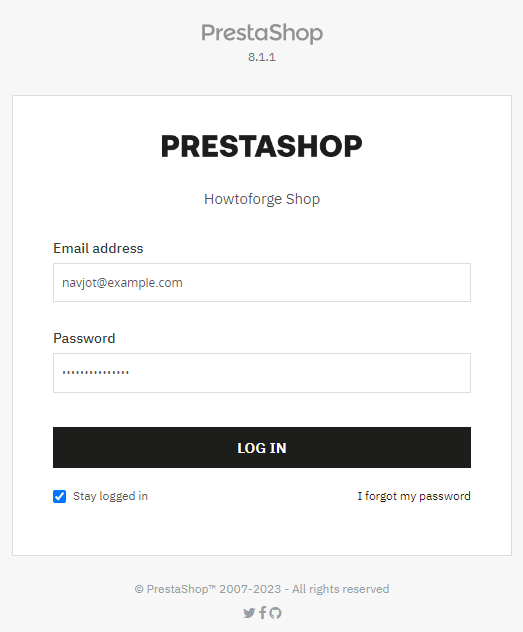
输入你的账户凭据并点击“登录(LOG IN)”按钮以进入后台。
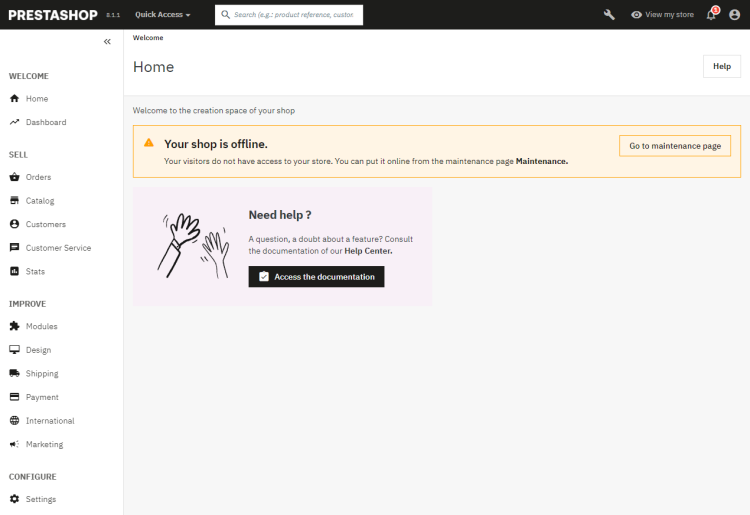
默认安装的 PrestaShop 店铺页面应如下所示。

从现在起,你就可以开始使用 PrestaShop 了。
第 12 步 - 更新 PrestaShop
更新 PrestaShop 有多种方式。最简单的是使用内置的升级助手模块。你的 PrestaShop 安装自带该模块。
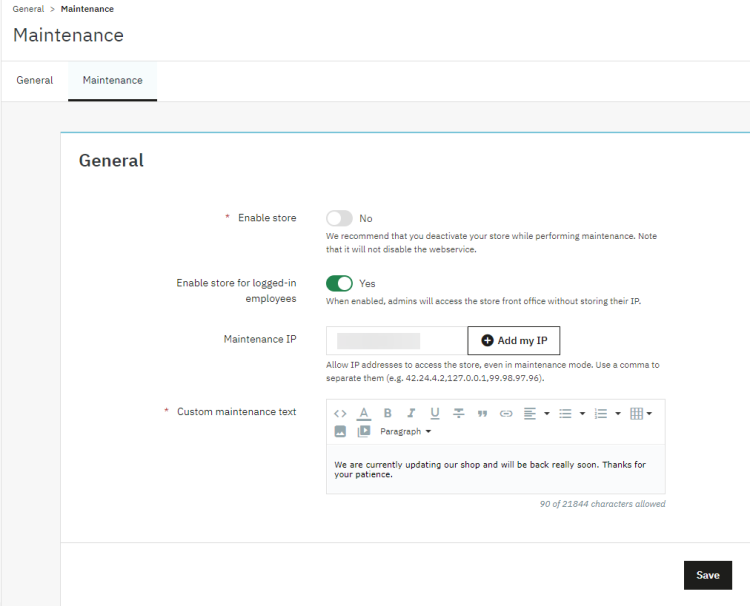
第一步是将你的店铺设置为维护模式。在管理页面的左侧菜单中点击“配置(Configure)>> 商店参数(Shop Parameters)>> 常规(General)”选项,然后切换到页面上的“维护(maintenance)”标签页。
禁用店铺,并通过点击“添加我的 IP(Add my IP)”按钮将你的 IP 地址添加为维护 IP。这样可以确保即使在维护期间你也能访问店铺。完成后点击“保存(Save)”按钮。
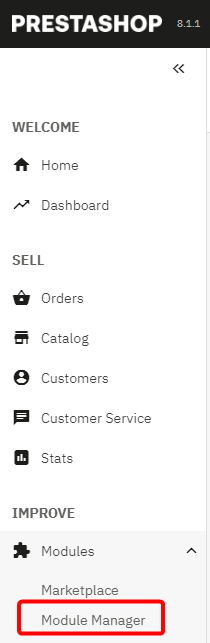
接下来,在管理面板的左侧选择“改进(Improve)>> 模块(Modules)>> 模块管理器(Module Manager)”选项,打开模块管理器页面。
进入该页面后,点击“安装(Install)”按钮安装“1-Click Upgrade(一键升级)”模块。安装完成后,点击“配置(Configure)”按钮打开一个新页面,在其中进行升级前的设置。
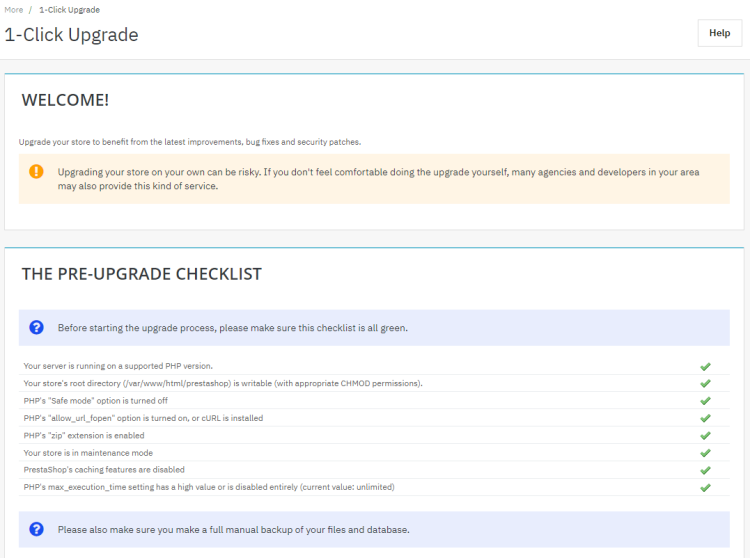
页面的第一部分列出了一些升级前的检查项。在执行升级前,所有这些检查都应通过。
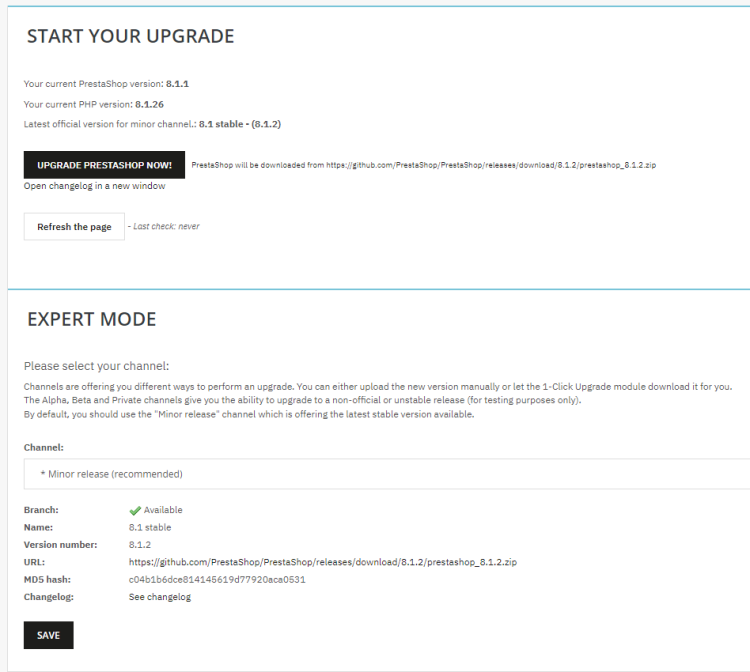
第一项配置允许你选择要运行何种类型的升级。由于我们使用的是基础版 8.1.1,可供升级的开源版本为 8.1.2。建议保持在次版本/主版本分支(minor/major branches)内。
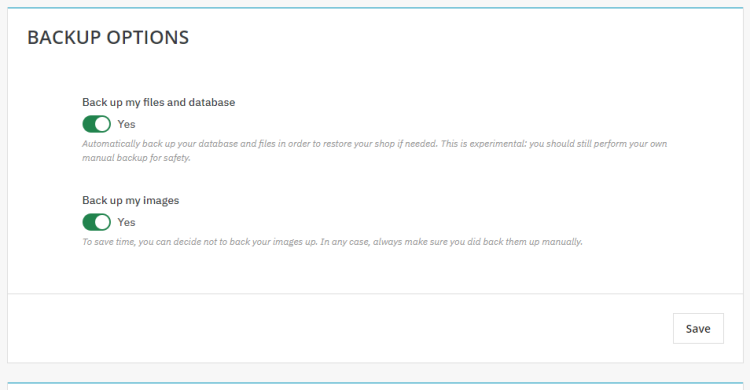
向下滚动页面到“备份(Backup)”选项,你可以在此处选择让 PrestaShop 备份文件、数据库和图片。这些功能仍处于实验阶段,但你仍应包含它们。
接下来,选择升级选项中你希望保留的内容以及希望升级的内容。
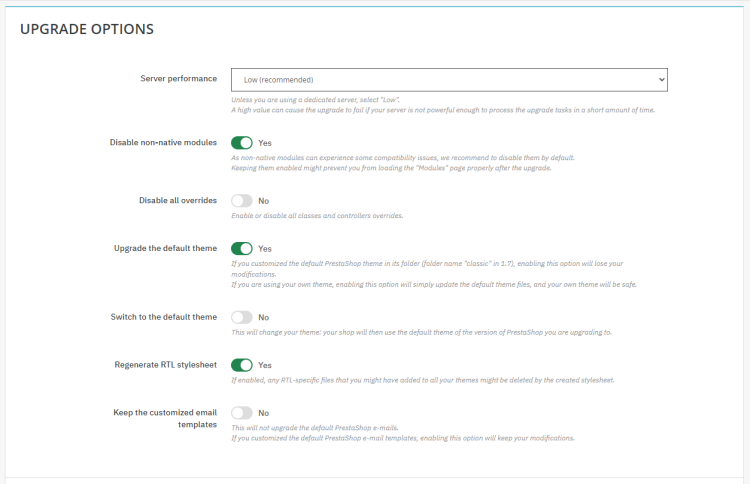
在各部分点击“保存(Save)”按钮以保存选项。确认无误后,点击同一页面上的“立即升级 PrestaShop(Upgrade Prestashop Now!)”按钮来升级你的店铺。如果升级因某种原因失败,你将有机会进行回滚。
总结
本教程到此结束,你已学会如何在 Rocky Linux 9 服务器上安装 PrestaShop。如果你有任何疑问,请在下方评论区留言。