
本页内容
- 准备工作
- 安装 Apache Web 服务器
- 修改 Apache 默认端口
- 安装 Nginx Web 服务器
- 将 Nginx 配置为 Apache 的反向代理
- 验证反向代理
- 总结
Apache 和 Nginx 都是免费的、开源的,并且是全球最流行的 Web 服务器之一。它们常被用于托管基于 PHP 的应用程序。Nginx 以其轻量化的架构和速度著称,而 Apache 则以其性能闻名。两者被设计用于处理不同的工作负载。Nginx 非常适合处理静态内容,而 Apache 则能很好地处理动态内容。我们可以在同一台系统上同时使用这两个 Web 服务器,从而兼得二者之长。
本文将向您展示如何在 Ubuntu 22.04 上将 Nginx 配置为 Apache 的反向代理。
准备工作
- 一台运行 Ubuntu 22.04 的服务器。
- 一个指向您服务器 IP 的有效域名。
- 服务器上已配置 root 密码。
安装 Apache Web 服务器
Apache Web 服务器软件包默认已包含在 Ubuntu 22.04 的默认软件源中。您可以通过运行以下命令进行安装:
apt-get install apache2 -yApache 软件包安装完成后,启动 Apache 服务并将其设置为开机自启:
systemctl start apache2
systemctl enable apache2
修改 Apache 默认端口
默认情况下,Apache Web 服务器监听 80 端口。在本文中,我们将使用 Nginx 作为 Apache 的反向代理。因此,您需要将 Apache 的默认端口修改为 8080。您可以通过编辑以下文件来完成修改:
nano /etc/apache2/ports.conf找到以下行:
Listen 80
并将其替换为以下行:
Listen 127.0.0.1:8080
完成后保存并关闭文件。接下来,您还需要编辑 Apache 默认的虚拟主机配置文件,并修改默认端口。
您可以使用以下命令进行编辑:
nano /etc/apache2/sites-available/000-default.conf找到以下行:
<VirtualHost *:80>
并将其替换为以下行:
<VirtualHost 127.0.0.1:8080>
保存并关闭文件,然后重启 Apache 服务以使更改生效。
systemctl restart apache2您现在可以使用以下命令检查 Apache 的状态:
systemctl status apache2您将看到类似以下的输出:
? apache2.service - The Apache HTTP Server
     Loaded: loaded (/lib/systemd/system/apache2.service; enabled; vendor preset: enabled)
     Active: active (running) since Thu 2022-05-05 12:02:11 UTC; 7s ago
       Docs: https://httpd.apache.org/docs/2.4/
    Process: 25295 ExecStart=/usr/sbin/apachectl start (code=exited, status=0/SUCCESS)
   Main PID: 25299 (apache2)
      Tasks: 6 (limit: 4630)
     Memory: 20.5M
        CPU: 126ms
     CGroup: /system.slice/apache2.service
             ??25299 /usr/sbin/apache2 -k start
             ??25300 /usr/sbin/apache2 -k start
             ??25301 /usr/sbin/apache2 -k start
             ??25302 /usr/sbin/apache2 -k start
             ??25303 /usr/sbin/apache2 -k start
             ??25304 /usr/sbin/apache2 -k start

May 05 12:02:11 ubuntu2204 systemd[1]: Starting The Apache HTTP Server...
此时,Apache 已启动并监听 8080 端口。您可以使用以下命令进行确认:
ss -antpl | grep apache2您将看到类似以下的输出:
LISTEN 0 511 127.0.0.1:8080 0.0.0.0:* users:(("apache2",pid=25304,fd=3),("apache2",pid=25303,fd=3),("apache2",pid=25302,fd=3),("apache2",pid=25301,fd=3),("apache2",pid=25300,fd=3),("apache2",pid=25299,fd=3))
安装 Nginx Web 服务器
您可以通过运行以下命令安装 Nginx 软件包:
apt-get install nginx -yNginx 软件包安装完成后,启动 Nginx 服务并将其设置为开机自启:
systemctl start nginx
systemctl enable nginx
将 Nginx 配置为 Apache 的反向代理
现在,您需要将 Nginx 配置为反向代理,以便将 80 端口上的所有请求转发到 Apache Web 服务器的 8080 端口。
为此,请创建一个 Nginx 虚拟主机配置文件:
nano /etc/nginx/conf.d/proxy.conf添加以下行:
server {
   listen 80;

   root /var/www/html/;
   index index.html index.htm;

   server_name proxy.example.com;

   location \ {

   proxy_set_header X-Real-IP $remote_addr;
   proxy_set_header X-Forwarded-For $remote_addr;
   proxy_set_header Host $host;
   proxy_pass http://127.0.0.1:8080;
}

}
完成后保存并关闭文件。然后,使用以下命令检查 Nginx 是否存在语法错误:
nginx -t您将看到类似以下的输出:
nginx: the configuration file /etc/nginx/nginx.conf syntax is ok
nginx: configuration file /etc/nginx/nginx.conf test is successful
接下来,重启 Nginx 服务以使更改生效:
systemctl restart nginx您也可以使用以下命令查看 Nginx 的状态:
systemctl status nginx您将看到类似以下的输出:
? nginx.service - A high performance web server and a reverse proxy server
     Loaded: loaded (/lib/systemd/system/nginx.service; enabled; vendor preset: enabled)
     Active: active (running) since Thu 2022-05-05 12:03:09 UTC; 5s ago
       Docs: man:nginx(8)
    Process: 25313 ExecStartPre=/usr/sbin/nginx -t -q -g daemon on; master_process on; (code=exited, status=0/SUCCESS)
    Process: 25314 ExecStart=/usr/sbin/nginx -g daemon on; master_process on; (code=exited, status=0/SUCCESS)
   Main PID: 25315 (nginx)
      Tasks: 3 (limit: 4630)
     Memory: 3.3M
        CPU: 49ms
     CGroup: /system.slice/nginx.service
             ??25315 "nginx: master process /usr/sbin/nginx -g daemon on; master_process on;"
             ??25316 "nginx: worker process" "" "" "" "" "" "" "" "" "" "" "" "" "" "" "" "" "" "" "" "" "" "" "" "" "" "" ""
             ??25317 "nginx: worker process" "" "" "" "" "" "" "" "" "" "" "" "" "" "" "" "" "" "" "" "" "" "" "" "" "" "" ""

May 05 12:03:09 ubuntu2204 systemd[1]: Starting A high performance web server and a reverse proxy server...
May 05 12:03:09 ubuntu2204 systemd[1]: Started A high performance web server and a reverse proxy server.
验证反向代理
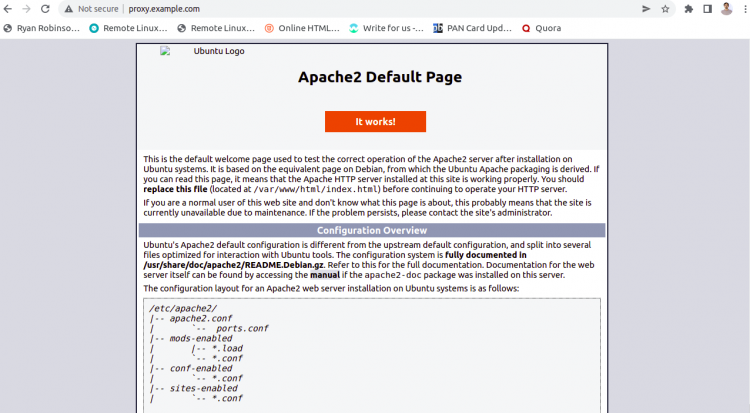
至此,Nginx 已安装并配置为 Apache Web 服务器的反向代理。您现在可以使用 URL http://proxy.example.com 对其进行测试。如果一切正常,您将在以下界面看到 Apache 的测试页面:
总结
本指南介绍了如何将 Nginx 安装并配置为 Apache Web 服务器的反向代理。您现在可以利用该配置在 Internet 上托管任何应用程序。如果您有任何疑问,欢迎随时向我提问。