
本页内容
- 准备工作
- 第 1 步 - 配置防火墙
- 第 2 步 - 安装 Nginx
- 第 3 步 - 安装 PHP
- 第 4 步 - 安装 Composer
- 第 5 步 - 安装 MariaDB
- 第 6 步 - 配置 MariaDB
- 第 7 步 - 安装 Flarum
- 第 8 步 - 安装 SSL
- 第 9 步 - 配置 PHP-FPM
- 第 10 步 - 配置 Nginx
- 第 11 步 - 访问并完成 Flarum 安装、启用 2FA、配置邮件设置
- 第 12 步 - 更新 Flarum
- 第 12 步 - 备份与恢复 Flarum
- 结语
- 启用 2FA
- 配置邮件设置
Flarum 是一款开源的讨论软件,是 esoTalk 与 FluxBB 论坛的联合继承者。它使用 PHP 编写,其界面由轻量级的 JavaScript 框架 Mithril 驱动。它具有响应式、快速的特点,并通过强大的 Extension API 支持扩展。它同样非常轻量,因此可以在配置相对较低的服务器上运行。
在本教程中,我们将学习如何在基于 Ubuntu 24.04 的服务器上安装 Flarum 社区论坛软件。
准备工作
- 一台运行 Ubuntu 24.04 的服务器。
- 一个具有 sudo 权限的非 root 用户。
- 一个指向你服务器的完全限定域名(FQDN),例如 flarum.example.com。
- 如果你的服务器只有 1GB 内存,请确保已启用 swap 交换空间。
- 确保系统已更新。 $ sudo apt update && sudo apt upgrade
- 本教程和 Flarum 的运行需要一些必需的软件包。其中部分软件包可能已存在于你的服务器上。 $ sudo apt install wget curl nano ufw software-properties-common dirmngr apt-transport-https gnupg2 ca-certificates lsb-release ubuntu-keyring unzip -y
一台运行 Ubuntu 24.04 的服务器。
一个具有 sudo 权限的非 root 用户。
一个指向你服务器的完全限定域名(FQDN),例如 flarum.example.com。
如果你的服务器只有 1GB 内存,请确保已启用 swap 交换空间。
确保系统已更新。
$ sudo apt update && sudo apt upgrade
本教程和 Flarum 的运行需要一些必需的软件包。其中部分软件包可能已存在于你的服务器上。
$ sudo apt install wget curl nano ufw software-properties-common dirmngr apt-transport-https gnupg2 ca-certificates lsb-release ubuntu-keyring unzip -y
第 1 步 - 配置防火墙
第一步是配置防火墙。Debian 默认自带 ufw(Uncomplicated Firewall,简易防火墙)。
检查防火墙是否正在运行。
$ sudo ufw status
你将看到如下输出。
Status: inactive
放行 SSH 端口,以免启用防火墙后中断当前连接。
$ sudo ufw allow OpenSSH
同时放行 HTTP 和 HTTPS 端口。
$ sudo ufw allow http
$ sudo ufw allow https
启用防火墙
$ sudo ufw enable
Command may disrupt existing ssh connections. Proceed with operation (y|n)? y
Firewall is active and enabled on system startup
再次检查防火墙的状态。
$ sudo ufw status
你应该会看到类似的输出。
Status: active

To                         Action      From
--                         ------      ----
OpenSSH                    ALLOW       Anywhere
80/tcp                     ALLOW       Anywhere
443                        ALLOW       Anywhere
OpenSSH (v6)               ALLOW       Anywhere (v6)
80/tcp (v6)                ALLOW       Anywhere (v6)
443 (v6)                   ALLOW       Anywhere (v6)
第 2 步 - 安装 Nginx
Ubuntu 24.04 自带的 Nginx 版本较旧。要安装最新版本,你需要添加官方的 Nginx 软件源。
导入 Nginx 的签名密钥。
$ curl https://nginx.org/keys/nginx_signing.key | gpg --dearmor \
    | sudo tee /usr/share/keyrings/nginx-archive-keyring.gpg >/dev/null
添加 Nginx 稳定版的软件源。
$ echo "deb [signed-by=/usr/share/keyrings/nginx-archive-keyring.gpg] \
http://nginx.org/packages/ubuntu `lsb_release -cs` nginx" \
    | sudo tee /etc/apt/sources.list.d/nginx.list
配置软件源优先级(pinning),使官方软件源优先于 Ubuntu 自带的软件包。
echo -e "Package: *\nPin: origin nginx.org\nPin: release o=nginx\nPin-Priority: 900\n" \
    | sudo tee /etc/apt/preferences.d/99nginx
更新系统软件源。
$ sudo apt update
安装 Nginx。
$ sudo apt install nginx
验证安装。
$ nginx -v
nginx version: nginx/1.26.1
启动 Nginx 服务。
$ sudo systemctl start nginx
检查服务状态。
$ sudo systemctl status nginx
? nginx.service - nginx - high performance web server
     Loaded: loaded (/usr/lib/systemd/system/nginx.service; enabled; preset: enabled)
     Active: active (running) since Mon 2024-06-03 10:41:52 UTC; 2s ago
       Docs: https://nginx.org/en/docs/
    Process: 1817 ExecStart=/usr/sbin/nginx -c /etc/nginx/nginx.conf (code=exited, status=0/SUCCESS)
   Main PID: 1818 (nginx)
      Tasks: 3 (limit: 4543)
     Memory: 2.9M (peak: 3.1M)
        CPU: 15ms
     CGroup: /system.slice/nginx.service
             ??1818 "nginx: master process /usr/sbin/nginx -c /etc/nginx/nginx.conf"
             ??1819 "nginx: worker process"
             ??1820 "nginx: worker process"

Jun 03 10:41:52 flarum systemd[1]: Starting nginx.service - nginx - high performance web server...
Jun 03 10:41:52 flarum systemd[1]: Started nginx.service - nginx - high performance web server.
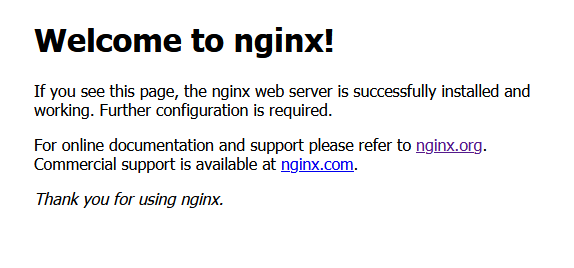
在你的浏览器中打开服务器的 IP 地址。你应该会看到如下页面,这表示你的服务器已正常启动并运行。
第 3 步 - 安装 PHP
Ubuntu 24.04 默认自带 PHP 8.3。你可以通过运行以下命令来安装它。
$ sudo apt install php-cli php-fpm php-mysql php-xml php-gd php-json php-mbstring php-zip php-curl -y
如果你想始终使用最新版本的 PHP,或者想安装多个版本的 PHP,可以添加 Ondrej 的 PHP 软件源。
添加 Ondrej Sury 的 PHP 软件源。
$ sudo add-apt-repository ppa:ondrej/php
更新系统软件源列表。
$ sudo apt update
你可以忽略以下错误。Launchpad 尚不支持 Ubuntu 24.04 所需的更强加密算法。该提示应该很快就会消失。
接下来,安装 PHP 以及 Flarum 所需的扩展。
$ sudo apt install php8.3-cli php8.3-fpm php8.3-mysql php8.3-xml php8.3-gd php8.3-mbstring php8.3-zip php8.3-curl -y
检查 PHP 是否正常工作。
$ php --version
你应该会看到类似的输出。
PHP 8.3.7 (cli) (built: May 23 2024 12:36:54) (NTS)
Copyright (c) The PHP Group
Zend Engine v4.3.7, Copyright (c) Zend Technologies
    with Zend OPcache v8.3.7, Copyright (c), by Zend Technologies
第 4 步 - 安装 Composer
Composer 是 PHP 的依赖管理器。Flarum 需要 Composer 来安装其运行所需的各种组件。
运行以下命令来安装 Composer。首先,我们获取安装脚本,并通过校验哈希值来验证它,然后使用 PHP 命令行运行安装脚本。之后,我们将二进制文件移动到 /usr/local/bin 目录。
$ php -r "copy('https://getcomposer.org/installer', 'composer-setup.php');"
$ php -r "if (hash_file('sha384', 'composer-setup.php') === 'dac665fdc30fdd8ec78b38b9800061b4150413ff2e3b6f88543c636f7cd84f6db9189d43a81e5503cda447da73c7e5b6') { echo 'Installer verified'; } else { echo 'Installer corrupt'; unlink('composer-setup.php'); } echo PHP_EOL;"
$ php composer-setup.php
$ php -r "unlink('composer-setup.php');"
$ sudo mv composer.phar /usr/local/bin/composer
检查 Composer 是否安装正确。
$ composer --version
Composer version 2.7.6 2024-05-04 23:03:15
PHP version 8.3.7 (/usr/bin/php8.3)
Run the "diagnose" command to get more detailed diagnostics output.
第 5 步 - 安装 MariaDB
MariaDB 是 MySQL 的替代品(drop-in replacement),这意味着运行和管理 MariaDB 的命令与 MySQL 相同。
Ubuntu 24.04 默认自带 MariaDB 10.11.7,该版本稍显过时。你需要使用官方软件源来获取最新稳定版的 MariaDB。MariaDB 下载页面上并未列出 Ubuntu 24.04 的官方软件源,但在撰写本教程时它仍然可用。
导入 MariaDB 的 GPG 密钥。
$ sudo curl -o /etc/apt/keyrings/mariadb-keyring.pgp 'https://mariadb.org/mariadb_release_signing_key.pgp'
创建 MariaDB 的软件源文件。
$ echo "deb [signed-by=/etc/apt/keyrings/mariadb-keyring.pgp] https://deb.mariadb.org/10.11/ubuntu `lsb_release -cs` main" | sudo tee /etc/apt/sources.list.d/mariadb-server.list
更新系统软件源列表。
$ sudo apt update
执行以下命令来安装 MariaDB 服务器。
$ sudo apt install mariadb-server -y
检查 MariaDB 是否安装正确。
$ mysql --version
你应该会看到如下输出。
mysql Ver 15.1 Distrib 10.11.8-MariaDB, for debian-linux-gnu (x86_64) using EditLine wrapper
你也可以使用 mariadb --version 来查看版本。
MariaDB 服务默认已启用并正在运行。使用以下命令检查其状态。
$ sudo systemctl status mariadb
? mariadb.service - MariaDB 10.11.8 database server
     Loaded: loaded (/usr/lib/systemd/system/mariadb.service; enabled; preset: enabled)
    Drop-In: /etc/systemd/system/mariadb.service.d
             ??migrated-from-my.cnf-settings.conf
     Active: active (running) since Mon 2024-06-03 11:31:09 UTC; 27s ago
       Docs: man:mariadbd(8)
             https://mariadb.com/kb/en/library/systemd/
    Process: 14981 ExecStartPre=/usr/bin/install -m 755 -o mysql -g root -d /var/run/mysqld (code=exited, status=0/SUCCESS)
    Process: 14983 ExecStartPre=/bin/sh -c systemctl unset-environment _WSREP_START_POSITION (code=exited, status=0/SUCCESS)
    Process: 14985 ExecStartPre=/bin/sh -c [ ! -e /usr/bin/galera_recovery ] && VAR= ||   VAR=`cd /usr/bin/..; /usr/bin/galera_recovery`; [ $? -eq 0 ]   && systemctl set-environment _WSREP_START_POSITION=$VAR ||>    Process: 15029 ExecStartPost=/bin/sh -c systemctl unset-environment _WSREP_START_POSITION (code=exited, status=0/SUCCESS)
    Process: 15032 ExecStartPost=/etc/mysql/debian-start (code=exited, status=0/SUCCESS)
   Main PID: 15015 (mariadbd)
     Status: "Taking your SQL requests now..."
      Tasks: 14 (limit: 29985)
     Memory: 78.9M (peak: 81.8M)
        CPU: 559ms
     CGroup: /system.slice/mariadb.service
             ??15015 /usr/sbin/mariadbd
运行以下命令执行默认安全配置,例如设置 root 密码、删除匿名用户、禁止 root 远程登录以及移除测试表。
$ sudo mariadb-secure-installation
系统会提示你输入 root 密码。由于我们尚未设置 root 密码,直接按 Enter 键继续即可。
NOTE: RUNNING ALL PARTS OF THIS SCRIPT IS RECOMMENDED FOR ALL MariaDB
      SERVERS IN PRODUCTION USE!  PLEASE READ EACH STEP CAREFULLY!

In order to log into MariaDB to secure it, we'll need the current
password for the root user. If you've just installed MariaDB, and
haven't set the root password yet, you should just press enter here.

Enter current password for root (enter for none): [PRESS ENTER]
OK, successfully used password, moving on...
接下来,系统会询问你是否要切换到 unix_socket 插件。unix_socket 插件允许你使用 Linux 用户凭据登录 MariaDB。由于我们已有受保护的 root 账户,输入 n 跳过切换。
Setting the root password or using the unix_socket ensures that nobody
can log into the MariaDB root user without the proper authorisation.

You already have your root account protected, so you can safely answer 'n'.

Switch to unix_socket authentication [Y/n] n
 ... skipping.
接下来,系统会询问你是否要修改 root 密码。在 Ubuntu 24.04 上,MariaDB 的 root 账户与自动化系统维护紧密相关,因此不应更改该账户已配置的认证方式。否则,软件包更新可能会因移除对管理员账户的访问权限而导致数据库系统损坏。输入 n 继续。
You already have your root account protected, so you can safely answer 'n'.

Change the root password? [Y/n] n
 ... skipping.
此后,对所有问题按 y 然后回车,接受默认设置。这将移除对匿名用户和测试数据库的访问权限,禁用 root 远程登录,并加载更改。
By default, a MariaDB installation has an anonymous user, allowing anyone
to log into MariaDB without having to have a user account created for
them.  This is intended only for testing, and to make the installation
go a bit smoother.  You should remove them before moving into a
production environment.

Remove anonymous users? [Y/n] y
 ... Success!

Normally, root should only be allowed to connect from 'localhost'.  This
ensures that someone cannot guess at the root password from the network.

Disallow root login remotely? [Y/n] y
 ... Success!

By default, MariaDB comes with a database named 'test' that anyone can
access.  This is also intended only for testing, and should be removed
before moving into a production environment.

Remove test database and access to it? [Y/n] y
 - Dropping test database...
 ... Success!
 - Removing privileges on test database...
 ... Success!

Reloading the privilege tables will ensure that all changes made so far
will take effect immediately.

Reload privilege tables now? [Y/n] y
 ... Success!

Cleaning up...

All done!  If you've completed all of the above steps, your MariaDB
installation should now be secure.

Thanks for using MariaDB!
就这样。下次你想登录 MariaDB 命令行时,使用以下命令。
$ sudo mysql
在提示时输入你的 Linux root 密码。
Welcome to the MariaDB monitor.  Commands end with ; or \g.
Your MariaDB connection id is 37
Server version: 10.11.8-MariaDB-ubu2404 mariadb.org binary distribution

Copyright (c) 2000, 2018, Oracle, MariaDB Corporation Ab and others.

Type 'help;' or '\h' for help. Type '\c' to clear the current input statement.

MariaDB [(none)]>
输入 exit 退出 MariaDB 命令行。
第 6 步 - 配置 MariaDB
登录 MariaDB 命令行。
$ sudo mysql
为你的 Flarum 安装创建一个新的 MySQL 数据库、数据库用户和密码。
MariaDB> CREATE DATABASE flarum;
MariaDB> CREATE USER 'flarumuser'@'localhost' IDENTIFIED BY 'yourpassword';
MariaDB> GRANT ALL PRIVILEGES ON flarum.* TO 'flarumuser'@'localhost';
将 flarum、flarumuser 和 yourpassword 替换为你自行选择的凭据。请选择一个强密码。
同时,创建一个具有与 root 账户相同权限的管理员用户。
MariaDB> GRANT ALL ON *.* TO 'admin'@'localhost' IDENTIFIED BY 'password' WITH GRANT OPTION;
刷新权限,确保它们已保存到当前会话中。
MariaDB> FLUSH PRIVILEGES;
退出 MariaDB 命令行。
MariaDB> exit
第 7 步 - 安装 Flarum
创建一个用于存放 Flarum 的目录。
$ sudo mkdir /var/www/flarum -p
使用 -p 参数可以一并创建此前不存在的父目录。
将 Flarum 目录的所有权更改为当前登录的 Linux 用户,这样你就可以在不使用 sudo 的情况下执行命令。
$ sudo chown -R $USER:$USER /var/www/flarum
允许对该目录的写入权限。
$ sudo chmod 775 -R /var/www/flarum
进入安装目录。
$ cd /var/www/flarum
使用 Composer 下载并安装 Flarum。
$ composer create-project flarum/flarum .
将 Flarum 目录的所有权更改为 nginx,以便 Nginx 服务器使用。
$ sudo chown -R nginx:nginx /var/www/flarum
此后,Composer 将需要 sudo 权限才能运行,这并不推荐。你也可以使用 Composer 完成前将目录的组权限改为你的 Linux 用户,完成后再改回 nginx。这不是理想的方案,因为你需要重复执行相同的命令。更彻底的解决办法是将你的用户名加入 nginx 组。运行以下命令,将当前登录的 Linux 用户加入 nginx 组。
$ sudo usermod -a -G nginx $USER
要使新的组成员身份生效,请注销服务器后重新登录,或执行以下命令。
su - ${USER}
第 8 步 - 安装 SSL
我们需要安装 Certbot 来生成 SSL 证书。你既可以通过 Debian 的软件源安装 Certbot,也可以使用 Snapd 工具获取最新版本。我们将使用 Snapd 版本。Ubuntu 24.04 已预装 Snapd。
运行以下命令,确保你的 Snapd 版本是最新的。
$ sudo snap install core && sudo snap refresh core
安装 Certbot。
$ sudo snap install --classic certbot
使用以下命令,通过创建指向 /usr/bin 目录的符号链接,确保 Certbot 命令可以运行。
$ sudo ln -s /snap/bin/certbot /usr/bin/certbot
验证 Certbot 是否正常工作。
$ certbot --version
certbot 2.10.0
生成 SSL 证书。
$ sudo certbot certonly --nginx --agree-tos --no-eff-email --staple-ocsp --preferred-challenges http -m
[email protected]
 -d flarum.example.com
上述命令会将证书下载到服务器上的 /etc/letsencrypt/live/flarum.example.com 目录。
生成 Diffie-Hellman 组证书。
$ sudo openssl dhparam -dsaparam -out /etc/ssl/certs/dhparam.pem 4096
检查 Certbot 续期计划任务服务。
$ sudo systemctl list-timers
你会看到 snap.certbot.renew.service 是计划运行的服务之一。
NEXT                            LEFT LAST                           PASSED UNIT                           ACTIVATES
---------------------------------------------------------------------------------------------------------------------------------
Mon 2024-06-03 11:39:00 UTC      36s Mon 2024-06-03 11:09:06 UTC 29min ago phpsessionclean.timer          phpsessionclean.service
Mon 2024-06-03 13:09:56 UTC 1h 31min Mon 2024-06-03 10:34:09 UTC         - motd-news.timer                motd-news.service
Mon 2024-06-03 21:58:00 UTC      10h -                                   - snap.certbot.renew.timer       snap.certbot.renew.service
对续期过程进行一次演练(dry run),以检查 SSL 续期是否正常工作。
$ sudo certbot renew --dry-run
如果没有看到错误,说明一切就绪。你的证书将自动续期。
第 9 步 - 配置 PHP-FPM
打开文件 /etc/php/8.3/fpm/pool.d/www.conf。
$ sudo nano /etc/php/8.3/fpm/pool.d/www.conf
我们必须将 PHP 进程的 Unix 用户/组设置为 nginx。找到文件中的 user=www-data 和 group=www-data 两行,将其改为 nginx。
; Unix user/group of the child processes. This can be used only if the master
; process running user is root. It is set after the child process is created.
; The user and group can be specified either by their name or by their numeric
; IDs.
; Note: If the user is root, the executable needs to be started with
;       --allow-to-run-as-root option to work.
; Default Values: The user is set to master process running user by default.
;                 If the group is not set, the user's group is used.
user = nginx
group = nginx
...
找到文件中的 listen.owner = www-data 和 listen.group = www-data 两行,将其改为 nginx。
; Set permissions for unix socket, if one is used. In Linux, read/write
; permissions must be set in order to allow connections from a web server. Many
; BSD-derived systems allow connections regardless of permissions. The owner
; and group can be specified either by name or by their numeric IDs.
; Default Values: Owner is set to the master process running user. If the group
;                 is not set, the owner's group is used. Mode is set to 0660.
listen.owner = nginx
listen.group = nginx
按 Ctrl + X 保存文件,并在提示时输入 Y。
将文件上传大小上限提高到 8 MB。
$ sudo sed -i 's/upload_max_filesize = 2M/upload_max_filesize = 8M/' /etc/php/8.3/fpm/php.ini
重启 PHP-FPM 服务。
$ sudo systemctl restart php8.3-fpm
将 PHP 会话目录的组更改为 Nginx。
$ sudo chgrp -R nginx /var/lib/php/sessions
第 10 步 - 配置 Nginx
运行以下命令,为你的站点添加配置文件。
$ sudo nano /etc/nginx/conf.d/flarum.conf
在编辑器中粘贴以下代码。
server {
    listen [::]:80;
    listen 80;

    server_name flarum.example.com;

    # redirect http to https
    return 301 https://flarum.example.com$request_uri;
}

server {
    listen [::]:443 ssl;
    listen 443 ssl;

    http2 on;

    server_name flarum.example.com;

    access_log /var/log/nginx/flarum.access.log;
    error_log  /var/log/nginx/flarum.error.log;

    root /var/www/flarum/public;
    index index.php;

    include /var/www/flarum/.nginx.conf;

    client_max_body_size 8M;

    if ($host != "flarum.example.com") {
        return 301 $scheme://flarum.example.com$request_uri;
    }

    # SSL code
    ssl_certificate /etc/letsencrypt/live/flarum.example.com/fullchain.pem;
    ssl_certificate_key /etc/letsencrypt/live/flarum.example.com/privkey.pem;
    ssl_trusted_certificate /etc/letsencrypt/live/flarum.example.com/chain.pem;
    ssl_session_timeout 1d;
    ssl_session_cache shared:MozSSL:10m;
    ssl_session_tickets off;
    ssl_prefer_server_ciphers off;
    ssl_stapling on;
    ssl_stapling_verify on;
    ssl_dhparam /etc/ssl/certs/dhparam.pem;
    resolver 1.1.1.1 1.0.0.1 [2606:4700:4700::1111] [2606:4700:4700::1001] 8.8.8.8 8.8.4.4 [2001:4860:4860::8888] [2001:4860:4860::8844] valid=60s;
    resolver_timeout 2s;

    ssl_protocols TLSv1.2 TLSv1.3;
    ssl_ciphers ECDHE-ECDSA-AES128-GCM-SHA256:ECDHE-RSA-AES128-GCM-SHA256:ECDHE-ECDSA-AES256-GCM-SHA384:ECDHE-RSA-AES256-GCM-SHA384:ECDHE-ECDSA-CHACHA20-POLY1305:ECDHE-RSA-CHACHA20-POLY1305:DHE-RSA-AES128-GCM-SHA256:DHE-RSA-AES256-GCM-SHA384;

    tcp_nopush on;
    types_hash_max_size 2048;

    location ~ \.php$ {
        fastcgi_pass  unix:/run/php/php8.3-fpm.sock;
        fastcgi_param SCRIPT_FILENAME $document_root$fastcgi_script_name;
        fastcgi_index index.php;
        include  fastcgi_params;
    }
}
该配置文件假定我们将在 /var/www/flarum/public 目录中托管 example.com。Flarum 自带的 /var/www/flarum/.nginx.conf 文件中包含一些默认的 Nginx 设置,我们已通过以下指令将其包含在 Nginx 配置中。
include /var/www/flarum/.nginx.conf;
完成后,按 Ctrl + X 关闭编辑器,并在提示时按 Y 保存文件。
打开文件 /etc/nginx/nginx.conf 进行编辑。
$ sudo nano /etc/nginx/nginx.conf
在 include /etc/nginx/conf.d/*.conf; 这一行之前添加以下行。
server_names_hash_bucket_size 64;
按 Ctrl + X 保存文件,并在提示时输入 Y。测试 Nginx 配置。
$ sudo nginx -t
你应该会看到如下输出,表明你的配置正确。
nginx: the configuration file /etc/nginx/nginx.conf syntax is ok
nginx: configuration file /etc/nginx/nginx.conf test is successful
重新加载 Nginx 服务。
$ sudo systemctl reload nginx
第 11 步 - 访问并完成 Flarum 安装
在浏览器中打开 http://example.com 以完成安装。
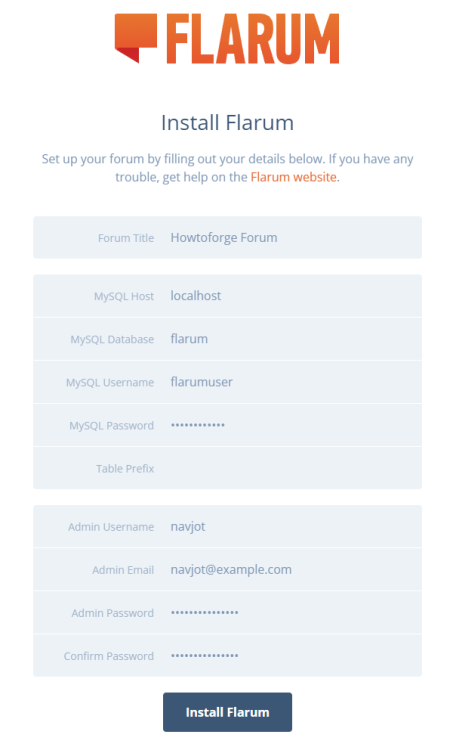
填写我们上面创建的必需数据库信息。你可以将“表前缀”(Table Prefix)留空,让 Flarum 使用默认前缀,也可以输入任何自定义前缀,例如 fla_。选择一个用户名、强密码和邮箱 ID 来安装 Flarum。
点击“Install Flarum”按钮完成安装。
安装完成后,你将看到默认的 Flarum 首页。
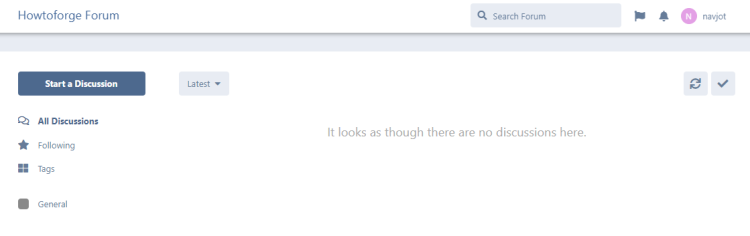
你的论坛现已安装完成,可以开始使用了。
启用 2FA
双因素认证(2FA)是任何公开论坛必备的功能。Flarum 原生并不包含该功能,但你可以通过安装相应的扩展来启用它。该扩展可通过 GitHub 获取。
要安装该插件,首先切换到 Flarum 目录。
$ cd /var/www/flarum
使用 Composer 安装该插件。
$ composer require ianm/twofactor:"*"
下一步是从 Flarum 管理面板中启用该插件。点击首页右上角的用户名,然后从下拉菜单中点击 Administration 链接。
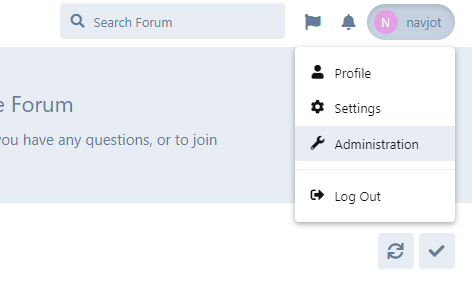
你将进入管理后台。从左侧菜单中选择 2FA 功能并将其开启。你无需更改任何设置,默认配置即可正常工作。
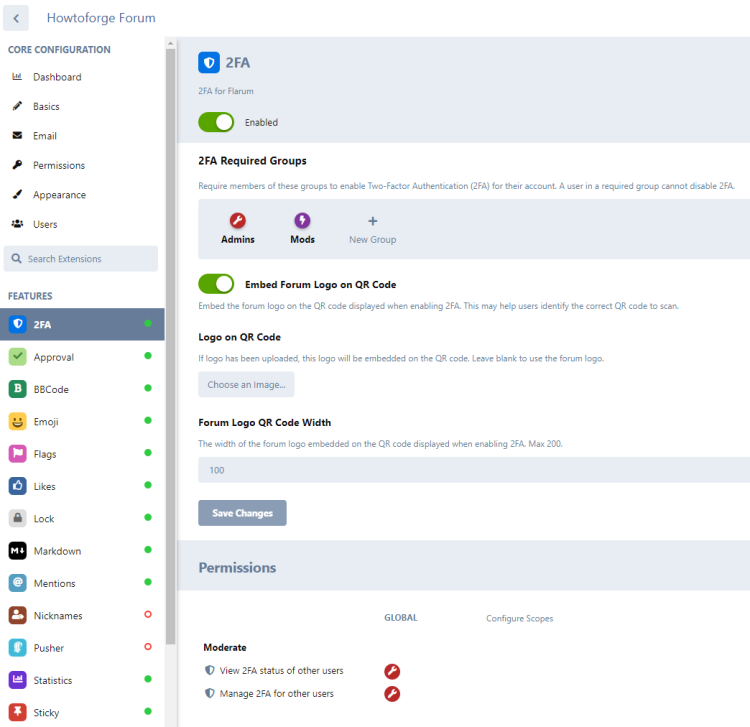
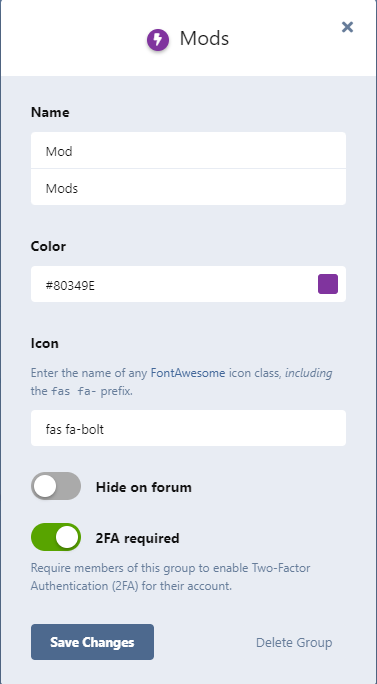
如果你希望论坛中的版主也启用 2FA,请点击 Mods 按钮并启用“Require 2FA”(强制 2FA)设置。点击 Save Changes 按钮完成。
要为你的账户启用 2FA,请从论坛首页右上角的菜单打开设置页面。在左侧边栏中选择 Security(安全)页面。
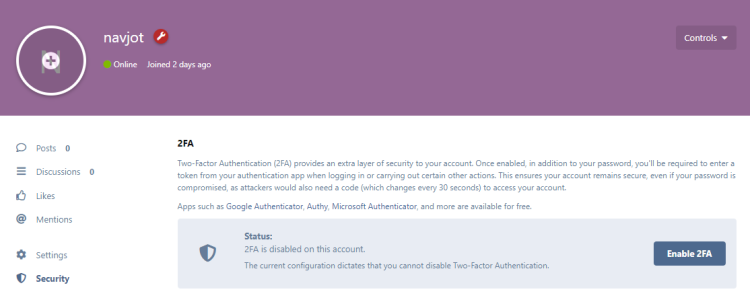
点击 Enable 2FA 按钮,将打开如下弹窗。
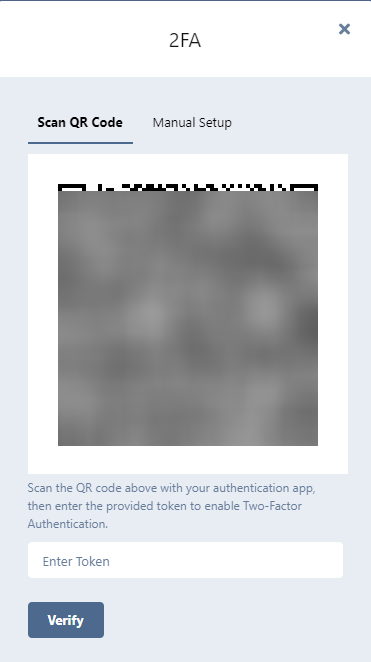
使用你的 2FA 应用扫描二维码,或选择手动输入选项,并将生成的验证码填入框中。完成后点击 Verify 按钮。系统会显示备份恢复码。请保存它们并点击按钮继续。
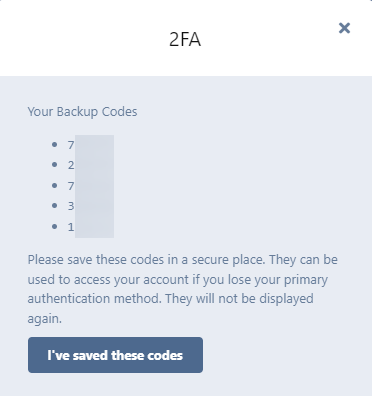
系统会再次要求确认。点击 Ok 按钮继续。至此流程完成。
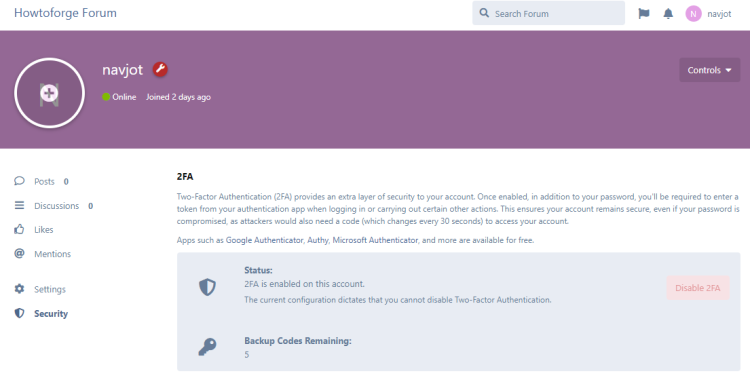
配置邮件设置
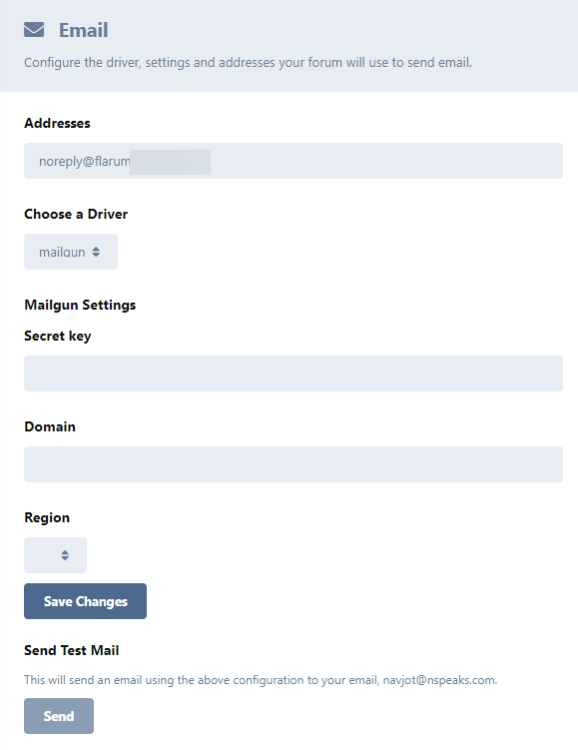
你还需要在管理面板中配置邮件设置。Flarum 原生支持 Mailgun SMTP 服务,你也可以选择使用外部 SMTP 提供商。
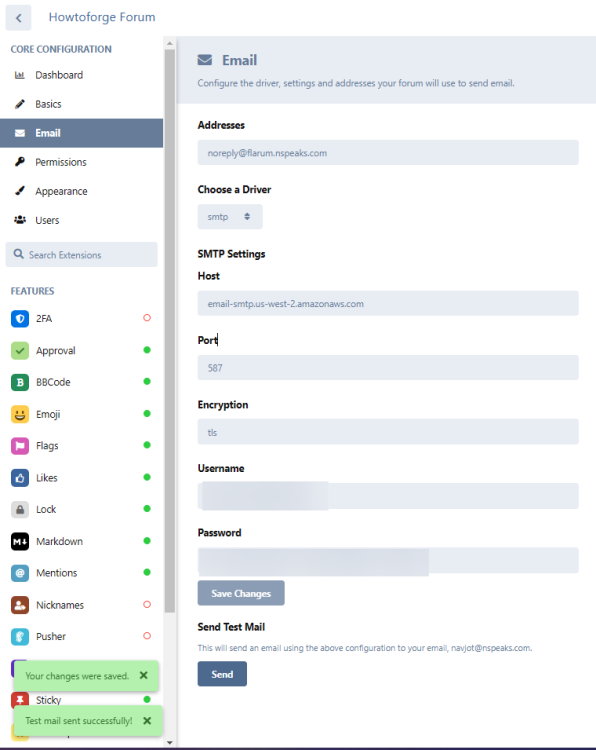
我们使用的是 Amazon SES 服务,因此在邮件页面的 email driver(邮件驱动)下拉菜单中选择了 smtp。点击 Save Changes 按钮。
在发送测试邮件之前,你需要安装一个 composer 包才能使其正常工作。切换到服务器上的 Flarum 目录。
$ cd /var/www/flarum
安装该 composer 包。
$ composer require guzzlehttp/guzzle:^7.0
返回邮件设置页面,点击 Send 按钮发送一封测试邮件。如果邮件发送成功,页面会给出提示。你应该会收到如下邮件。
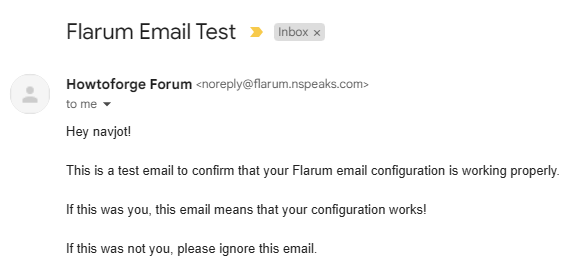
如果你想使用 Mailgun,请从下拉菜单中选择 mailgun。填写所需字段并保存设置。
第 12 步 - 更新 Flarum
你需要安装 Extension Manager(扩展管理器)扩展,才能通过管理后台更新 Flarum。使用以下命令安装 Extension Manager。
$ cd /var/www/flarum
$ composer require flarum/extension-manager:*
打开管理员后台,将 Extension Manager 扩展的禁用按钮向右切换以启用它。
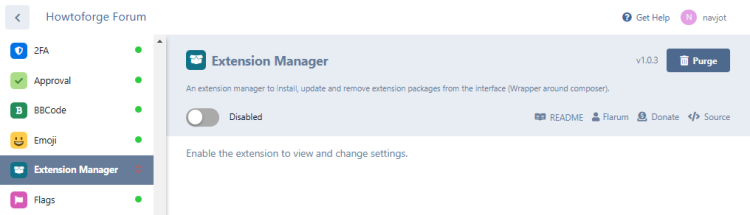
启用该扩展后,界面应如下所示。
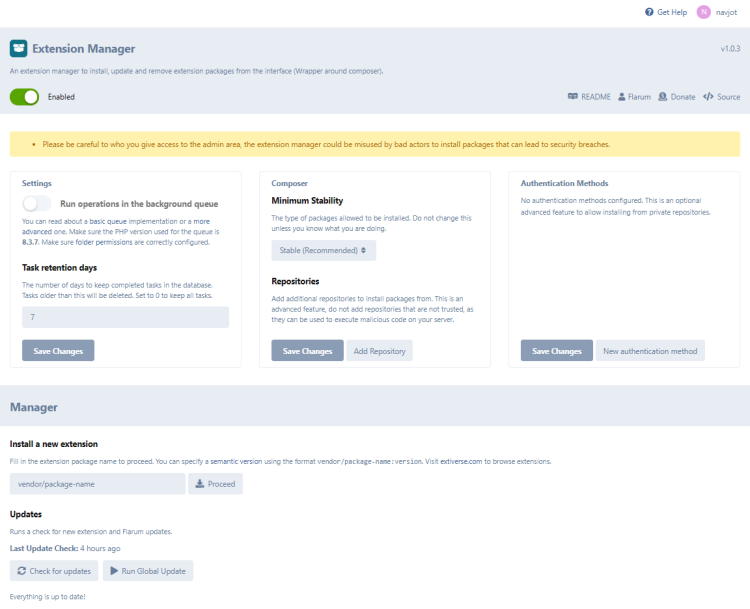
在更新论坛之前,你需要启用论坛的维护模式。该配置无法通过管理后台设置。部分设置可通过 Flarum 根目录下的 config.php 文件进行修改。切换到终端并打开 config.php 文件进行编辑。
$ nano /var/www/flarum/config.php
找到 'debug' => false, 这一行,并在其下方添加以下行,使其如下所示。
'debug' => false,
'offline' => true,
完成后,按 Ctrl + X 关闭编辑器,并在提示时按 Y 保存文件。
切换回管理后台,点击 Extension Manager 页面底部的 Check for updates(检查更新)按钮来更新 Flarum 软件。如需使用扩展管理器管理扩展更新,请查阅 Extension Manager 文档。
第 12 步 - 备份与恢复 Flarum
备份 Flarum 最简单的方法是备份 MariaDB 数据库。为此,可通过以下命令使用 mysqldump 工具。
$ sudo mysqldump flarum > flarumbackup.sql
要在新的服务器上恢复数据库,请重复第 6 步中关于配置 MariaDB 的所有命令。这将创建一个空白数据库(flarum)以及一个可访问它的数据库用户。
接下来,运行以下命令来恢复论坛。
$ sudo mysql flarum < backup.sql
要备份文件,请复制整个 /var/www/flarum 文件夹,并在新服务器上恢复它。如果你要更改 URL,请修改 config.php 文件中 url 变量的值,并重新配置 Nginx 以托管该论坛。
结语
至此,我们关于在 Ubuntu 24.04 服务器上安装 Flarum 社区论坛软件的教程就结束了。如果你有任何疑问或反馈,请在下方评论区留言。