
本教程适用于以下操作系统版本
- Ubuntu 24.04(Noble Numbat)
- Ubuntu 22.04(Jammy Jellyfish)
- Ubuntu 20.04(Focal Fossa)
- Ubuntu 18.04(Bionic Beaver)
本页内容
- 先决条件
- 第 1 步 - 配置防火墙
- 第 2 步 - 安装 OpenLiteSpeed 与创建管理员密码
- 第 3 步 - 安装 MySQL
- 第 4 步 - 安装 PHP
- 第 5 步 - 配置 MySQL
- 第 6 步 - 配置 OpenLiteSpeed 与将 HTTP 端口切换回 80
- 第 7 步 - 配置 PHP 与重启 PHP
- 第 8 步 - 创建虚拟主机
- 第 9 步 - 安装 SSL
- 第 10 步 - 测试站点
- 结语
- 创建管理员密码
- 将 HTTP 端口切换回 80
- 重启 PHP
OpenLiteSpeed 是由 LiteSpeed Technologies 开发的 LiteSpeed 服务器的一个轻量级开源版本。它支持 Apache 重写规则、HTTP/2 和 HTTP/3,以及 TLS v1.3 和 QUIC 协议。它自带基于 WebGUI 的管理面板,这使它与其他服务器不同,也更易于管理。
LOMP 栈是 Linux、OpenLiteSpeed、MySQL/MariaDB 和 PHP 的缩写。LiteSpeed 服务器以速度快著称,尤其是在运行 PHP 时,PHP 通过 LiteSpeed 服务器应用程序编程接口(LSAPI)进行集成。LiteSpeed PHP(LSPHP)解释器通过 LSAPI 提供动态的 PHP 页面。
本教程将向您展示如何在 Ubuntu 24.04 上安装 OpenLiteSpeed 服务器。
先决条件
- 一台运行 Ubuntu 24.04 的服务器。
- 一个具有 sudo 权限的非 root 用户。
- 一个指向该服务器的完全限定域名(FQDN),例如 example.com。
- 确保一切已更新。 $ sudo apt update $ sudo apt upgrade
- 系统所需的几个软件包。$ sudo apt install wget curl nano ufw software-properties-common dirmngr apt-transport-https gnupg2 ca-certificates lsb-release ubuntu-keyring unzip -y 其中部分软件包可能已在您的系统中安装。
一台运行 Ubuntu 24.04 的服务器。
一个具有 sudo 权限的非 root 用户。
一个指向该服务器的完全限定域名(FQDN),例如 example.com。
确保一切已更新。
$ sudo apt update
$ sudo apt upgrade
系统所需的几个软件包。
$ sudo apt install wget curl nano ufw software-properties-common dirmngr apt-transport-https gnupg2 ca-certificates lsb-release ubuntu-keyring unzip -y
其中部分软件包可能已在您的系统中安装。
第 1 步 - 配置防火墙
第一步是配置防火墙。Debian 默认自带 ufw(Uncomplicated Firewall,简易防火墙)。
检查防火墙是否正在运行。
$ sudo ufw status
您将看到如下输出。
Status: inactive
放行 SSH 端口,以免启用防火墙时断开当前连接。
$ sudo ufw allow OpenSSH
同时放行 HTTP 和 HTTPS 端口。
$ sudo ufw allow http
$ sudo ufw allow https
开放与 OpenLiteSpeed 相关的端口。
$ sudo ufw allow 7080/tcp
启用防火墙。
$ sudo ufw enable
Command may disrupt existing ssh connections. Proceed with operation (y|n)? y
Firewall is active and enabled on system startup
再次检查防火墙状态。
$ sudo ufw status
您应看到类似的输出。
Status: active

To                         Action      From
--                         ------      ----
OpenSSH                    ALLOW       Anywhere
80/tcp                     ALLOW       Anywhere
443                        ALLOW       Anywhere
7080/tcp                   ALLOW       Anywhere
OpenSSH (v6)               ALLOW       Anywhere (v6)
80/tcp (v6)                ALLOW       Anywhere (v6)
443 (v6)                   ALLOW       Anywhere (v6)
7080/tcp (v6)              ALLOW       Anywhere (v6)
第 2 步 - 安装 OpenLiteSpeed
我们将通过编译源代码的方式来安装 OpenLiteSpeed。下载 OpenLiteSpeed 源代码文件。您可以从 OpenLiteSpeed 官方下载页面获取最新源代码文件的链接。1.7.19 版本是当前可用的稳定版本。
$ wget https://openlitespeed.org/packages/openlitespeed-1.7.19.src.tgz
解压文件。
$ tar -zxf openlitespeed-*.tgz
切换到解压后的目录。
$ cd openlitespeed-1.7.19
构建服务器软件包。
$ sudo ./build.sh
该过程可能需要等待 5–10 分钟才能完成。请忽略过程中出现的任何警告。完成后您将收到如下输出。
...............
[100%] Linking CXX shared library modpagespeed.so
/usr/bin/ld: warning: 140.x25519-asm-x86_64.o.o: missing .note.GNU-stack section implies executable stack
/usr/bin/ld: NOTE: This behaviour is deprecated and will be removed in a future version of the linker
[100%] Built target modpagespeed
Start to pack files.
-e Building finished, please run ./install.sh for installation.
-e You may want to update the ols.conf to change the settings before installation.
-e Enjoy.
过程完成后,打开 ols.conf 文件进行编辑。
$ sudo nano ols.conf
按如下方式编辑该文件。
#If you want to change the default values, please update this file.
#

SERVERROOT=/usr/local/lsws
OPENLSWS_USER=nobody
OPENLSWS_GROUP=nobody
OPENLSWS_ADMIN=navjot

[email protected]

OPENLSWS_ADMINSSL=yes
OPENLSWS_ADMINPORT=7080
USE_LSPHP7=yes
DEFAULT_TMP_DIR=/tmp/lshttpd
PID_FILE=/tmp/lshttpd/lshttpd.pid
OPENLSWS_EXAMPLEPORT=8088

#You can set password here
#OPENLSWS_PASSWORD=
不要在此处填写您的密码。我们稍后会通过命令行设置密码。完成后,按 Ctrl + X 保存文件,并在提示时输入 Y。
既然 OpenLiteSpeed 已经构建完成,让我们来安装它。
$ sudo ./install.sh
安装脚本会为服务器安装并启用 lsws 服务。完成后您将收到如下输出。
Updating webcache manager, please waiting ...
Downloading latest shared code tar file...
Checking tar file md5...
Removing existing shared code directory...
Extracting downloaded shared code...
Removing local shared code tar file...
Updating lscmctl script...
Done!

-e Installation finished, Enjoy!

-e Your webAdmin password is kXjWTl5j, written to file /usr/local/lsws/adminpasswd.
启动 OpenLiteSpeed 服务器。
$ sudo systemctl start lsws
检查服务状态。
$ sudo systemctl status lsws
? lshttpd.service - OpenLiteSpeed HTTP Server
     Loaded: loaded (/usr/lib/systemd/system/lshttpd.service; enabled; preset: enabled)
     Active: active (running) since Sun 2024-06-02 12:58:44 UTC; 3s ago
    Process: 52583 ExecStart=/usr/local/lsws/bin/lswsctrl start (code=exited, status=0/SUCCESS)
   Main PID: 52604 (litespeed)
     CGroup: /system.slice/lshttpd.service
             ??52604 "openlitespeed (lshttpd - main)"
             ??52610 "openlitespeed (lscgid)"
             ??52623 "openlitespeed (lshttpd - #01)"
             ??52624 lsphp

Jun 02 12:58:42 lompserver systemd[1]: Starting lshttpd.service - OpenLiteSpeed HTTP Server...
Jun 02 12:58:42 lompserver lswsctrl[52583]: [OK] litespeed: pid=52604.
Jun 02 12:58:44 lompserver systemd[1]: Started lshttpd.service - OpenLiteSpeed HTTP Server.
检查已安装服务器的版本。
$ /usr/local/lsws/bin/lshttpd -v
LiteSpeed/1.7.19 Open (BUILD built: Tue Apr 16 15:14:26 UTC 2024)
        module versions:
        lsquic 3.3.2
        modgzip 1.1
        cache 1.66
        mod_security 1.4 (with libmodsecurity v3.0.12)
创建管理员密码
您可以使用安装过程中提供的管理员密码。不过,您应通过重置密码来创建自己的密码。运行密码重置脚本。
$ sudo /usr/local/lsws/admin/misc/admpass.sh
您将收到如下输出。选择您的用户名并设置一个强密码。
Please specify the user name of administrator.
This is the user name required to login the administration Web interface.

User name [admin]: navjot

Please specify the administrator's password.
This is the password required to login the administration Web interface.

Password:
Retype password:
Administrator's username/password is updated successfully!
您现在可以使用新的管理员密码了。
打开 http://
您应看到登录页面。
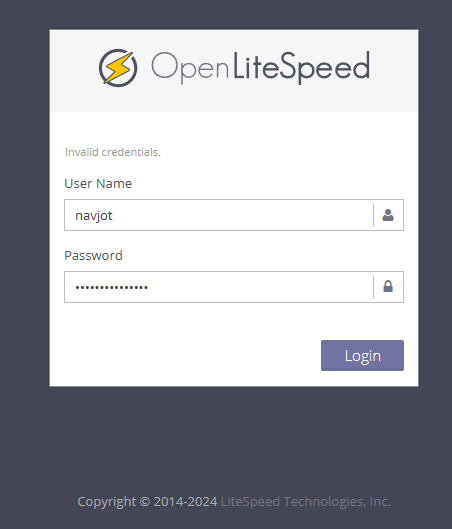
输入您之前设置的凭据,然后按“登录”按钮继续。
您将看到如下界面。
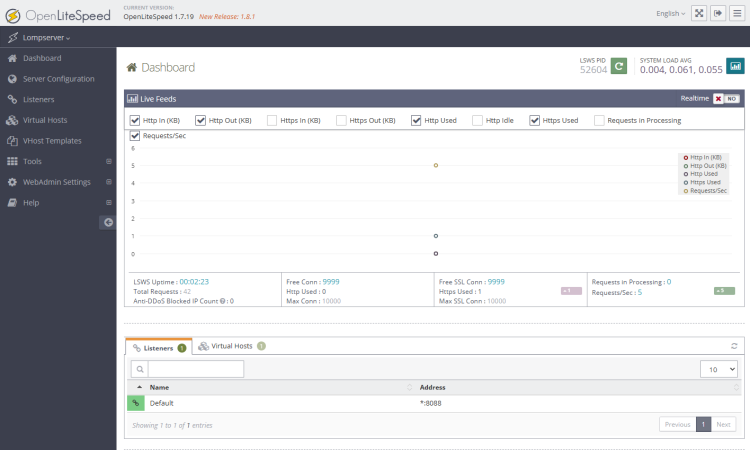
第 3 步 - 安装 MySQL
在继续进行 MySQL 安装之前,我们需要更新 LiteSpeed 软件仓库。通过安装程序添加的 LiteSpeed 仓库无法正常工作。
打开 /etc/apt/sources.list.d/lst_debian_repo.list 文件进行编辑。
$ sudo nano /etc/apt/sources.list.d/lst_debian_repo.list
通过在仓库 URL 中添加 Ubuntu 24.04 的发行代号(noble)来修改文件内容。
deb http://rpms.litespeedtech.com/debian/ noble main
完成后,按 Ctrl + X 保存文件,并在提示时输入 Y。
安装 MySQL 服务器。
$ sudo apt install mysql-server
MySQL 服务会在安装后自动启动并运行。
检查服务状态。
$ sudo systemctl status mysql
您将收到如下输出。
? mysql.service - MySQL Community Server
     Loaded: loaded (/usr/lib/systemd/system/mysql.service; enabled; preset: enabled)
     Active: active (running) since Sun 2024-06-02 13:42:12 UTC; 8min ago
    Process: 57889 ExecStartPre=/usr/share/mysql/mysql-systemd-start pre (code=exited, status=0/SUCCESS)
   Main PID: 57898 (mysqld)
     Status: "Server is operational"
      Tasks: 37 (limit: 2263)
     Memory: 370.6M (peak: 386.9M)
        CPU: 6.762s
     CGroup: /system.slice/mysql.service
             ??57898 /usr/sbin/mysqld

Jun 02 13:42:11 lompserver systemd[1]: Starting mysql.service - MySQL Community Server...
运行 MySQL 安全脚本。
$ sudo mysql_secure_installation
系统会要求您安装验证密码组件(Validate Password Component)。按 Y 继续。
Securing the MySQL server deployment.

Connecting to MySQL using a blank password.

VALIDATE PASSWORD COMPONENT can be used to test passwords
and improve security. It checks the strength of password
and allows the users to set only those passwords which are
secure enough. Would you like to setup VALIDATE PASSWORD component?

Press y|Y for Yes, any other key for No: y
接下来,系统会要求您选择密码的强度。选择 2(强)并继续。
There are three levels of password validation policy:

LOW    Length >= 8
MEDIUM Length >= 8, numeric, mixed case, and special characters
STRONG Length >= 8, numeric, mixed case, special characters and dictionary                  file

Please enter 0 = LOW, 1 = MEDIUM and 2 = STRONG: 2
MySQL 安装不会要求您设置 root 密码,因为默认的认证类型是 auth_socket,它依赖于您的 Linux 系统认证。不过您可以稍后更改。
Skipping password set for root as authentication with auth_socket is used by default.
If you would like to use password authentication instead, this can be done with the "ALTER_USER" command.
See https://dev.mysql.com/doc/refman/8.0/en/alter-user.html#alter-user-password-management for more information.
接下来,系统会询问您一些问题以加强 MySQL 的安全性。输入 Y 以删除匿名用户、禁止远程 root 登录、删除测试数据库并重新加载权限表。
By default, a MySQL installation has an anonymous user,
allowing anyone to log into MySQL without having to have
a user account created for them. This is intended only for
testing, and to make the installation go a bit smoother.
You should remove them before moving into a production
environment.

Remove anonymous users? (Press y|Y for Yes, any other key for No) : y
Success.


Normally, root should only be allowed to connect from
'localhost'. This ensures that someone cannot guess at
the root password from the network.

Disallow root login remotely? (Press y|Y for Yes, any other key for No) : y
Success.

By default, MySQL comes with a database named 'test' that
anyone can access. This is also intended only for testing,
and should be removed before moving into a production
environment.


Remove test database and access to it? (Press y|Y for Yes, any other key for No) : y
 - Dropping test database...
Success.

 - Removing privileges on test database...
Success.

Reloading the privilege tables will ensure that all changes
made so far will take effect immediately.

Reload privilege tables now? (Press y|Y for Yes, any other key for No) : y
Success.

All done!
您可以在命令行输入 sudo mysql 进入 MySQL shell。
第 4 步 - 安装 PHP
由于我们的软件包是从源代码构建的,它会编译并构建一个不推荐使用的旧版本 PHP。您可以通过以下命令进行查看。
$ /usr/local/lsws/fcgi-bin/lsphp -v
PHP 5.6.40 (litespeed) (built: May 10 2023 23:03:31)
Copyright (c) 1997-2016 The PHP Group
Zend Engine v2.6.0, Copyright (c) 1998-2016 Zend Technologies
因此,我们需要构建并安装最新版本的 PHP。但在继续之前,我们需要安装构建工具。
$ sudo apt install build-essential autoconf libtool bison re2c pkg-config
下一步是安装 PHP 构建过程所需的软件包。
$ sudo apt install libssl-dev libsqlite3-dev zlib1g-dev libcurl4-openssl-dev libonig-dev libzip-dev libmemcached-dev libreadline-dev libgmp-dev libpng-dev libjpeg-dev libwebp-dev libxpm-dev libicu-dev libfreetype6-dev libxslt-dev libldb-dev libtidy-dev libvips-dev libsodium-dev libavif-dev libldap2-dev libxml2-dev libkrb5-dev libc-client2007e-dev libpq-dev libargon2-1 libargon2-dev libbz2-dev libffi-dev libc-client-dev libpspell-dev flex libgmp3-dev libmcrypt-dev libmhash-dev freetds-dev libmysqlclient-dev libncurses5-dev libpcre3-dev libaspell-dev librecode-dev libsnmp-dev
接下来,下载 PHP 源代码。我们将下载撰写本文时可用的最新版本 PHP 8.3.7。
$ cd ~
$ wget https://www.php.net/distributions/php-8.3.7.tar.gz
解压文件。
$ tar -xzf php-8.3.7.tar.gz
切换到下载的目录。
$ cd php-8.3.7
接下来,使用以下选项运行 configure 脚本。--enable-litespeed 选项必不可少。
$ sudo ./configure --prefix=/usr/local/lsws/lsphp83 --enable-bcmath --enable-calendar --enable-exif --enable-ftp --enable-gd --enable-intl --enable-mbregex --enable-mbstring --enable-mysqlnd --enable-opcache --enable-shmop --enable-soap --enable-sockets --enable-sysvsem --enable-sysvshm --with-avif --with-curl --with-ffi --with-freetype --with-gettext --with-gmp --with-imap --with-imap-ssl --with-jpeg --with-kerberos --with-libxml --with-ldap --with-mysqli --with-mysql-sock=/run/mysqld/mysqld.sock --with-openssl --with-password-argon2 --with-pdo-mysql=mysqlnd --with-pdo-pgsql=/usr/bin/pg_config --with-pear --with-pspell --with-readline --with-sodium --with-tidy --with-webp --with-xpm --with-xsl --with-zip --with-zlib --enable-litespeed
脚本完成后,您应得到如下输出。
+--------------------------------------------------------------------+
| License:                                                           |
| This software is subject to the PHP License, available in this     |
| distribution in the file LICENSE. By continuing this installation  |
| process, you are bound by the terms of this license agreement.     |
| If you do not agree with the terms of this license, you must abort |
| the installation process at this point.                            |
+--------------------------------------------------------------------+

Thank you for using PHP.
编译源代码。
$ sudo make -j $(nproc)
完成后您将收到类似的输出。
Generating phar.php
Generating phar.phar
PEAR package PHP_Archive not installed: generated phar will require PHP's phar extension be enabled.
directorytreeiterator.inc
phar.inc
invertedregexiterator.inc
directorygraphiterator.inc
pharcommand.inc
clicommand.inc

Build complete.
Don't forget to run 'make test'.
完成后,运行以下命令尝试并检查版本。
$ ./sapi/litespeed/php -v
PHP 8.3.7 (litespeed) (built: Jun  3 2024 05:28:43)
Copyright (c) The PHP Group
Zend Engine v4.3.7, Copyright (c) Zend Technologies
安装 PHP。
$ sudo make install
您将得到如下输出。
Installing shared extensions:     /usr/local/lsws/lsphp83/lib/php/extensions/no-debug-non-zts-20230831/
Installing PHP CLI binary:        /usr/local/lsws/lsphp83/bin/
Installing PHP CLI man page:      /usr/local/lsws/lsphp83/php/man/man1/
Installing PHP LiteSpeed binary:  /usr/local/lsws/lsphp83/bin/
Installing phpdbg binary:         /usr/local/lsws/lsphp83/bin/
Installing phpdbg man page:       /usr/local/lsws/lsphp83/php/man/man1/
Installing PHP CGI binary:        /usr/local/lsws/lsphp83/bin/
Installing PHP CGI man page:      /usr/local/lsws/lsphp83/php/man/man1/
Installing build environment:     /usr/local/lsws/lsphp83/lib/php/build/
Installing header files:          /usr/local/lsws/lsphp83/include/php/
Installing helper programs:       /usr/local/lsws/lsphp83/bin/
  program: phpize
  program: php-config
Installing man pages:             /usr/local/lsws/lsphp83/php/man/man1/
  page: phpize.1
  page: php-config.1
Installing PEAR environment:      /usr/local/lsws/lsphp83/lib/php/
[PEAR] Archive_Tar    - installed: 1.4.14
[PEAR] Console_Getopt - installed: 1.4.3
[PEAR] Structures_Graph- installed: 1.1.1
[PEAR] XML_Util       - installed: 1.4.5
warning: pear/PEAR dependency package "pear/Archive_Tar" installed version 1.4.14 is not the recommended version 1.4.4
[PEAR] PEAR           - installed: 1.10.15
Wrote PEAR system config file at: /usr/local/lsws/lsphp83/etc/pear.conf
You may want to add: /usr/local/lsws/lsphp83/lib/php to your php.ini include_path
Installing PDO headers:           /usr/local/lsws/lsphp83/include/php/ext/pdo/
验证 PHP 安装。/usr/local/lsws/lsphp83/bin 目录下有两个 PHP 二进制文件。一个是普通的 php(命令行版本),另一个是 LiteSpeed 版本的 lsphp。我们将使用第二个。
$ /usr/local/lsws/lsphp83/bin/lsphp -v
PHP 8.3.7 (litespeed) (built: Jun  3 2024 05:28:43)
Copyright (c) The PHP Group
Zend Engine v4.3.7, Copyright (c) Zend Technologies
您可以查看已启用的 PHP 模块列表。
$ /usr/local/lsws/lsphp83/bin/php --modules
[PHP Modules]
bcmath
calendar
Core
ctype
curl
date
dom
exif
FFI
fileinfo
filter
ftp
gd
gettext
gmp
hash
iconv
imap
intl
json
ldap
libxml
mbstring
mysqli
mysqlnd
openssl
pcre
PDO
pdo_mysql
pdo_pgsql
pdo_sqlite
Phar
posix
pspell
random
readline
Reflection
session
shmop
SimpleXML
soap
sockets
sodium
SPL
sqlite3
standard
sysvsem
sysvshm
tidy
tokenizer
xml
xmlreader
xmlwriter
xsl
zip
zlib

[Zend Modules]
将 php.ini-production 从安装文件夹复制到 /usr/local/lsws/lsphp83/lib 文件夹。
$ sudo cp php.ini-production /usr/local/lsws/lsphp83/lib/php.ini
我们稍后再配置 OpenLiteSpeed 以使用 PHP。
打开 php.ini 进行编辑。
$ sudo nano /usr/local/lsws/lsphp83/lib/php.ini
找到 include_path 变量,并按如下方式修改其值。
$ ;;;;;;;;;;;;;;;;;;;;;;;;;
; Paths and Directories ;
;;;;;;;;;;;;;;;;;;;;;;;;;

; UNIX: "/path1:/path2"
include_path = "/usr/local/lsws/lsphp83/lib/php"
完成后,按 Ctrl + X 保存文件,并在提示时输入 Y。
第 5 步 - 配置 MySQL
登录 MySQL shell。
$ sudo mysql
创建一个测试数据库。请将 testdb 替换为您选择的合适数据库名称。
mysql> CREATE DATABASE testdb;
创建一个测试用户。请将 testuser 替换为合适的用户名。请将 Your_Password123 替换为一个强密码。
mysql> CREATE USER 'testuser'@'localhost' IDENTIFIED BY 'Your_Password123';
将该数据库的所有权限授予该用户。
mysql> GRANT ALL PRIVILEGES ON testdb.* TO 'testuser'@'localhost';
刷新用户权限。
mysql> FLUSH PRIVILEGES;
退出 MySQL shell。
mysql> exit
第 6 步 - 配置 OpenLiteSpeed
将 HTTP 端口切换回 80
让我们将默认的 HTTP 端口改为 80。使用您刚刚创建的凭据登录位于 http://
从左侧访问 Listeners(监听器)部分。您将看到端口为 8080 的默认监听器。
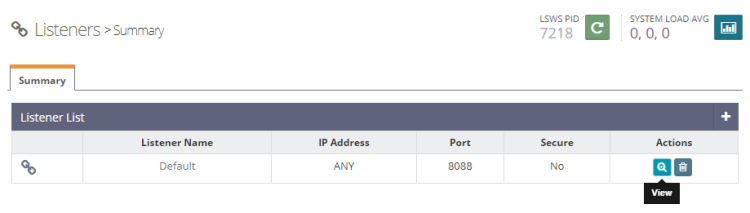
点击“查看”按钮查看详细配置。在下一页的 Listener Default > General(通用)页面下,点击编辑图标,将端口从 8080 改为 80。
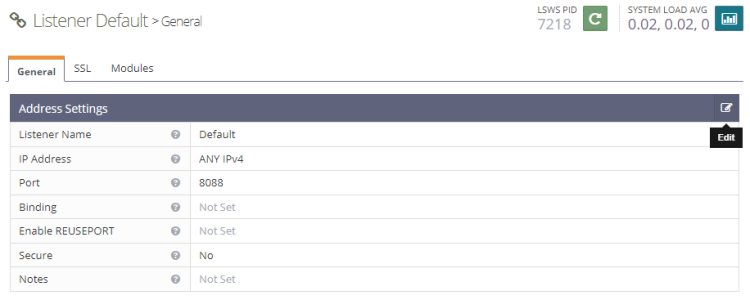
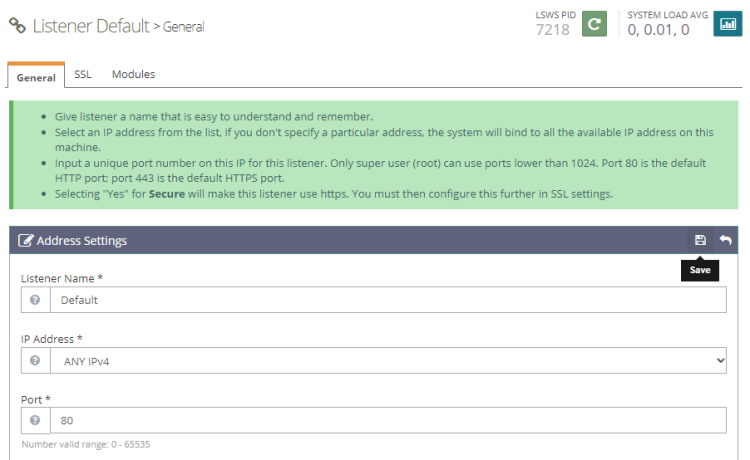
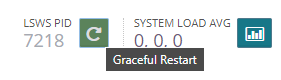
点击“保存”,然后点击“平滑重启(Graceful restart)”按钮重启服务器。
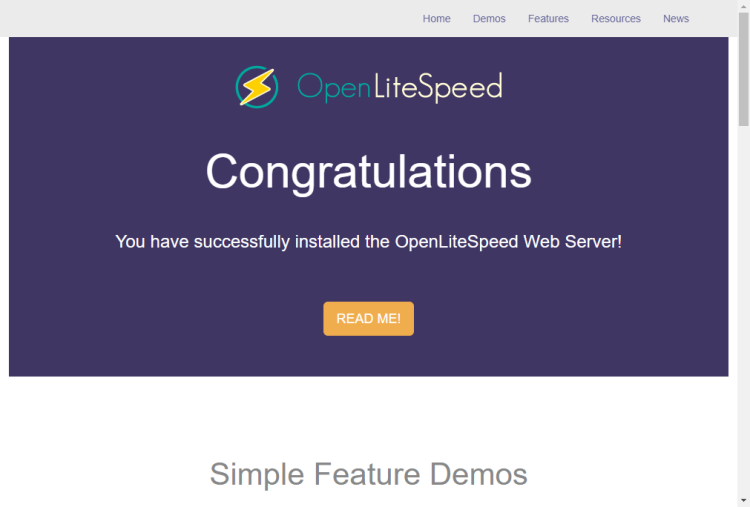
在浏览器中打开 URL http://
第 7 步 - 配置 PHP
在此步骤中,我们需要将我们自己的 PHP 8.3 与服务器关联起来。
点击左侧的 Server Configuration(服务器配置)部分,然后点击 External App(外部应用)选项卡。您将看到一个已有的 PHP 的 LiteSpeed 应用。我们将对其做一些修改。
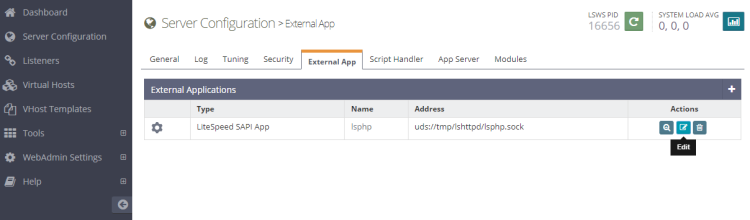
点击“编辑”按钮编辑该 PHP 应用。
接下来,按如下方式匹配配置。将所有其他字段留空。
Name: lsphp
Address: uds://tmp/lshttpd/lsphp.sock
Max Connections: 35
Environment: PHP_LSAPI_MAX_REQUESTS=500
             PHP_LSAPI_CHILDREN=35
             LSAPI_AVOID_FORK=200M
Initial Request Timeout (secs): 60
Retry Timeout : 0
Persistent Connection: Yes
Response Buffering: no
Start By Server: Yes(Through CGI Daemon)
Command: lsphp83/bin/lsphp
Back Log: 100
Instances: 1
Priority: 0
Memory Soft Limit (bytes): 2047M
Memory Hard Limit (bytes): 2047M
Process Soft Limit: 1400
Process Hard Limit: 1500
完成后点击“保存”。
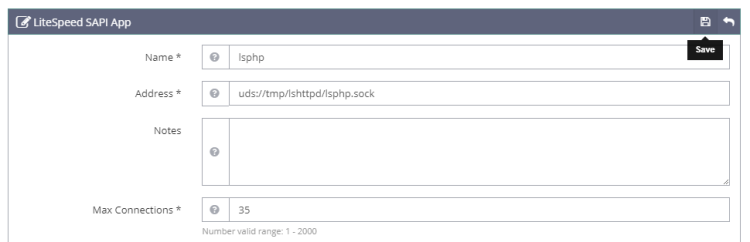
既然我们已经创建了自己的 PHP 8.3 应用,我们必须告诉服务器开始使用它。由于我们已经编辑了默认监听设置,它已被配置好。点击“平滑重启(Graceful restart)”按钮重启服务器。
要测试您的 PHP 是否已正确切换,请在浏览器中访问 http://
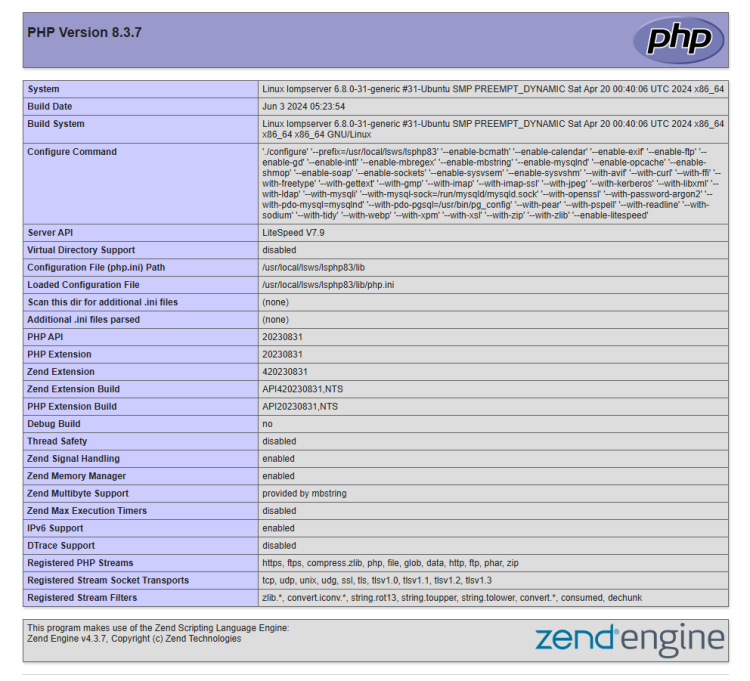
重启 PHP
在 OpenLiteSpeed 上,如果您编辑了 php.ini 或安装了新的 PHP 模块,重启服务器不会显示这些更改。您需要为此重启 PHP 进程。首先,您需要找到 lsphp 进程的进程 ID。
$ ps aux | grep lsphp
nobody    120093  0.0  0.8 123772 32920 ?        S    06:35   0:00 lsphp
nobody    120111  0.0  0.4 123772 18980 ?        Ss   06:38   0:00 lsphp
navjot    120139  0.0  0.0   6544  2304 pts/0    S+   06:44   0:00 grep --color=auto lsphp
手动结束(kill)lsphp 进程。
$ sudo kill -9 120093
$ sudo kill -9 120111
重启服务器。
$ sudo systemctl restart lsws
第 8 步 - 创建虚拟主机
首先,我们需要为虚拟主机创建目录。
$ sudo mkdir /usr/local/lsws/example.com/{html,logs} -p
html 目录将存放公开文件,logs 目录将存放服务器日志。
接下来,打开管理控制台,从左侧访问 Virtual Hosts(虚拟主机)部分,然后点击“添加”按钮。
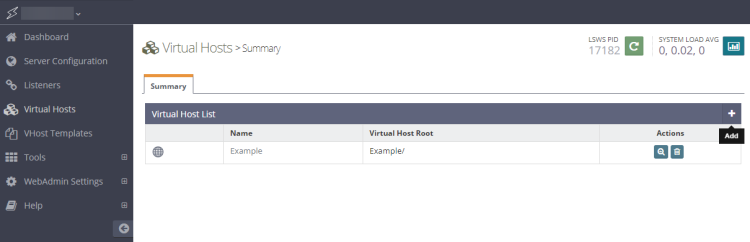
按指定内容填写各项值。
Virtual Host Name: example.com
Virtual Host Root: $SERVER_ROOT/example.com/
Config File: $SERVER_ROOT/conf/vhosts/$VH_NAME/vhconf.conf
Follow Symbolic Link: Yes
Enable Scripts/ExtApps: Yes
Restrained: Yes
External App Set UID Mode: Server UID
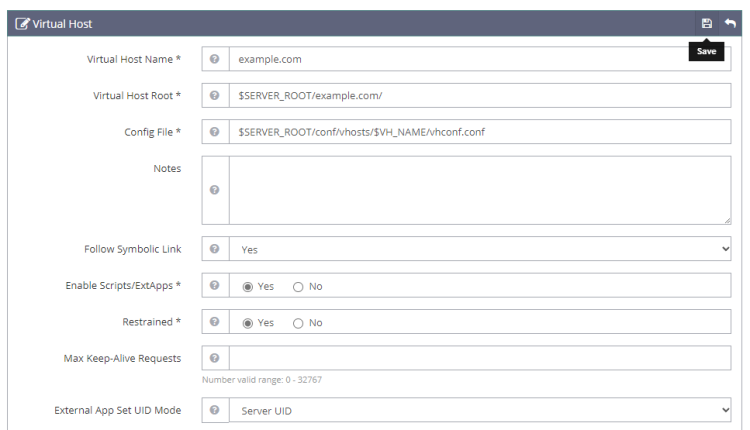
完成后点击“保存”按钮。由于配置文件目前尚不存在,您将收到如下错误。点击链接以创建配置文件。
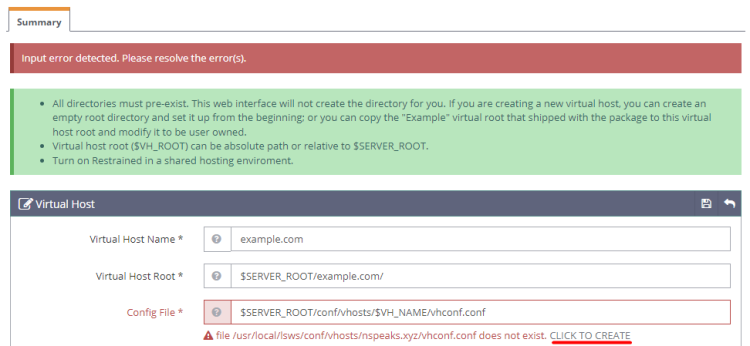
再次点击“保存”按钮以完成虚拟主机的创建。
虚拟主机创建完成后,转到 Virtual Hosts -> Choose Virtual Host(example.com) -> General(通用),并按给定内容修改配置。
Document Root: $VH_ROOT/html/
Domain Name: example.com
Enable GZIP Compression: Yes
Enable Brotli Compression: Yes
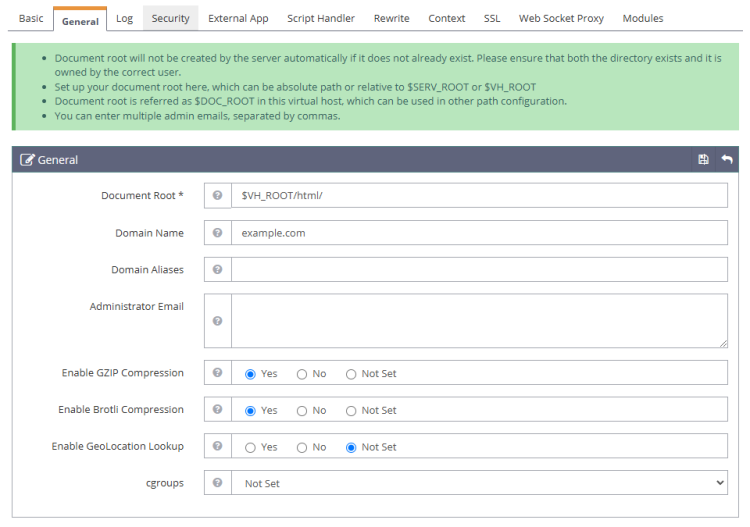
完成后点击“保存”按钮。接下来,我们需要设置索引文件。点击 General(通用)部分下方的 Index files(索引文件)对应的编辑按钮,设置以下选项。
Use Server Index Files: No
Index files: index.php, index.html, index.htm
Auto Index: No
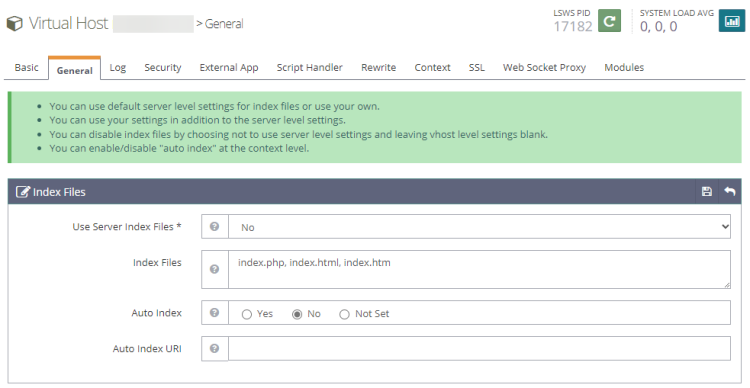
完成后点击“保存”。接下来,我们需要选择日志文件。转到 Log(日志)部分,点击 Virtual Host Log(虚拟主机日志)对应的“编辑”,并填写以下值。其他设置保持不变。
Use Server’s Log: Yes
File Name: $VH_ROOT/logs/error.log
Log Level: ERROR
Rolling Size (bytes): 10M
Keep Days: 30
Compress Archive: Not Set
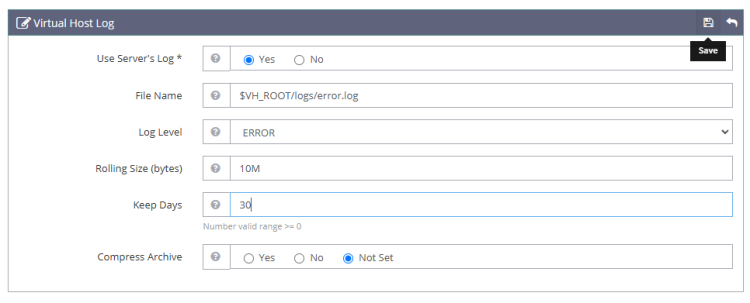
如果您在开发机器上,可以将日志级别(Log Level)选择为 DEBUG。
点击“保存”,然后点击 Access Log(访问日志)部分中的加号以添加新条目。填写以下值。
Log Control: Own Log File
File Name: $VH_ROOT/logs/access.log
Piped Logger: Not Set
Log Format: Not Set
Log Headers: Not Set
Rolling Size (bytes): 10M
Keep Days: 30
Compress Archive: Not Set
Bytes log: Not Set
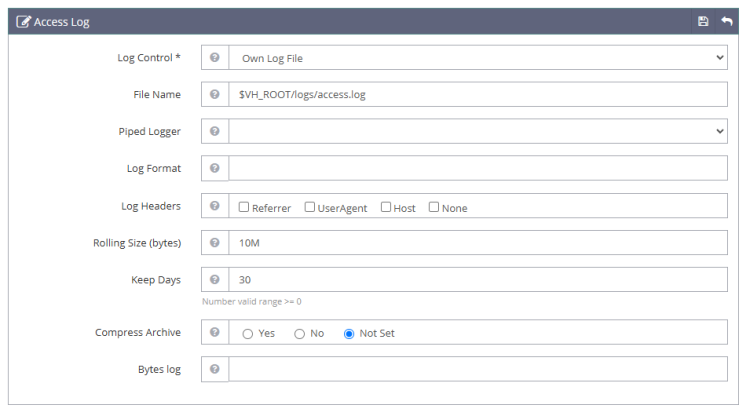
完成后点击“保存”。接下来,我们需要在 Security(安全)部分下配置 Access Control(访问控制)。设置以下值。
Allowed List: *
Denied List: Not set
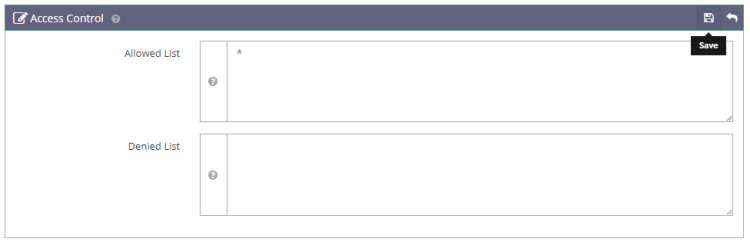
完成后点击“保存”。接下来,我们需要设置 Script Handler Definition(脚本处理器定义)。点击加号(+)添加新定义。设置以下值。
Suffixes: php
Handler Type: LiteSpeed SAPI
Handler Name: [Server Level]: lsphp
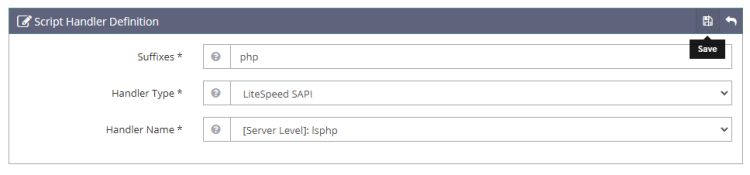
完成后点击“保存”。接下来,我们需要在 Rewrite(重写)部分下设置 Rewrite Control(重写控制)。设置以下值。
Enable Rewrite: Yes
Auto Load from .htaccess: Yes
Log Level: Not Set
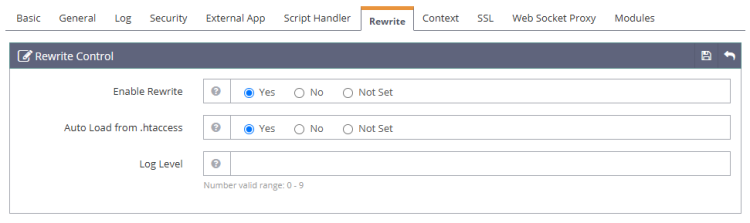
完成后点击“保存”。最后,我们需要设置 Listeners(监听器)。转到 Listeners 部分,点击 Default Listener(默认监听器)对应的“查看”按钮。然后,点击 Virtual Host Mappings(虚拟主机映射)对应的“添加”按钮以添加新的映射,并设置以下值。
Virtual Host: example.com
Domains: example.com

完成后点击“保存”。现在,点击“平滑重启(Graceful restart)”按钮以应用上述所有更改并重启服务器。
第 9 步 - 安装 SSL
在 OpenLiteSpeed 中设置 SSL 需要我们配置两个证书:一个用于整个服务器的自签名证书,以及一个站点专用的 Let's Encrypt 证书。
管理面板已预装一个自签名证书,位于 /usr/local/lsws/admin/conf 目录中。
让我们先为整个服务器创建自签名证书。
$ cd ~
$ openssl req -x509 -days 365 -newkey rsa:4096 -keyout key.pem -out cert.pem -nodes
您将收到类似的输出。
-----
You are about to be asked to enter information that will be incorporated
into your certificate request.
What you are about to enter is what is called a Distinguished Name or a DN.
There are quite a few fields but you can leave some blank
For some fields there will be a default value,
If you enter '.', the field will be left blank.
-----
Country Name (2 letter code) [AU]:
State or Province Name (full name) [Some-State]:
Locality Name (eg, city) []:
Organization Name (eg, company) [Internet Widgits Pty Ltd]:
Organizational Unit Name (eg, section) []:
Common Name (e.g. server FQDN or YOUR name) []:example.com
Email Address []:
[email protected]
您可以一路按回车将所有字段留空。在 Common name 处填写您的域名,并填写您的电子邮件地址。
为自签名证书创建目录。
$ sudo mkdir /usr/local/lsws/certs
将证书复制到 /usr/local/lsws/certs 目录。
$ sudo mv *.pem /usr/local/lsws/certs
我们需要安装 Certbot 来生成 Let's Encrypt 提供的免费 SSL 证书。
您可以使用 Debian 的仓库安装 Certbot,也可以通过 Snapd 工具获取最新版本。我们将使用 Snapd 版本。Ubuntu 24.04 默认预装了 Snapd。
运行以下命令以确保您的 Snapd 版本是最新的。
$ sudo snap install core
$ sudo snap refresh core
执行以下命令以安装 Certbot。
$ sudo snap install --classic certbot
使用以下命令创建指向 /usr/bin 目录的符号链接,以确保可以运行 Certbot 命令。
$ sudo ln -s /snap/bin/certbot /usr/bin/certbot
验证安装。
$ certbot --version
certbot 2.10.0
运行以下命令以生成 SSL 证书。
获取 SSL 证书。webroot 目录设置为之前配置的公开 HTML 目录。
$ sudo certbot certonly --webroot -w /usr/local/lsws/example.com/html/ --agree-tos --no-eff-email --staple-ocsp --preferred-challenges http -m
[email protected]
 -d example.com
生成 Diffie-Hellman 组证书。
$ sudo openssl dhparam -dsaparam -out /etc/ssl/certs/dhparam.pem 4096
检查 Certbot 续期调度服务。
$ sudo systemctl list-timers
您会发现 snap.certbot.renew.service 是计划运行的服务之一。
NEXT                           LEFT LAST                              PASSED UNIT                      ACTIVATES
Mon 2024-06-03 07:20:00 UTC    5min Mon 2024-06-03 07:10:02 UTC 4min 11s ago sysstat-collect.timer     sysstat-collect.service
Mon 2024-06-03 08:29:00 UTC    1h 14min -                                  - snap.certbot.renew.timer  snap.certbot.renew.service
Mon 2024-06-03 08:50:32 UTC    1h 36min Mon 2024-06-03 07:04:04 UTC    10min ago fwupd-refresh.timer   fwupd-refresh.service
要检查 SSL 续期是否正常工作,请对该过程进行一次试运行(dry run)。
$ sudo certbot renew --dry-run
如果您没有看到任何错误,说明一切就绪。您的证书将自动续期。
现在打开管理控制台,转到 Listeners >> Add New Listener(添加新监听器),并添加以下值。
Listener Name: SSL
IP Address: ANY IPv4
Port: 443
Secure: Yes
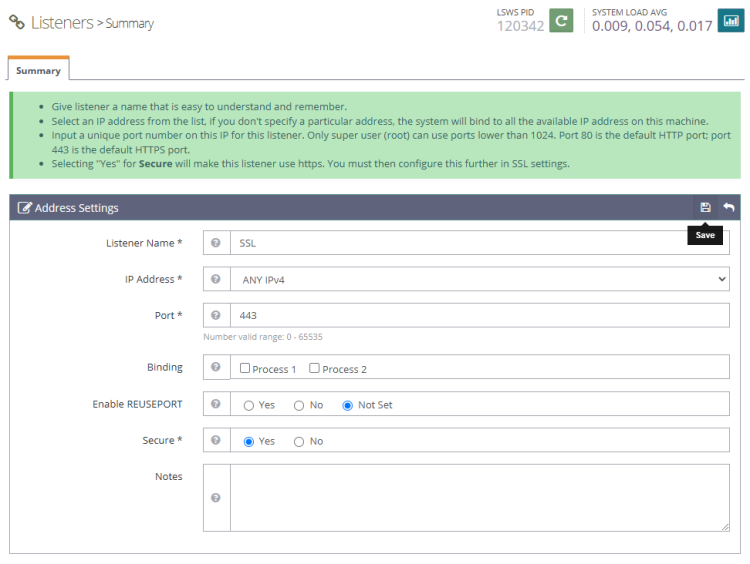
完成后点击“保存”。接下来,转到 SSL 监听器下的 Virtual Host Mappings(虚拟主机映射)部分,点击 SSL,再点击“添加”按钮,并填写以下值。
Virtual Host: example.com
Domains: example.com
完成后点击“保存”。接下来,转到 Listeners >> SSL Listener >> SSL Tab(SSL 选项卡)>> SSL Private Key & Certificate(SSL 私钥与证书,编辑按钮),为我们之前创建的自签名证书填写以下值。
Private Key File: $SERVER_ROOT/certs/key.pem
Certificate File: $SERVER_ROOT/certs/cert.pem
Chained Certificate: Yes
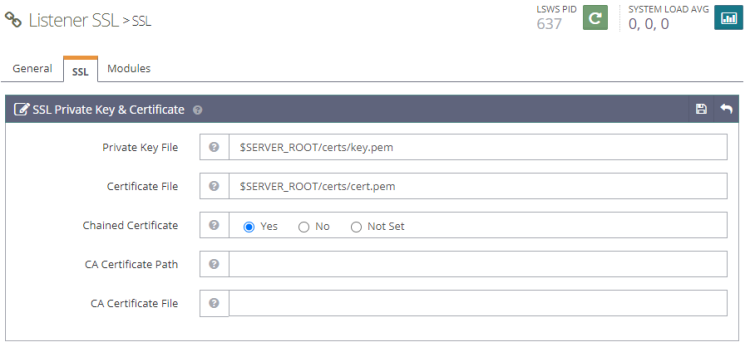
完成后点击“保存”。接下来,转到 Listeners >> SSL Listener >> SSL Tab(SSL 选项卡)>> SSL Protocol(SSL 协议,编辑按钮),填写以下用于 SSL 协议和密码套件的值。
Protocol Version: TLS v1.2 TLS v1.3
Ciphers: ECDHE-ECDSA-AES128-GCM-SHA256:ECDHE-RSA-AES128-GCM-SHA256:ECDHE-ECDSA-AES256-GCM-SHA384:ECDHE-RSA-AES256-GCM-SHA384:ECDHE-ECDSA-CHACHA20-POLY1305:ECDHE-RSA-CHACHA20-POLY1305:DHE-RSA-AES128-GCM-SHA256:DHE-RSA-AES256-GCM-SHA384:DHE-RSA-CHACHA20-POLY1305
Enable ECDH Key Exchange: Yes
Enable DH Key Exchange: Yes
DH Parameter: /etc/ssl/certs/dhparam.pem
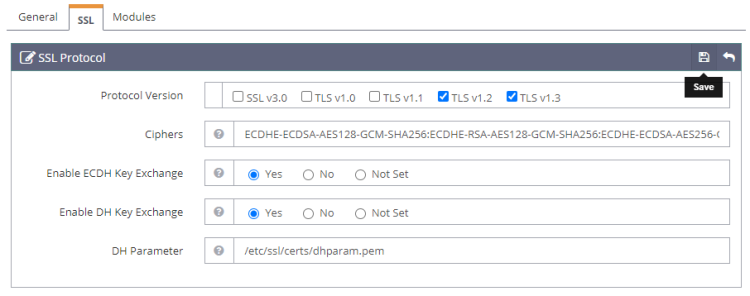
完成后点击“保存”。接下来,转到 Virtual Hosts >> example.com >> SSL Tab(SSL 选项卡)>> SSL Private Key & Certificate(SSL 私钥与证书,编辑按钮),使用 Let's Encrypt 证书填写以下值。
Private Key File: /etc/letsencrypt/live/example.com/privkey.pem
Certificate File: /etc/letsencrypt/live/example.com/fullchain.pem
Chained Certificate: Yes
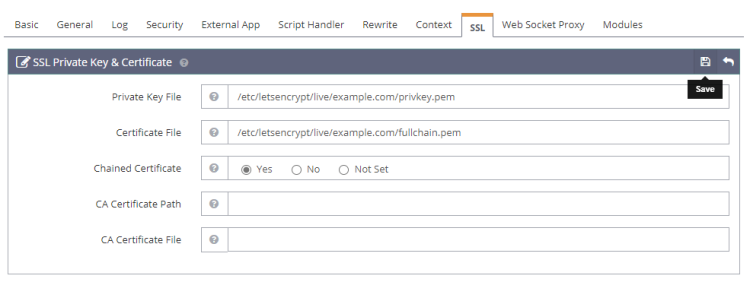
完成后点击“保存”。接下来,转到 Virtual Hosts >> example.com >> SSL Tab(SSL 选项卡)>> OCSP Stapling(OCSP 装订,编辑按钮),填写以下值以启用 OCSP Stapling。
Enable OCSP Stapling: Yes
OCSP Response Max Age(Secs): 300
OCSP Responder: http://r3.o.lencr.org
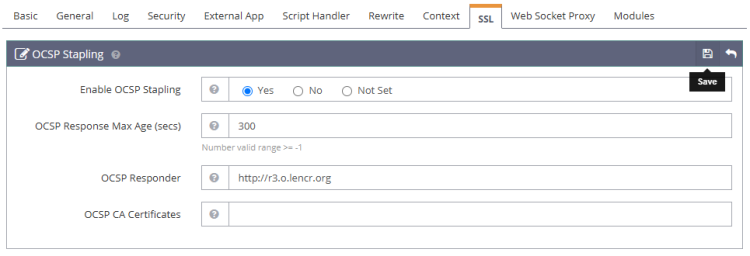
完成后点击“保存”。接下来,转到 Virtual Hosts >> example.com >> SSL Tab(SSL 选项卡)>> Security(安全,编辑按钮),填写以下值以启用 HTTP3/QUIC 协议。
ALPN: Enable HTTP/2 and HTTP/3
Enable HTTP3/QUIC: Yes
我们不需要启用其他选项,因为它们默认已开启。
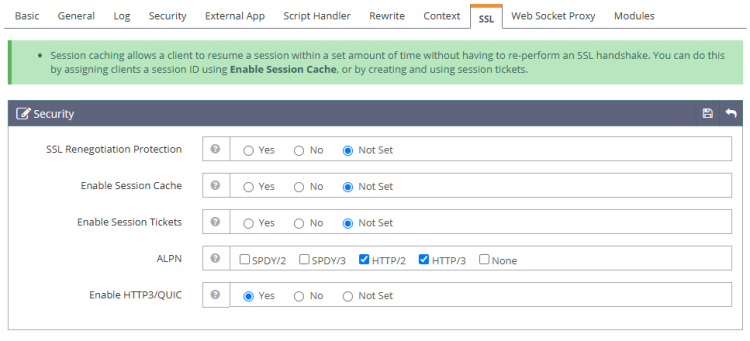
完成后点击“保存”。
点击“平滑重启(Graceful restart)”按钮重启服务器。
第 10 步 - 测试站点
在您的 html 目录中创建一个测试文件。
$ sudo nano /usr/local/lsws/example.com/html/index.php
在 Nano 编辑器中粘贴以下代码。
<html>
<head>
    <h2>OpenLiteSpeed Server Install Test</h2>
</head>
    <body>
    <?php echo '<p>Hello,</p>';

    // Define PHP variables for the MySQL connection.
    $servername = "localhost";
    $username = "testuser";
    $password = "Your_Password123";

    // Create a MySQL connection.
    $conn = mysqli_connect($servername, $username, $password);

    // Report if the connection fails or is successful.
    if (!$conn) {
        exit('<p>Your connection has failed.<p>' .  mysqli_connect_error());
    }
    echo '<p>You have connected successfully.</p>';
    ?>
</body>
</html>
按 Ctrl + X 保存文件,并在提示时输入 Y。在浏览器中打开 URL https://example.com,您应看到如下页面。
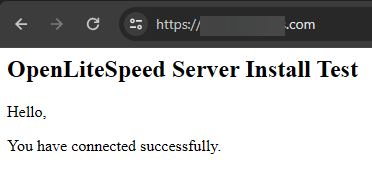
测试站点已完全正常工作。您可以开始使用服务器来提供动态的 PHP 网站和应用程序。
结语
至此,我们关于在 Ubuntu 24.04 服务器上安装 LOMP 栈(OpenLiteSpeed、MySQL 和 PHP)的教程就结束了。如果您有任何问题,请在下方评论中留言。