
本页内容
- 准备工作
- 安装 Node.js
- 创建 Next.js 应用
- 运行 Next.js 应用
- 使用 PM2 管理 Next.js 应用
- 将 Nginx 配置为 Next.js 应用的反向代理
- 访问 Next.js Web 应用
- 总结
Next.js 是一个免费、开源且可用于生产环境的 React 应用框架,它为你提供了构建超快且极具用户友好性的 Web 应用的基石。它由 Vercel 创建,使基于 React 的 Web 应用支持服务端渲染并能够生成静态网站。Next.js 能够处理 React 所需的全部配置,并为你的应用提供额外的功能与优化。
本教程将向你展示如何在 Ubuntu 22.04 上以 Nginx 作为反向代理来安装 Next.js。
准备工作
- 一台运行 Ubuntu 22.04 的服务器。
- 一个已解析到你的服务器 IP 的有效域名。
- 服务器上已配置 root 密码。
安装 Node.js
开始之前,必须在你的服务器上安装 Node.js。首先,使用以下命令安装所有必需的依赖项:
apt install curl gnupg2 wget -y接下来,使用以下命令添加 Node.js 软件源:
curl -sL https://deb.nodesource.com/setup_18.x | bash -软件源添加完成后,使用以下命令安装 Node.js:
apt install nodejs -y安装完成后,使用以下命令验证 Node.js 版本:
node -v你应该会看到类似以下的输出:
v18.12.1
你也可以使用以下命令验证 NPM 版本:
npm -v你应该会看到类似以下的输出:
8.19.2
创建 Next.js 应用
你可以使用 npx 工具来创建 Next.js 应用。npx 是一个命令行工具,可让你轻松安装并管理托管在 npm 仓库中的依赖项。
运行以下命令以创建一个名为 nextapp 的 Next.js 应用:
npx create-next-app nextapp你应该会看到类似以下的输出:
Need to install the following packages:

[email protected]

Ok to proceed? (y) y
? Would you like to use TypeScript with this project? … No / Yes
? Would you like to use ESLint with this project? … No / Yes
Creating a new Next.js app in /root/nextapp.

Using npm.

Installing dependencies:
- react
- react-dom
- next
- typescript
- @types/react
- @types/node
- @types/react-dom
- eslint
- eslint-config-next

added 237 packages, and audited 238 packages in 20s

78 packages are looking for funding
  run `npm fund` for details

found 0 vulnerabilities

Initializing project with template: default

Success! Created nextapp at /root/nextapp
完成后,你可以继续进行下一步。
运行 Next.js 应用
创建 Next.js 应用后,切换到 nextapp 目录并使用以下命令运行它:
cd nextapp
npm run dev
你将看到类似以下的输出:
>
[email protected]
 dev
> next dev

ready - started server on 0.0.0.0:3000, url: http://localhost:3000
event - compiled client and server successfully in 3.2s (154 modules)
Attention: Next.js now collects completely anonymous telemetry regarding usage.
This information is used to shape Next.js' roadmap and prioritize features.
You can learn more, including how to opt-out if you'd not like to participate in this anonymous program, by visiting the following URL:
https://nextjs.org/telemetry
按 CTRL+C 停止应用。然后,使用以下命令构建应用:
npm run build你将看到类似以下的输出:
>
[email protected]
 build
> next build

info  - Linting and checking validity of types
info  - Creating an optimized production build
info  - Compiled successfully
info  - Collecting page data
info  - Generating static pages (3/3)
info  - Finalizing page optimization

Route (pages)                              Size     First Load JS
? ? /                                      4.83 kB        83.7 kB
?   ? css/ae0e3e027412e072.css             707 B
?   /_app                                  0 B            78.9 kB
? ? /404                                   212 B          79.1 kB
? λ /api/hello                             0 B            78.9 kB
+ First Load JS shared by all              79.2 kB
  ? chunks/framework-0f397528c01bc177.js   45.7 kB
  ? chunks/main-5cebf592faf0463a.js        31.8 kB
  ? chunks/pages/_app-05f53d08443c56f6.js  402 B
  ? chunks/webpack-2369ea09e775031e.js     1.02 kB
  ? css/ab44ce7add5c3d11.css               247 B

λ  (Server)  server-side renders at runtime (uses getInitialProps or getServerSideProps)
?  (Static)  automatically rendered as static HTML (uses no initial props)
接下来,使用以下命令启动 Next.js 应用:
npm start你应该会看到类似以下的输出:
>
[email protected]
 start
> next start

ready - started server on 0.0.0.0:3000, url: http://localhost:3000
按 CTRL+C 停止应用。
使用 PM2 管理 Next.js 应用
PM2 是一个面向生产环境 Node.js 应用的高级进程管理器。它可以让你的应用持续保持运行状态。
要安装 PM2,请运行以下命令:
npm install pm2@latest -g接下来,通过运行以下命令使用 PM2 启动你的 Next.js 应用:
pm2 start "npm start"你将看到类似以下的输出:
[PM2] Starting /usr/bin/bash in fork_mode (1 instance)
[PM2] Done.
???????????????????????????????????????????????????????????????????????????????????????????????????????????????????????????????????????????
? id  ? name         ? namespace   ? version ? mode    ? pid      ? uptime ? ?    ? status    ? cpu      ? mem      ? user     ? watching ?
???????????????????????????????????????????????????????????????????????????????????????????????????????????????????????????????????????????
? 0   ? npm start    ? default     ? N/A     ? fork    ? 1321     ? 0s     ? 0    ? online    ? 0%       ? 24.5mb   ? root     ? disabled ?
???????????????????????????????????????????????????????????????????????????????????????????????????????????????????????????????????????????
此时,Next.js 应用已启动并在 3000 端口监听。你可以使用以下命令进行检查:
ss -antpl | grep 3000你将看到类似以下的输出:
LISTEN 0 511 0.0.0.0:3000 0.0.0.0:* users:(("node",pid=1337,fd=18))
你也可以使用以下命令查看 Next.js 应用的状态:
pm2 show "npm start"你将看到类似以下的输出:
 Describing process with id 0 - name npm start
???????????????????????????????????????????????????????????
? status            ? online                              ?
? name              ? npm start                           ?
? namespace         ? default                             ?
? version           ? N/A                                 ?
? restarts          ? 0                                   ?
? uptime            ? 59s                                 ?
? script path       ? /usr/bin/bash                       ?
? script args       ? -c npm start                        ?
? error log path    ? /root/.pm2/logs/npm-start-error.log ?
? out log path      ? /root/.pm2/logs/npm-start-out.log   ?
? pid path          ? /root/.pm2/pids/npm-start-0.pid     ?
? interpreter       ? none                                ?
? interpreter args  ? N/A                                 ?
? script id         ? 0                                   ?
? exec cwd          ? /root/nextapp                       ?
? exec mode         ? fork_mode                           ?
? node.js version   ? N/A                                 ?
? node env          ? N/A                                 ?
? watch & reload    ? ?                                   ?
? unstable restarts ? 0                                   ?
? created at        ? 2022-11-12T13:30:39.734Z            ?
???????????????????????????????????????????????????????????
 Divergent env variables from local env


 Add your own code metrics: http://bit.ly/code-metrics
 Use `pm2 logs npm start [--lines 1000]` to display logs
 Use `pm2 env 0` to display environment variables
 Use `pm2 monit` to monitor CPU and Memory usage npm start
完成后,你可以继续安装并配置 Nginx。
将 Nginx 配置为 Next.js 应用的反向代理
安装并配置 Nginx 作为反向代理来访问 Next.js 应用是一个不错的主意。
首先,使用以下命令安装 Nginx 软件包:
apt install nginx -yNginx 安装完成后,创建一个 Nginx 虚拟主机配置文件:
nano /etc/nginx/conf.d/next.conf添加以下配置:
server {

  server_name next.example.com;

  location / {
    # Reverse proxy for Next server
    proxy_pass http://localhost:3000;
    proxy_http_version 1.1;
    proxy_set_header Upgrade $http_upgrade;
    proxy_set_header Connection "upgrade";
    proxy_set_header Host $host;
    proxy_set_header X-Real-IP $remote_addr;
    proxy_set_header X-Forwarded-For $proxy_add_x_forwarded_for;
    proxy_set_header X-Forwarded-Proto $scheme;
    proxy_set_header X-Forwarded-Host $host;
    proxy_set_header X-Forwarded-Port $server_port;

  }
}
保存并关闭文件。然后,检查 Nginx 是否存在语法配置错误:
nginx -t你应该会看到类似以下的输出:
nginx: the configuration file /etc/nginx/nginx.conf syntax is ok
nginx: configuration file /etc/nginx/nginx.conf test is successful
接下来,重启 Nginx 服务以使更改生效:
systemctl restart nginx你也可以使用以下命令查看 Nginx 的状态:
systemctl status nginx你应该会看到类似以下的输出:
? nginx.service - A high performance web server and a reverse proxy server
     Loaded: loaded (/lib/systemd/system/nginx.service; enabled; vendor preset: enabled)
     Active: active (running) since Sat 2022-11-12 13:35:46 UTC; 6s ago
       Docs: man:nginx(8)
    Process: 2023 ExecStartPre=/usr/sbin/nginx -t -q -g daemon on; master_process on; (code=exited, status=0/SUCCESS)
    Process: 2024 ExecStart=/usr/sbin/nginx -g daemon on; master_process on; (code=exited, status=0/SUCCESS)
   Main PID: 2025 (nginx)
      Tasks: 3 (limit: 464122)
     Memory: 3.3M
     CGroup: /system.slice/nginx.service
             ??2025 "nginx: master process /usr/sbin/nginx -g daemon on; master_process on;"
             ??2026 "nginx: worker process" "" "" "" "" "" "" "" "" "" "" "" "" "" "" "" "" "" "" "" "" "" "" "" "" "" "" ""
             ??2027 "nginx: worker process" "" "" "" "" "" "" "" "" "" "" "" "" "" "" "" "" "" "" "" "" "" "" "" "" "" "" ""

Nov 12 13:35:46 ubuntu22041 systemd[1]: Starting A high performance web server and a reverse proxy server...
Nov 12 13:35:46 ubuntu22041 systemd[1]: Started A high performance web server and a reverse proxy server.
完成后,你可以继续进行下一步。
访问 Next.js Web 应用
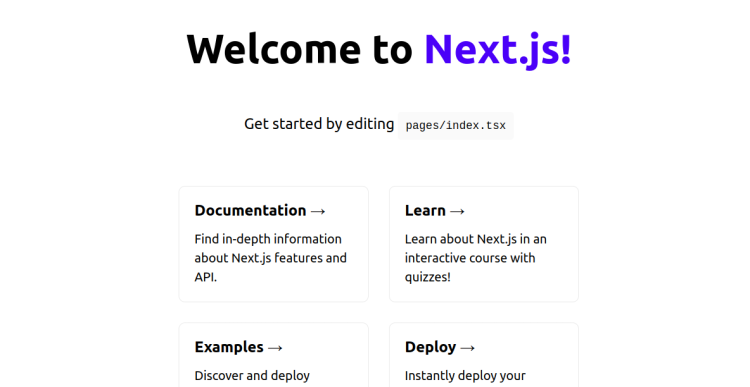
此时,Next.js 应用已安装并完成了 Nginx 配置。你現在可以使用 URL http://next.example.com 访问它。你应该会在以下界面看到 Next.js 网页:
总结
恭喜!你已成功在 Ubuntu 22.04 上配合 Nginx 安装了 Next.js 应用。现在你可以借助 Next.js 框架加快你的开发进程。如果你有任何疑问,欢迎随时向我提问。