
本教程适用于以下操作系统版本
- Ubuntu 22.04(Jammy Jellyfish)
- Ubuntu 18.04(Bionic Beaver)
- Ubuntu 16.04(Xenial Xerus)
本页内容
- 准备工作
- 开始之前
- 安装 Docker
- 下载并启动 OpenProject 容器
- 将 Apache 配置为 OpenProject 的反向代理
- 使用 Let's Encrypt SSL 保护 OpenProject
- 访问 OpenProject Web 界面
- 总结
OpenProject 是一款开源的基于 Web 的项目管理系统。它为团队提供了一种安全可靠的方式来连接、梳理工作并取得成果。借助 OpenProject,您可以在一处组织自己的任务,并将任务分配给团队成员。其社区版涵盖了丰富的功能与插件,并且完全免费。它提供了广泛的功能,例如项目规划与排期、Wiki、论坛、敏捷与 Scrum、缺陷跟踪等。
本文将讲解如何在 Ubuntu 22.04 上使用 Docker 安装 OpenProject。
准备工作
- 一台运行 Ubuntu 22.04 的服务器。
- 服务器上已配置 root 密码。
开始之前
首先,您需要将系统软件包更新并升级到最新版本。可以使用以下命令完成:
apt update -y
apt upgrade -y
所有软件包更新完成后,即可进入下一步。
安装 Docker
接下来,您需要在服务器上安装 Docker 引擎。可以通过运行以下命令来安装:
apt install docker.io -yDocker 安装完成后,可以使用以下命令验证 Docker 版本:
docker --version您将在以下输出中看到 Docker 版本:
Docker version 20.10.12, build 20.10.12-0ubuntu4
您也可以使用以下命令查看 Docker 的状态:
systemctl status docker您将看到类似以下的输出:
? docker.service - Docker Application Container Engine
     Loaded: loaded (/lib/systemd/system/docker.service; enabled; vendor preset: enabled)
     Active: active (running) since Mon 2022-09-12 03:55:27 UTC; 27min ago
TriggeredBy: ? docker.socket
       Docs: https://docs.docker.com
   Main PID: 2188 (dockerd)
      Tasks: 18
     Memory: 175.3M
        CPU: 2min 52.389s
     CGroup: /system.slice/docker.service
             ??2188 /usr/bin/dockerd -H fd:// --containerd=/run/containerd/containerd.sock

Sep 12 04:05:02 ubuntu2204 dockerd[2188]: time="2022-09-12T04:05:02.260137217Z" level=info msg="Container failed to exit within 10s of signal>
Sep 12 04:05:02 ubuntu2204 dockerd[2188]: time="2022-09-12T04:05:02.288143240Z" level=info msg="ignoring event" container=c69a4c77c21fcc30bf5>
Sep 12 04:05:02 ubuntu2204 dockerd[2188]: time="2022-09-12T04:05:02.313368392Z" level=info msg="ignoring event" container=1e168552ee6decb4d38>
Sep 12 04:05:02 ubuntu2204 dockerd[2188]: time="2022-09-12T04:05:02.346672185Z" level=info msg="ignoring event" container=4f042da15c0abe50ac0>
Sep 12 04:05:03 ubuntu2204 dockerd[2188]: time="2022-09-12T04:05:03.128611054Z" level=info msg="ignoring event" container=d07c7ddcf4c5c8e1df3>
Sep 12 04:05:03 ubuntu2204 dockerd[2188]: time="2022-09-12T04:05:03.471773239Z" level=info msg="ignoring event" container=f0095298f0394b4e97c>
Sep 12 04:05:03 ubuntu2204 dockerd[2188]: time="2022-09-12T04:05:03.860303969Z" level=info msg="ignoring event" container=7c591187d6dea45ad9c>
Sep 12 04:10:05 ubuntu2204 dockerd[2188]: time="2022-09-12T04:10:05.733958315Z" level=info msg="ignoring event" container=a9126dced469461963a>
Sep 12 04:17:00 ubuntu2204 dockerd[2188]: time="2022-09-12T04:17:00.365019409Z" level=info msg="ignoring event" container=317a71b1e5e2810e618>
Sep 12 04:19:40 ubuntu2204 dockerd[2188]: time="2022-09-12T04:19:40.133136639Z" level=info msg="ignoring event" container=e5fa71f4c2a7d8f3dc4>
下载并启动 OpenProject 容器
安装 OpenProject 最简单便捷的方式是使用 Docker 容器启动。可以通过运行以下命令来下载并运行:
docker run -dit -p 8080:80 -e OPENPROJECT_SECRET_KEY_BASE=secret -e OPENPROJECT_HOST__NAME=127.0.0.1:8080 -e OPENPROJECT_HTTPS=false openproject/community:12这将下载 OpenProject 社区版 Docker 镜像并启动,如下所示:
Unable to find image 'openproject/community:12' locally
12: Pulling from openproject/community
76dff75df4d9: Pull complete
3e8c90a1c4bb: Pull complete
b3662c105080: Pull complete
ad5dcb7dd592: Pull complete
fa57cc7ce341: Pull complete
9b3a1f58f992: Pull complete
3ba44da7772d: Pull complete
bb99cfe1d593: Pull complete
d9be85920c31: Pull complete
887163836f1b: Pull complete
8d9b5634408e: Pull complete
40cd37c7c054: Pull complete
8f3f7ae1eab6: Pull complete
0bad647edadc: Pull complete
7604d9da2c69: Pull complete
5064bcba96f5: Pull complete
a31fefd0310b: Pull complete
57856090623a: Pull complete
c5788f49d4cb: Pull complete
Digest: sha256:5b3850c813b44e0e83b31ee3ee7e65a22a05009f5101132caee51b4c799adaa9
Status: Downloaded newer image for openproject/community:12
cecc63dbe7c8263cdf9813a5dee5d5cfda3e2f8b8cdb78b3d038679507fa7769
您可以使用以下命令验证已下载的 Docker 镜像:
docker images您将看到类似以下的输出:
REPOSITORY              TAG       IMAGE ID       CREATED       SIZE
openproject/community   12        88f613862e98   11 days ago   1.93GB
要查看 OpenProject 容器状态,请运行以下命令:
docker ps您应能看到 OpenProject 容器已启动,并监听 8080 端口:
CONTAINER ID   IMAGE                      COMMAND                  CREATED          STATUS          PORTS                                             NAMES
cecc63dbe7c8   openproject/community:12   "./docker/prod/entry…"   12 seconds ago   Up 11 seconds   5432/tcp, 0.0.0.0:8080->80/tcp, :::8080->80/tcp   silly_fermi
您也可以使用以下命令查看 OpenProject 容器的日志:
docker logs cecc63dbe7c8您将看到类似以下的输出:
=> Booting Puma
=> Rails 7.0.3.1 application starting in production
=> Run `bin/rails server --help` for more startup options
I, [2022-09-12T04:25:12.466164 #138]  INFO -- : Using schema cache file /app/db/schema_cache.yml
[138] Puma starting in cluster mode...
[138] * Puma version: 5.6.4 (ruby 3.1.2-p20) ("Birdie's Version")
[138] *  Min threads: 4
[138] *  Max threads: 16
[138] *  Environment: production
[138] *   Master PID: 138
[138] *      Workers: 2
[138] *     Restarts: (?) hot (?) phased
[138] * Preloading application
[138] * Listening on http://0.0.0.0:8080
[138] Use Ctrl-C to stop
[138] - Worker 1 (PID: 337) booted in 0.01s, phase: 0
[138] - Worker 0 (PID: 336) booted in 0.02s, phase: 0
将 Apache 配置为 OpenProject 的反向代理
如您所见,OpenProject 监听在 8080 端口。因此建议将 Apache 配置为反向代理,以便通过 80 端口访问 OpenProject。
首先,使用以下命令安装 Apache Web 服务器软件包:
apt install apache2 -yApache 安装完成后,使用以下命令启用所需模块:
a2enmod proxy_http headers rewrite接下来,使用以下命令创建 Apache 虚拟主机配置文件:
nano /etc/apache2/sites-available/openproject.conf添加以下配置内容:
<VirtualHost *:80>
ServerName openproject.linuxbuz.com

RewriteEngine on
RewriteRule "^$" "/" [R,L]

ProxyRequests off

<Location "/">
ProxyPreserveHost On
ProxyPass http://127.0.0.1:8080/
ProxyPassReverse http://127.0.0.1:8080/
</Location>

</VirtualHost>
保存并关闭文件,然后使用以下命令启用 OpenProject 虚拟主机:
a2ensite openproject.conf最后,重启 Apache 服务以使更改生效:
systemctl reload apache2您也可以使用以下命令查看 Apache 的状态:
systemctl status apache2您将看到类似以下的输出:
? apache2.service - The Apache HTTP Server
     Loaded: loaded (/lib/systemd/system/apache2.service; enabled; vendor preset: enabled)
     Active: active (running) since Mon 2022-09-12 04:26:23 UTC; 1min 30s ago
       Docs: https://httpd.apache.org/docs/2.4/
    Process: 14508 ExecReload=/usr/sbin/apachectl graceful (code=exited, status=0/SUCCESS)
   Main PID: 14058 (apache2)
      Tasks: 55 (limit: 4579)
     Memory: 5.4M
        CPU: 98ms
     CGroup: /system.slice/apache2.service
             ??14058 /usr/sbin/apache2 -k start
             ??14512 /usr/sbin/apache2 -k start
             ??14513 /usr/sbin/apache2 -k start

Sep 12 04:26:23 ubuntu2204 systemd[1]: Starting The Apache HTTP Server...
使用 Let's Encrypt SSL 保护 OpenProject
建议在 OpenProject 网站上启用 SSL。首先,使用以下命令安装 Certbot 客户端软件包:
apt install python3-certbot-apache -y接下来,运行以下命令为您的网站域名下载并安装 Let's Encrypt SSL。
certbot --apache -d openproject.linuxbuz.com按如下所示回答所有问题,以完成 Let's Encrypt SSL 的安装:
Saving debug log to /var/log/letsencrypt/letsencrypt.log
Enter email address (used for urgent renewal and security notices)
 (Enter 'c' to cancel):
[email protected]


- - - - - - - - - - - - - - - - - - - - - - - - - - - - - - - - - - - - - - - -
Please read the Terms of Service at
https://letsencrypt.org/documents/LE-SA-v1.2-November-15-2017-w-v1.3-notice.pdf.
You must agree in order to register with the ACME server. Do you agree?
- - - - - - - - - - - - - - - - - - - - - - - - - - - - - - - - - - - - - - - -
(Y)es/(N)o: (Y)es/(N)o: Y

- - - - - - - - - - - - - - - - - - - - - - - - - - - - - - - - - - - - - - - -
Would you be willing, once your first certificate is successfully issued, to
share your email address with the Electronic Frontier Foundation, a founding
partner of the Let's Encrypt project and the non-profit organization that
develops Certbot? We'd like to send you email about our work encrypting the web,
EFF news, campaigns, and ways to support digital freedom.
- - - - - - - - - - - - - - - - - - - - - - - - - - - - - - - - - - - - - - - -
(Y)es/(N)o: Y
Account registered.
Requesting a certificate for openproject.linuxbuz.com

Successfully received certificate.
Certificate is saved at: /etc/letsencrypt/live/openproject.linuxbuz.com/fullchain.pem
Key is saved at:         /etc/letsencrypt/live/openproject.linuxbuz.com/privkey.pem
This certificate expires on 2022-12-11.
These files will be updated when the certificate renews.
Certbot has set up a scheduled task to automatically renew this certificate in the background.

Deploying certificate
Successfully deployed certificate for openproject.linuxbuz.com to /etc/apache2/sites-available/openproject-le-ssl.conf
Added an HTTP->HTTPS rewrite in addition to other RewriteRules; you may wish to check for overall consistency.
Congratulations! You have successfully enabled HTTPS on https://openproject.linuxbuz.com
We were unable to subscribe you the EFF mailing list because your e-mail address appears to be invalid. You can try again later by visiting https://act.eff.org.

- - - - - - - - - - - - - - - - - - - - - - - - - - - - - - - - - - - - - - - -
If you like Certbot, please consider supporting our work by:
 * Donating to ISRG / Let's Encrypt:   https://letsencrypt.org/donate
 * Donating to EFF:                    https://eff.org/donate-le
- - - - - - - - - - - - - - - - - - - - - - - - - - - - - - - - - - - - - - - -
访问 OpenProject Web 界面
现在,打开您的 Web 浏览器,通过 URL https://openproject.linuxbuz.com 访问 OpenProject。您应该会看到 OpenProject 欢迎页面:
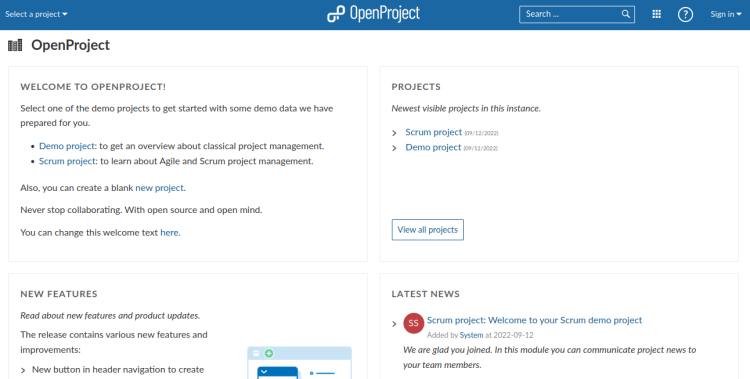
点击“登录”(Sign in)按钮。您应该会看到 OpenProject 登录页面:
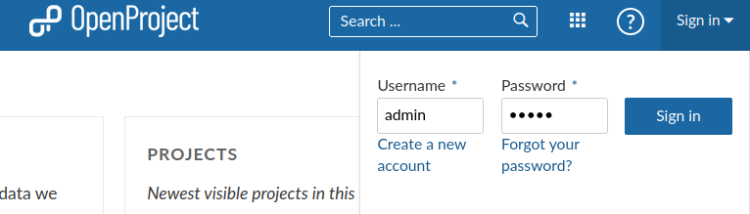
输入默认的用户名和密码 admin / admin,然后点击“登录”(Sign In)按钮。您应该会看到密码修改界面:
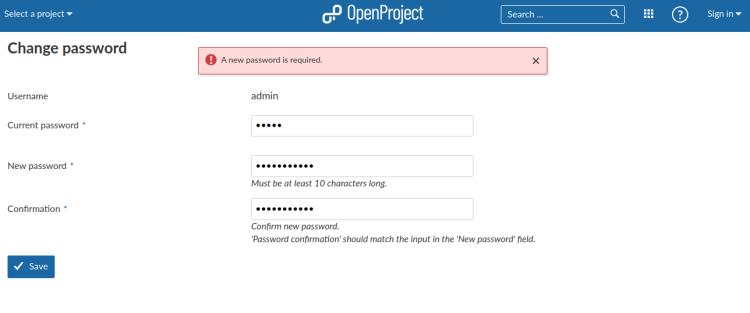
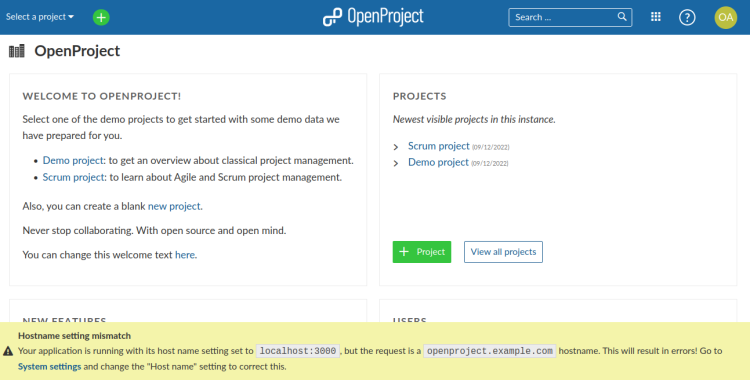
修改您的默认密码并点击“保存”(Save)按钮。您将在以下界面看到 OpenProject 仪表盘:
总结
恭喜!您已成功在 Ubuntu 22.04 上使用 Docker 安装了 OpenProject。现在,您可以在您的组织中部署 OpenProject,并开始在集中位置管理与跟踪您的项目。