
本页内容
- 准备工作
- 步骤 1 - 配置防火墙
- 步骤 2 - 安装 GoCD
- 步骤 3 - 安装并配置 PostgreSQL
- 步骤 4 - 配置 GoCD
- 步骤 5 - 配置 GoCD 身份验证
- 步骤 6 - 安装 Nginx
- 步骤 7 - 安装 SSL
- 步骤 8 - 配置 Nginx
- 步骤 9 - 安装 GoCD 代理
- 总结
GoCD 是一个开源的持续交付和自动化系统。GoCD 擅长通过建模构造、并行执行和依赖管理,对复杂的 CD 工作流进行建模以实现快速反馈。GoCD 通过实时跟踪从提交到部署的每一次变更,帮助你排查损坏的流水线。GoCD 让你轻松比较两个构建,并部署任意所需版本的应用程序。GoCD 生态系统由一个 GoCD 服务器和一个 GoCD 代理(agent)组成。GoCD 控制一切,例如运行基于 Web 的用户界面,以及管理并向代理分派任务。Go 代理(Go agents)负责运行任务与部署。
本教程将教你如何在 Ubuntu 22.04 服务器上安装并配置 GoCD。
先决条件
- 一台运行 Ubuntu 22.04 的服务器,至少 2GB 内存。
- 一个具有 root 权限的非 sudo 用户。
- 已启用并正在运行的不复杂防火墙(UFW)。
- 指向你服务器的完全限定域名(FQDN)。本教程中我们将使用 gocd.example.com。
- 确保系统全部已更新。$ sudo apt update && sudo apt upgrade
一台运行 Ubuntu 22.04 的服务器,至少 2GB 内存。
一个具有 root 权限的非 sudo 用户。
已启用并正在运行的不复杂防火墙(UFW)。
指向你服务器的完全限定域名(FQDN)。本教程中我们将使用 gocd.example.com。
确保系统全部已更新。
$ sudo apt update && sudo apt upgrade
步骤 1 - 配置防火墙
在安装任何软件包之前,第一步是配置防火墙,开放用于 HTTP、HTTPS 和 Synapse 的端口。
检查防火墙状态。
$ sudo ufw status
你应该会看到类似如下的输出。
Status: active

To                         Action      From
--                         ------      ----
OpenSSH                    ALLOW       Anywhere
OpenSSH (v6)               ALLOW       Anywhere (v6)
在防火墙中开放 HTTP、HTTPS 和 GoCD 端口。
$ sudo ufw allow 8153
$ sudo ufw allow http
$ sudo ufw allow https
再次检查状态以确认。
$ sudo ufw status
Status: active

To                         Action      From
--                         ------      ----
OpenSSH                    ALLOW       Anywhere
8153                       ALLOW       Anywhere
80/tcp                     ALLOW       Anywhere
443                        ALLOW       Anywhere
OpenSSH (v6)               ALLOW       Anywhere (v6)
8153 (v6)                  ALLOW       Anywhere (v6)
80/tcp (v6)                ALLOW       Anywhere (v6)
443 (v6)                   ALLOW       Anywhere (v6)
步骤 2 - 安装 GoCD
将 GoCD 的 GPG 密钥导入系统。
$ curl https://download.gocd.org/GOCD-GPG-KEY.asc | gpg --dearmor | sudo tee /usr/share/keyrings/gocd.gpg > /dev/null 2>&1
将 GoCD 软件源添加到系统。
$ echo "deb [signed-by=/usr/share/keyrings/gocd.gpg] https://download.gocd.org /" | sudo tee /etc/apt/sources.list.d/gocd.list
更新系统软件源列表。
$ sudo apt update
安装 GoCD。这同时会安装运行 GoCD 所需的最新兼容版本 Java Runtime(JRE)。
$ sudo apt install -y go-server
在进入下一步之前,我们需要创建一个目录来存储构建产物(artifacts)。构建产物可以存储在与服务器相同的磁盘上,也可以存储在专用磁盘或块存储设备上。本教程中我们将它存储在同一块磁盘上。
创建目录以存储构建产物。
$ sudo mkdir /opt/artifacts
将构建产物目录的所有权赋予 GoCD。
$ sudo chown -R go:go /opt/artifacts
步骤 3 - 安装并配置 PostgreSQL
GoCD 默认自带 H2 数据库,无需任何配置。如果你在生产环境中使用 GoCD,建议使用 PostgreSQL。
Ubuntu 22.04 自带的 PostgreSQL 版本较旧。本教程中我们将安装 Postgres 15。
安装 PostgreSQL 的软件源。
$ sudo sh -c 'echo "deb http://apt.postgresql.org/pub/repos/apt $(lsb_release -cs)-pgdg main" > /etc/apt/sources.list.d/pgdg.list'
导入 PostgreSQL 的 GPG 密钥。
$ curl https://www.postgresql.org/media/keys/ACCC4CF8.asc | gpg --dearmor | sudo tee /etc/apt/trusted.gpg.d/apt.postgresql.org.gpg >/dev/null
更新系统软件源列表。
$ sudo apt update
安装 PostgreSQL 15 服务器。
$ sudo apt install -y postgresql postgresql-contrib
检查服务状态。
$ sudo systemctl status postgresql
? postgresql.service - PostgreSQL RDBMS
     Loaded: loaded (/lib/systemd/system/postgresql.service; enabled; vendor preset: enabled)
     Active: active (exited) since Mon 2022-12-19 06:49:50 UTC; 2h 26min ago
   Main PID: 3536 (code=exited, status=0/SUCCESS)
        CPU: 1ms

Dec 19 06:49:50 gocd systemd[1]: Starting PostgreSQL RDBMS...
Dec 19 06:49:50 gocd systemd[1]: Finished PostgreSQL RDBMS.
登录 PostgreSQL shell。
$ sudo -i -u postgres psql
为 GoCD 创建一个新数据库。
postgres=# CREATE DATABASE "gocd" ENCODING="UTF8" TEMPLATE="template0";
创建一个具有强密码的新数据库用户。
postgres=# CREATE ROLE "gocd_database_user" PASSWORD 'gocd_database_password' NOSUPERUSER NOCREATEDB NOCREATEROLE INHERIT LOGIN;
授予该用户使用数据库的权限。
postgres=# GRANT ALL PRIVILEGES ON DATABASE "gocd" TO "gocd_database_user";
授予该用户超级用户权限。该数据库用户仅在 GoCD 服务器首次启动时才需要超级用户权限。这样做是因为最初需要创建 pgcrypto 和 citext 扩展。GoCD 服务器首次启动后,即可撤销该超级用户权限,因为之后将不再需要。
postgres-=# ALTER ROLE "gocd_database_user" SUPERUSER;
退出 Postgres Shell。
postgres=# \q
为 GoCD 配置 PostgreSQL 的最后一步,是将数据库凭据存储到 GoCD 服务器配置目录中。
创建 db.properties 文件并打开进行编辑。
$ sudo nano /etc/go/db.properties
将以下代码粘贴进去。
db.driver=org.postgresql.Driver
db.url=jdbc:postgresql://localhost:5432/gocd
db.user=gocd_database_user
db.password=gocd_database_password
按 Ctrl + X 保存文件,并在提示时输入 Y。
步骤 4 - 配置 GoCD
在配置 GoCD 之前,我们需要先启动 GoCD 服务器。
启动 GoCD 服务器。
$ sudo systemctl start go-server
检查服务器状态。
$ sudo systemctl status go-server
? go-server.service - go-server
     Loaded: loaded (/etc/systemd/system/go-server.service; enabled; vendor preset: enabled)
     Active: active (running) since Thu 2022-12-15 08:53:10 UTC; 8s ago
    Process: 8475 ExecStart=/usr/share/go-server/bin/go-server start sysd (code=exited, status=0/SUCCESS)
   Main PID: 8541 (wrapper-linux-x)
      Tasks: 43 (limit: 2237)
     Memory: 566.7M
        CPU: 11.873s
     CGroup: /system.slice/go-server.service
             ??8541 /usr/share/go-server/bin/../wrapper/wrapper-linux-x86-64 /usr/share/go-server/wrapper-config/wrapper.conf wrapper.syslog.ident=go-server wrapper.pidfile=/var/lib/go-server/run/go-server.pi>
             ??8556 /usr/share/go-server/jre/bin/java --add-opens=java.base/java.lang=ALL-UNNAMED --add-opens=java.base/java.util=ALL-UNNAMED -Xms512m -Xmx1024m -XX:MaxMetaspaceSize=400m .....
访问 URL http://
你将看到如下页面。
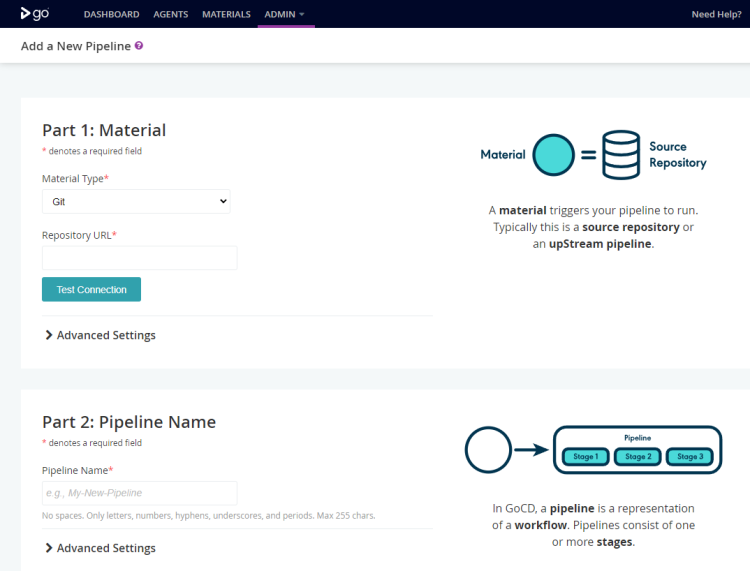
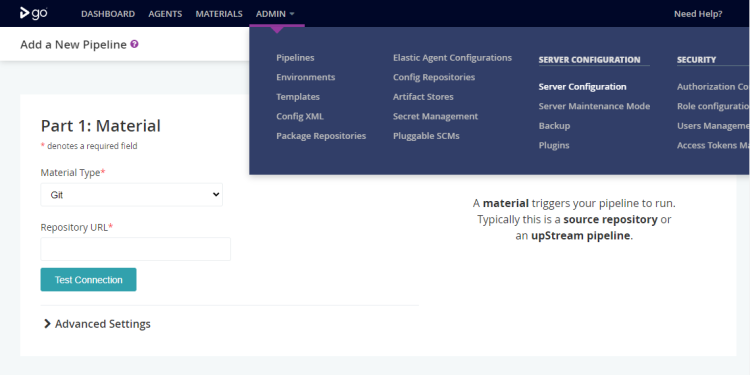
在使用之前,你应该配置 GoCD。从顶部导航栏进入 Admin >> Server Configuration 菜单。
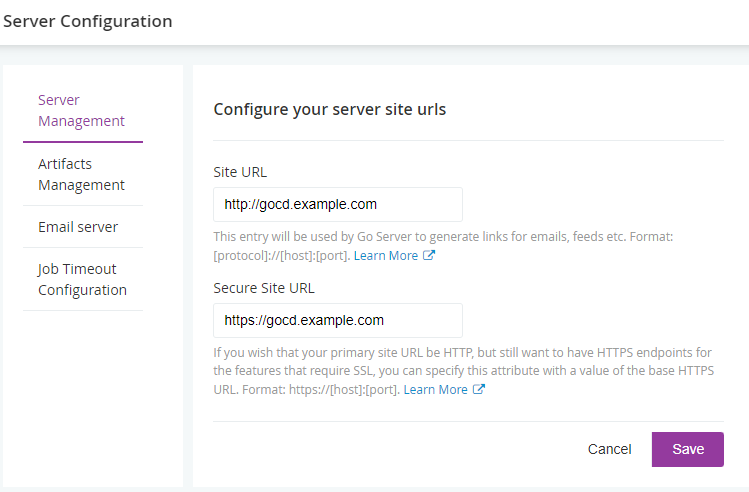
在相应字段中填写站点 URL,然后按下 Save 按钮。
从左侧菜单点击 Artifacts Management 选项,并输入之前创建的构建产物目录的位置。选择 Allow auto cleanup artifacts 选项以管理空间,并根据需要设置容量。完成后点击 Save 按钮。
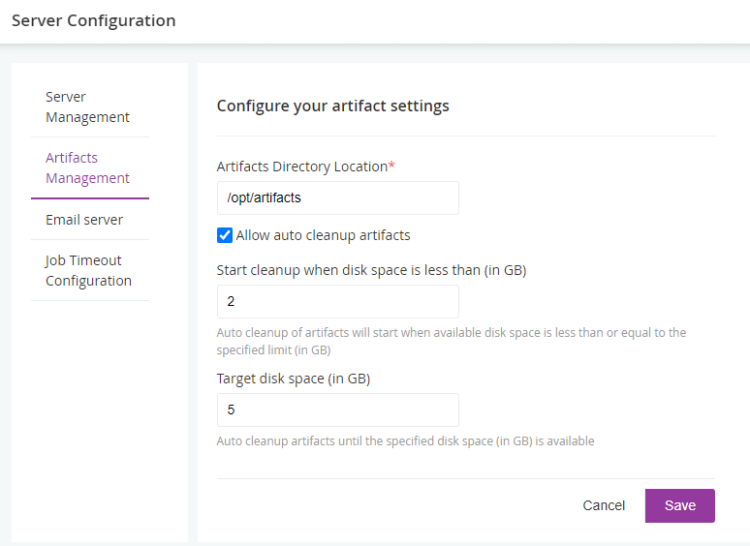
不过,自动删除选项不会备份你的旧构建产物。如果要先手动备份再删除旧构建产物,请取消勾选 Allow auto cleanup artifacts 选项以关闭自动删除。
接下来,我们需要配置邮件选项,以接收来自 GoCD 的邮件通知。
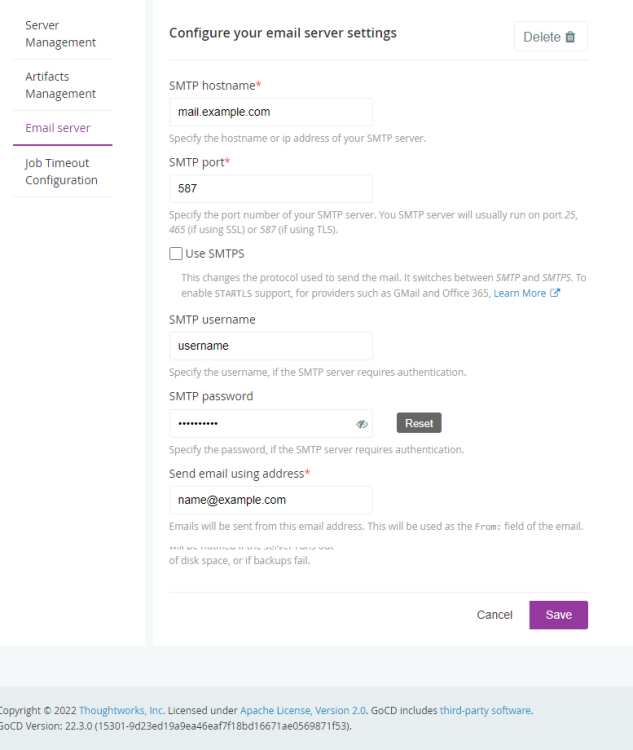
点击 Send Test Email 按钮测试设置,然后点击 Save 按钮完成。
如果你想设置任务超时时间,可以前往 Job Timeout Configuration 部分进行设置。
重启 GoCD 服务器以应用更改。
$ sudo systemctl restart go-server
步骤 5 - 配置 GoCD 身份验证
默认情况下,任何人都可访问 GoCD,但你可以使用密码文件或 LDAP 来配置身份验证。本教程中,我们将设置基于密码的身份验证。
安装 Apache 工具,以便我们可以使用 htpasswd 命令创建加密的密码文件。
$ sudo apt install apache2-utils
使用 Bcrypt 身份验证创建密码文件。其中 -c 标志用于创建新文件,-B 标志用于设置 Bcrypt 身份验证,goadmin 为用户名。
$ sudo htpasswd -B -c /etc/go/passwd_auth navjot
在提示时输入密码。
New password:
Re-type new password:
Adding password for user navjot
你可以使用相同的命令添加多个用户,但要去掉 -c 标志,因为文件已经存在。再次使用 -c 标志会覆盖现有文件,并用新用户替换原有用户。
$ sudo htpasswd -B /etc/go/passwd_auth gouser1
身份验证的下一步是在 GoCD 后端配置密码位置。从顶部导航栏进入 Admin >> Security >> Authorization Configuration 部分。
点击 Add 按钮并填写任意 ID。从下拉菜单中选择插件 ID 为 Password File Authentication Plugin for GoCD,并输入密码文件的路径。接下来,点击 Check Connection 按钮,以验证 GoCD 能否访问该文件用于身份验证。
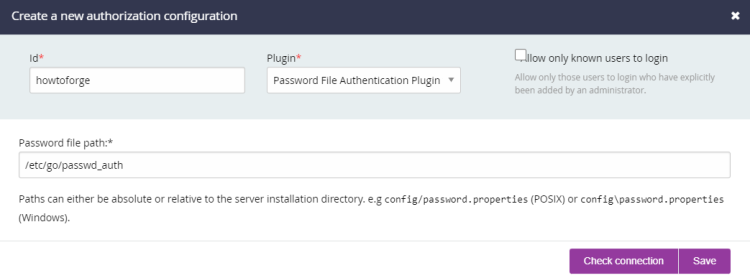
对于第一个用户,保持 Allow only known users to login 选项未勾选。点击 Save 按钮完成。
很快会要求你刷新 GoCD,并将跳转到登录页面。
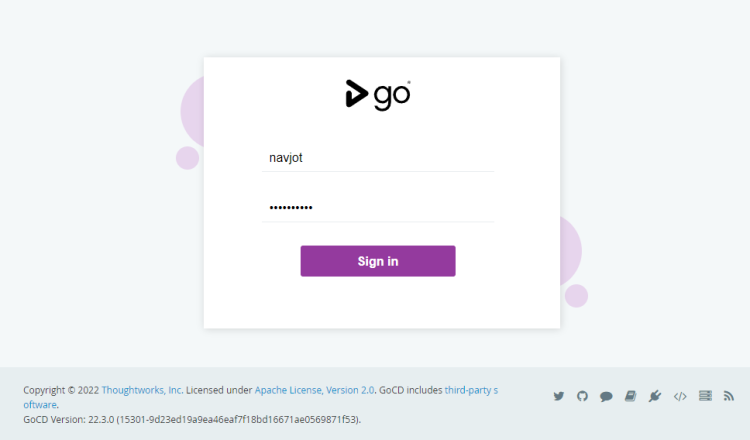
输入之前创建的凭据,按下 Sign in 按钮继续。从顶部导航栏进入 Admin >> Security >> Users Management 部分。
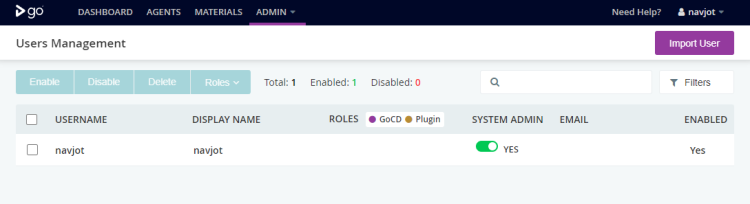
勾选 SYSTEM ADMIN 框,将该用户标记为管理员。现在,返回 Admin >> Security >> Authorization Configuration 部分,点击密码文件列表项对应的 Edit 按钮。

勾选 Allow only known users to login 选项。从此以后,你需要先通过 htpasswd 文件创建新用户,然后再从服务器页面将其导入。
让我们创建第二个用户。
$ sudo htpasswd -B /etc/go/passwd_auth gouser1
New password:
Re-type new password:
Adding password for user gouser1
从顶部导航菜单进入 Admin >> Security >> Users Management 部分,点击 Import User 按钮。输入用户名 gouser1 以搜索该用户。
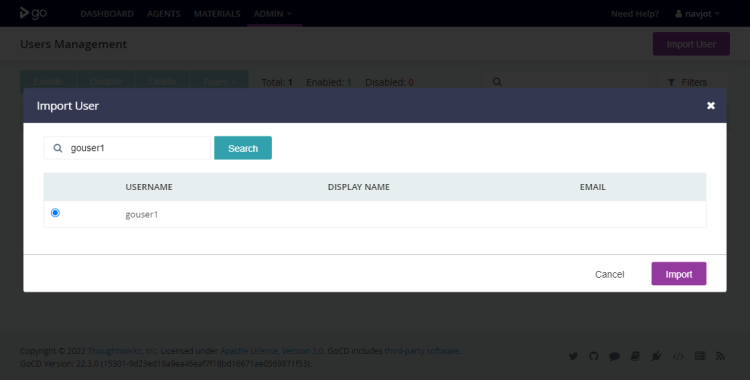
选择该用户并点击 Import 按钮以添加该用户。
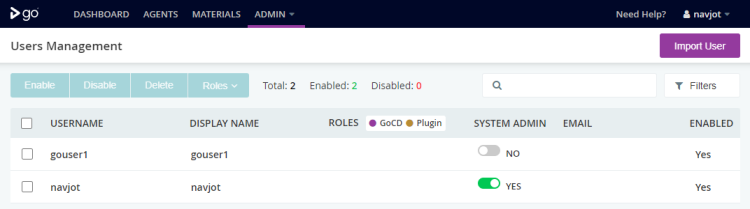
现在,你也可以使用第二个用户登录。重复该流程可添加更多用户。
步骤 6 - 安装 Nginx
Ubuntu 22.04 自带的 Nginx 版本较旧。要安装最新版本,你需要下载官方 Nginx 软件源。
导入 Nginx 的签名密钥。
$ curl https://nginx.org/keys/nginx_signing.key | gpg --dearmor \
| sudo tee /usr/share/keyrings/nginx-archive-keyring.gpg >/dev/null
添加 Nginx 稳定版的软件源。
$ echo "deb [signed-by=/usr/share/keyrings/nginx-archive-keyring.gpg arch=amd64] \
http://nginx.org/packages/ubuntu `lsb_release -cs` nginx" \
| sudo tee /etc/apt/sources.list.d/nginx.list
更新系统软件源。
$ sudo apt update
安装 Nginx。
$ sudo apt install nginx
验证安装。
$ nginx -v
nginx version: nginx/1.22.1
启动 Nginx 服务器。
$ sudo systemctl start nginx
步骤 7 - 安装 SSL
我们需要安装 Certbot 来生成 SSL 证书。你可以使用 Ubuntu 的软件源安装 Certbot,也可以通过 Snapd 工具获取最新版本。我们将使用 Snapd 版本。
Ubuntu 22.04 默认已安装 Snapd。运行以下命令,确保你的 Snapd 版本是最新的。
$ sudo snap install core
$ sudo snap refresh core
安装 Certbot。
$ sudo snap install --classic certbot
使用以下命令,通过创建指向 /usr/bin 目录的符号链接,确保 Certbot 命令可以运行。
$ sudo ln -s /snap/bin/certbot /usr/bin/certbot
运行以下命令生成 SSL 证书。
$ sudo certbot certonly --nginx --agree-tos --no-eff-email --staple-ocsp --preferred-challenges http -m
[email protected]
 -d gocd.example.com
上述命令会将证书下载到服务器上的 /etc/letsencrypt/live/gocd.example.com 目录。
生成 Diffie-Hellman 组证书。
$ sudo openssl dhparam -dsaparam -out /etc/ssl/certs/dhparam.pem 4096
对该过程进行一次试运行,以检查 SSL 续期是否正常工作。
$ sudo certbot renew --dry-run
如果没有看到错误,说明一切就绪。你的证书将自动续期。
步骤 8 - 配置 Nginx
打开文件 /etc/nginx/nginx.conf 进行编辑。
$ sudo nano /etc/nginx/nginx.conf
在 include /etc/nginx/conf.d/*.conf; 这一行之前添加以下行。
server_names_hash_bucket_size 64;
按 Ctrl + X 保存文件,并在提示时输入 Y。
创建并打开文件 /etc/nginx/conf.d/gocd.conf 进行编辑。
$ sudo nano /etc/nginx/conf.d/gocd.conf
将以下代码粘贴进去。
server {
  # Redirect any http requests to https
  listen         80;
  listen         [::]:80;
  server_name    gocd.example.com;
  return 301     https://$host$request_uri;
}

map $http_upgrade $connection_upgrade {
  default upgrade;
  '' close;
}

server {
  listen                    443 ssl http2;
  listen                    [::]:443 ssl http2;
  server_name               gocd.example.com;

  access_log                /var/log/nginx/gocd.access.log;
  error_log                 /var/log/nginx/gocd.error.log;

  # TLS configuration
  ssl_certificate           /etc/letsencrypt/live/gocd.example.com/fullchain.pem;
  ssl_certificate_key       /etc/letsencrypt/live/gocd.example.com/privkey.pem;
  ssl_trusted_certificate   /etc/letsencrypt/live/gocd.example.com/chain.pem;
  ssl_protocols             TLSv1.2 TLSv1.3;

  ssl_ciphers 'ECDHE-ECDSA-AES256-GCM-SHA384:ECDHE-RSA-AES256-GCM-SHA384:ECDHE-ECDSA-CHACHA20-POLY1305:ECDHE-RSA-CHACHA20-POLY1305:ECDHE-ECDSA-AES256-SHA384:ECDHE-RSA-AES256-SHA384';
  ssl_prefer_server_ciphers on;
  ssl_session_cache         shared:SSL:50m;
  ssl_session_timeout       1d;

  # OCSP Stapling ---
  # fetch OCSP records from URL in ssl_certificate and cache them
  ssl_stapling on;
  ssl_stapling_verify on;
  ssl_dhparam /etc/ssl/certs/dhparam.pem;

  # Proxy everything over to the GoCD server
  location / {
    proxy_set_header        Host            $host;
    proxy_set_header        X-Real-IP       $remote_addr;
    proxy_set_header        X-Forwarded-For $proxy_add_x_forwarded_for;
    proxy_set_header        X-Forwarded-Proto $scheme;
    proxy_http_version      1.1;
    proxy_set_header        Upgrade $http_upgrade;
    proxy_set_header        Connection $connection_upgrade;
    proxy_pass              http://localhost:8153/;

    # To be able to upload artifacts larger than default size of 1mb, ensure that you set this up to a large value.
    # setting to `0` will disable checking for body size.
    # See https://nginx.org/en/docs/http/ngx_http_core_module.html#client_max_body_size
    client_max_body_size  10000m;

    # If you are intending to allow downloading of large artifacts (> 1GB) from GoCD you may need to adjust one of the
    # following two proxy buffering settings to prevent downloads failing for slow clients due to server idle timeouts.
    #
    # See https://nginx.org/en/docs/http/ngx_http_proxy_module.html#proxy_buffering
    #
    # 1) disable the buffering of responses entirely (enabled by default on NGINX) OR
    # proxy_buffering off;
    #
    # 2) increase the max temporary file size (setting to `0` will disable the limit)
    # proxy_max_temp_file_size 2048m;
  }
}
完成后按 Ctrl + X 保存文件,并在提示时输入 Y。
验证 Nginx 配置文件语法。
$ sudo nginx -t
nginx: the configuration file /etc/nginx/nginx.conf syntax is ok
nginx: configuration file /etc/nginx/nginx.conf test is successful
重启 Nginx 服务。
$ sudo systemctl restart nginx
现在你可以通过 URL https://gocd.example.com 访问 GoCD 仪表盘。
步骤 9 - 安装 GoCD 代理(Agent)
GoCD 代理(Agents)是负责执行所有任务的工作节点。当检测到源代码发生变更时,会触发流水线,并将任务分派给可用的工作节点执行。随后代理执行任务,并在执行后报告最终状态。
要运行流水线,必须至少配置一个代理。让我们在 GoCD 服务器上安装 GoCD 代理。
我们已经导入了 GoCD 软件源,因此可以直接安装 GoCD 代理。
$ sudo apt install go-agent
启动 GoCD 代理服务。
$ sudo systemctl start go-agent
访问 GoCD 仪表盘上的 Agents 标签页,你应该会看到该代理已被列出并自动启用。
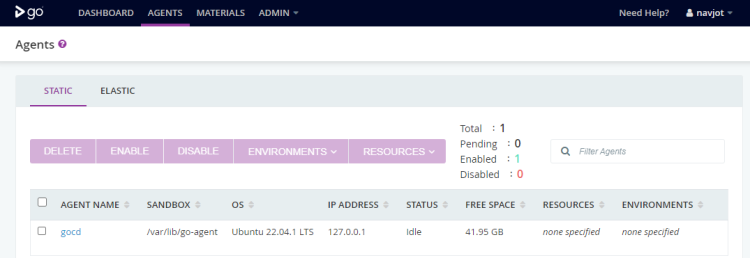
从这里开始,你就可以使用 GoCD CI/CD 服务了。
总结
本教程到此结束,你已学会如何在 Ubuntu 22.04 服务器上安装并配置 GoCD。如果你有任何疑问,请在下方评论中留言。