
在本页
- 1 系统要求
- 2 前置说明
- 3 准备服务器
- 4 启用附加软件仓库并安装一些软件
- 5 Quota 在 /(root)分区上启用配额 在单独的 /var 分区上启用配额
- 6 安装 Apache、PHP、MySQL 和 phpMyAdmin 可选:更改 Apache MPM 模块
- 7 安装 Dovecot
- 8 安装 Postfix
- 9 安装 Getmail
- 10 设置 MySQL 密码并配置 phpMyAdmin
- 11 安装 Amavisd-new、SpamAssassin、ClamAV 和 Postgrey
- 12 安装带 mod_php、mod_fcgi/PHP、PHP-FPM 的 Apache
- 13 安装 mod_python
- 14 安装 PureFTPd
- 15 安装 BIND
- 16 安装 AWStats
- 17 安装 Jailkit
- 18 安装 Fail2Ban
- 19 安装 rkhunter
- 20 安装 Mailman
- 21 安装 Roundcube 网页邮箱
- 22 安装 ISPConfig 3.2
- 23 首次登录 ISPConfig 23.1 ISPConfig 3 手册
- 24 以虚拟机形式下载
- 25 链接
- 在 /(root)分区上启用配额
- 在单独的 /var 分区上启用配额
- 可选:更改 Apache MPM 模块
- 23.1 ISPConfig 3 手册
本教程演示如何在 CentOS 8(64 位)服务器上安装 ISPConfig 3.2。ISPConfig 是一个网站托管控制面板,可让你通过网页浏览器配置以下服务:Apache 网站服务器、PHP、Postfix 邮件服务器、MySQL、BIND 域名服务器、PureFTPd、SpamAssassin、ClamAV、Mailman 等众多服务。
1 系统要求
要安装这样的系统,你需要具备以下条件:
- 一个 CentOS 8 最小化服务器系统。这可以是按照我们的 CentOS 8 最小化服务器教程从头安装的服务器,也可以是托管服务商提供的、已安装最小化 CentOS 8 设置的虚拟服务器或独立根服务器。
- 一条快速的网络连接。
2 前置说明
在本教程中,我使用主机名 server1.example.com、IP 地址 192.168.0.100 和网关 192.168.0.1。你的设置可能与此不同,因此需要在适当之处进行替换。
3 准备服务器
设置键盘布局
如果服务器的键盘布局与你的键盘不匹配,可以使用 localectl 命令切换到正确的键盘布局(在我的例子中是 "de",即德语键盘布局):
localectl set-keymap de要获取所有可用键盘映射的列表,请运行:
localectl list-keymaps我想在本教程的最后安装 ISPConfig,ISPConfig 自带 Bastille 防火墙脚本,我将把它用作防火墙,因此现在先禁用默认的 CentOS 防火墙。当然,你也可以自行选择保持 CentOS 防火墙开启并按需要进行配置(但那样的话,之后就不应再使用任何其他防火墙,因为它很可能会与 CentOS 防火墙产生冲突)。
运行……
dnf -y install net-tools wget rsyslog curl
systemctl stop firewalld.service
systemctl disable firewalld.service
以停止并禁用 CentOS 防火墙。如果这里出现错误也没有关系,这只是表明防火墙尚未安装。
然后你应检查防火墙是否确实已被禁用。为此,请运行以下命令:
iptables -L输出应如下所示:
[root@server1 ~]# iptables -L
Chain INPUT (policy ACCEPT)
target prot opt source destination
Chain FORWARD (policy ACCEPT)
target prot opt source destination
Chain OUTPUT (policy ACCEPT)
target prot opt source destination
或者使用 firewall-cmd 命令:
firewall-cmd --state[root@server1 ~]# firewall-cmd --state not running [root@server1 ~]#
现在我将安装网络配置编辑器,以及将在后续步骤中用来编辑配置文件的基于 shell 的编辑器 "nano":
dnf -y install nano wget NetworkManager-tui yum-utils如果你在安装过程中没有配置网卡,现在可以进行配置。运行……
nmtui……并进入 Edit a connection(编辑连接):
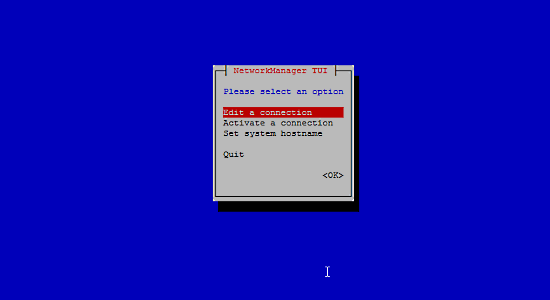
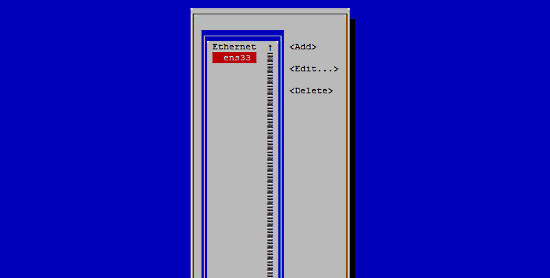
选择你的网络接口:
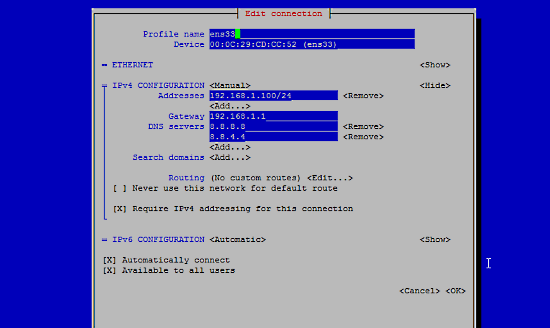
然后填写你的网络详细信息——禁用 DHCP,填入静态 IP 地址、子网掩码、网关以及一到两个域名服务器,然后点击 Ok:
接下来选择 OK 以确认你在网络设置中所做的更改
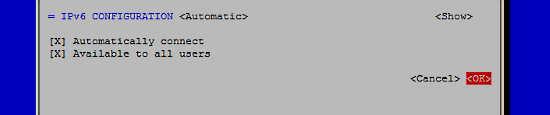
并选择 Quit 关闭 nmtui 网络配置工具。
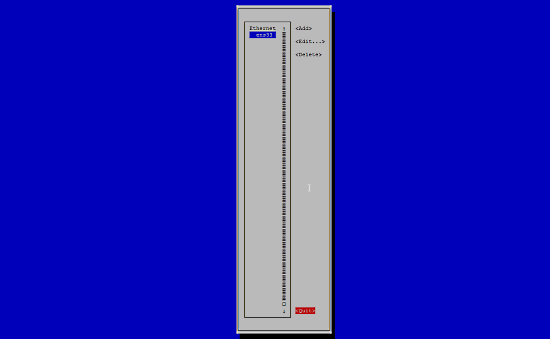
你应该运行
ifconfig以检查安装程序是否正确获取了你的 IP 地址:
[root@server1 ~]# ifconfig
ens33: flags=4163<UP,BROADCAST,RUNNING,MULTICAST>  mtu 1500
        inet 192.168.0.100  netmask 255.255.255.0  broadcast 192.168.0.255
        inet6 fe80::20c:29ff:feee:b665  prefixlen 64  scopeid 0x20<link>
        inet6 2003:e1:bf22:1b00:20c:29ff:feee:b665  prefixlen 64  scopeid 0x0<global>
        ether 00:0c:29:ee:b6:65  txqueuelen 1000  (Ethernet)
        RX packets 2874  bytes 1369892 (1.3 MiB)
        RX errors 0  dropped 546  overruns 0  frame 0
        TX packets 968  bytes 160901 (157.1 KiB)
        TX errors 0  dropped 0 overruns 0  carrier 0  collisions 0
lo: flags=73<UP,LOOPBACK,RUNNING>  mtu 65536
        inet 127.0.0.1  netmask 255.0.0.0
        inet6 ::1  prefixlen 128  scopeid 0x10<host>
        loop  txqueuelen 1000  (Local Loopback)
        RX packets 0  bytes 0 (0.0 B)
        RX errors 0  dropped 0  overruns 0  frame 0
        TX packets 0  bytes 0 (0.0 B)
        TX errors 0  dropped 0 overruns 0  carrier 0  collisions 0
如果你的网卡没有显示在那里,说明它在启动时未被启用。在这种情况下,打开文件 /etc/sysconfig/network-scripts/ifcfg-eth0
nano /etc/sysconfig/network-scripts/ifcfg-ens33并将 ONBOOT 设置为 yes:
[...]
ONBOOT=yes
[...]
然后重启服务器。
检查你的 /etc/resolv.conf,看其中是否列出了你先前配置的所有域名服务器:
cat /etc/resolv.conf如果缺少域名服务器,请运行
nmtui并重新添加缺失的域名服务器。
现在,进入配置环节……
调整 /etc/hosts 和 /etc/hostname
接下来,我们将编辑 /etc/hosts,使其看起来像这样:
nano /etc/hosts127.0.0.1 localhost localhost.localdomain localhost4 localhost4.localdomain4 192.168.0.100 server1.example.com server1 ::1 localhost localhost.localdomain localhost6 localhost6.localdomain6
在 /etc/hostname 文件中设置主机名。该文件应包含完全限定域名(例如在我的例子中是 server1.example.com),而不仅仅是像 "server1" 这样的短名称。用 nano 编辑器打开该文件:
nano /etc/hostname并在文件中设置主机名。
server1.example.com
保存文件并退出 nano。
将 SELinux 设置为 permissive(宽松模式)
SELinux 是 CentOS 的一个安全扩展,旨在提供更强的安全性。ISPConfig 并未附带 SELinux 规则集,因此我将其设置为 permissive(宽松模式)(如果你之后要安装 ISPConfig,这是必须的)。
编辑 /etc/selinux/config 并设置 SELINUX=permissive:
nano /etc/selinux/config# This file controls the state of SELinux on the system. # SELINUX= can take one of these three values: # enforcing - SELinux security policy is enforced. # permissive - SELinux prints warnings instead of enforcing. # disabled - No SELinux policy is loaded. SELINUX=permissive # SELINUXTYPE= can take one of these two values: # targeted - Targeted processes are protected, # mls - Multi Level Security protection. SELINUXTYPE=targeted
之后我们必须重启系统:
reboot4 启用附加软件仓库并安装一些软件
首先,我们导入软件包的 GPG 密钥:
rpm --import /etc/pki/rpm-gpg/RPM-GPG-KEY*然后在 CentOS 系统上启用 EPEL 仓库,因为我们在本教程过程中要安装的许多软件包在官方 CentOS 8 仓库中并不可用:
dnf -y install epel-release启用 Power Tools:
dnf config-manager --set-enabled powertools然后更新系统上现有的软件包:
dnf -y update现在我们安装一些后续需要用到的软件包:
dnf -y groupinstall 'Development Tools'5 Quota(磁盘配额)
(如果你选择了与我不同的分区方案,则必须调整本章,使配额应用于你需要它的分区。)
要安装 quota,我们运行以下命令:
dnf -y install quota现在我们检查存放网站(/var/www)和 Maildir 数据(var/vmail)的文件系统上是否已启用配额。在这个示例设置中,我有一个大的根分区,因此我搜索 ' / ':
mount | grep ' / '[root@server1 ~]# mount | grep ' / ' /dev/mapper/centos-root on / type xfs (rw,relatime,attr2,inode64,noquota) [root@server1 ~]#
如果你有一个单独的 /var 分区,则使用:
mount | grep ' /var '来代替。如果该行包含 " noquota " 字样,则继续以下步骤以启用配额。
在 /(root)分区上启用配额
通常你会在 /etc/fstab 文件中启用配额,但如果文件系统是根文件系统 "/",则必须通过 Linux 内核的启动参数来启用配额。
编辑 grub 配置文件:
nano /etc/default/grub搜索以 GRUB_CMDLINE_LINUX 开头的行,并在命令行参数中添加 rootflags=uquota,gquota,使最终的行如下所示:
GRUB_CMDLINE_LINUX="crashkernel=auto resume=/dev/mapper/cl-swap rd.lvm.lv=cl/root rd.lvm.lv=cl/swap rootflags=uquota,gquota"
并通过运行以下命令使更改生效。
cp /boot/grub2/grub.cfg /boot/grub2/grub.cfg_bak
grub2-mkconfig -o /boot/grub2/grub.cfg
然后重启服务器。
reboot现在检查配额是否已启用:
mount | grep ' / '[root@server1 ~]# mount | grep ' / ' /dev/mapper/centos-root on / type xfs (rw,relatime,attr2,inode64,usrquota,grpquota) [root@server1 ~]#
当配额处于活动状态时,我们可以在挂载选项列表中看到 " usrquota,grpquota "。
在单独的 /var 分区上启用配额
如果你有一个单独的 /var 分区,则编辑 /etc/fstab,并在 / 分区(/dev/mapper/centos-var)上添加 ,uquota,gquota:
nano /etc/fstab#
# /etc/fstab
# Created by anaconda on Sun Sep 21 16:33:45 2014
#
# Accessible filesystems, by reference, are maintained under '/dev/disk'
# See man pages fstab(5), findfs(8), mount(8) and/or blkid(8) for more info
#
/dev/mapper/centos-root / xfs defaults 1 1
/dev/mapper/centos-var /var xfs defaults
,uquota,gquota
1 2
UUID=9ac06939-7e43-4efd-957a-486775edd7b4 /boot xfs defaults 1 3
/dev/mapper/centos-swap swap swap defaults 0 0
然后运行
mount -o remount /varquotacheck -avugm
quotaon -avug以启用配额。如果出现没有启用配额的分区的错误,请先重启服务器再继续。
6 安装 Apache、PHP、MySQL 和 phpMyAdmin
启用 Remi 仓库以获取更新版本的 PHP(当前为 PHP 7.4):
dnf install http://rpms.remirepo.net/enterprise/remi-release-8.rpm
dnf -y install yum-utils
dnf -y module reset php
dnf -y module install php:remi-7.4
dnf update
我们可以用一条命令安装所需的软件包:
dnf -y install httpd mod_ssl mariadb-server php php-mysqlnd php-mbstring为确保服务器不会通过 HTTPOXY 漏洞受到攻击,我们将在 Apache 中全局禁用 HTTP_PROXY 头。
在 httpd.conf 文件末尾添加 Apache 头规则:
echo "RequestHeader unset Proxy early" >> /etc/httpd/conf/httpd.conf然后重启 httpd 以使配置更改生效。
service httpd restart安装 phpMyAdmin:
cd /tmp
wget https://files.phpmyadmin.net/phpMyAdmin/5.0.2/phpMyAdmin-5.0.2-all-languages.tar.gz
tar xzvf phpMyAdmin-5.0.2-all-languages.tar.gz
mkdir /usr/share/phpmyadmin
mv phpMyAdmin-5.0.2-all-languages/* /usr/share/phpmyadmin/
mkdir /usr/share/phpmyadmin/tmp
chown -R apache:apache /usr/share/phpmyadmin
chmod 777 /usr/share/phpmyadmin/tmp
可选:更改 Apache MPM 模块
CentOS 8 默认使用 Apache MPM Event 模块,这一方面是好事,因为它允许你使用 HTTP/2 协议。另一方面,它不允许你使用 Apache 的 mod_php 模块。一般来说,如今应将 PHP-FPM 作为默认选择,而 ISPConfig 支持这一点。如果出于兼容性原因需要旧的 mod_php 模式,可以按如下方式切换 Apache MPM:
nano /etc/httpd/conf.modules.d/00-mpm.conf在 MPM event 行前添加 #,使其看起来像这样:
# LoadModule mpm_event_module modules/mod_mpm_event.so
然后去掉 MPM Prefork 行前的 #,使其看起来像这样:
LoadModule mpm_prefork_module modules/mod_mpm_prefork.so
然后重启 httpd 以使配置更改生效。
service httpd restart7 安装 Dovecot
Dovecot 可按如下方式安装:
dnf -y install dovecot dovecot-mysql dovecot-pigeonhole创建一个空的 dovecot-sql.conf 文件并创建符号链接:
touch /etc/dovecot/dovecot-sql.conf
ln -s /etc/dovecot/dovecot-sql.conf /etc/dovecot-sql.conf
ln -s /etc/dovecot/dovecot.conf /etc/dovecot.conf
现在创建系统启动链接并启动 Dovecot:
systemctl enable dovecot
systemctl start dovecot
8 安装 Postfix
Postfix 可按如下方式安装:
dnf -y install postfix postfix-mysql接下来,在 Postfix 中开放 TLS/SSL 和 submission 端口:
nano /etc/postfix/master.cf按照如下方式取消注释 submission 和 smtps 部分,并在必要时添加行,使 master.cf 文件的这一部分与下面的内容完全一致。重要:也要去掉以 smtps 和 submission 开头的行前面的 #,而不只是去掉这些行之后的 -o 行前面的 #!
[...]
submission inet n - n - - smtpd
 -o syslog_name=postfix/submission
 -o smtpd_tls_security_level=encrypt
 -o smtpd_sasl_auth_enable=yes
 -o smtpd_client_restrictions=permit_sasl_authenticated,reject
# -o smtpd_reject_unlisted_recipient=no
# -o smtpd_client_restrictions=$mua_client_restrictions
# -o smtpd_helo_restrictions=$mua_helo_restrictions
# -o smtpd_sender_restrictions=$mua_sender_restrictions
# -o smtpd_recipient_restrictions=
# -o smtpd_relay_restrictions=permit_sasl_authenticated,reject
# -o milter_macro_daemon_name=ORIGINATING
smtps inet n - n - - smtpd
 -o syslog_name=postfix/smtps
 -o smtpd_tls_wrappermode=yes
 -o smtpd_sasl_auth_enable=yes
 -o smtpd_client_restrictions=permit_sasl_authenticated,reject
# -o smtpd_reject_unlisted_recipient=no
# -o smtpd_client_restrictions=$mua_client_restrictions
# -o smtpd_helo_restrictions=$mua_helo_restrictions
# -o smtpd_sender_restrictions=$mua_sender_restrictions
# -o smtpd_recipient_restrictions=
# -o smtpd_relay_restrictions=permit_sasl_authenticated,reject
# -o milter_macro_daemon_name=ORIGINATING
[...]
然后关闭 Sendmail,并启动 Postfix 和 MariaDB(MySQL):
systemctl enable mariadb.service
systemctl start mariadb.service
systemctl enable postfix.service
systemctl restart postfix.service我们禁用 sendmail,以确保即使它安装在你的服务器上也不会被启动。因此,错误信息 "Failed to issue method call: Unit sendmail.service not loaded." 可以忽略。
要启用对老旧/过时设备的支持,请运行此命令(可选,仅当你希望旧邮件设备连接时使用,因为它会通过允许安全性较低的加密套件来削弱 SSL/TLS 设置):
update-crypto-policies --set LEGACY9 安装 Getmail
Getmail 可按如下方式安装:
dnf install python2
cd /tmp
wget http://pyropus.ca/software/getmail/old-versions/getmail-5.14.tar.gz
tar xvfz getmail-5.14.tar.gz
cd getmail-5.14
python2 setup.py build
python2 setup.py install
10 设置 MySQL 密码并配置 phpMyAdmin
为 MySQL root 账户设置密码:
mysql_secure_installation[root@server1 tmp]# mysql_secure_installation NOTE: RUNNING ALL PARTS OF THIS SCRIPT IS RECOMMENDED FOR ALL MariaDB SERVERS IN PRODUCTION USE! PLEASE READ EACH STEP CAREFULLY!
In order to log into MariaDB to secure it, we'll need the current
password for the root user. If you've just installed MariaDB, and
you haven't set the root password yet, the password will be blank,
so you should just press enter here.
Enter current password for root (enter for none):
OK, successfully used password, moving on...
Setting the root password ensures that nobody can log into the MariaDB
root user without the proper authorisation.
Set root password? [Y/n]

<-- ENTER
New password:

<-- yourrootsqlpassword
Re-enter new password:

<-- yourrootsqlpassword
Password updated successfully!
Reloading privilege tables..
 ... Success!
By default, a MariaDB installation has an anonymous user, allowing anyone
to log into MariaDB without having to have a user account created for
them. This is intended only for testing, and to make the installation
go a bit smoother. You should remove them before moving into a
production environment.
Remove anonymous users? [Y/n]

<-- ENTER
 ... Success!
Normally, root should only be allowed to connect from 'localhost'.  This
ensures that someone cannot guess at the root password from the network.
Disallow root login remotely? [Y/n]

<-- ENTER
 ... Success!
By default, MariaDB comes with a database named 'test' that anyone can
access. This is also intended only for testing, and should be removed
before moving into a production environment.
Remove test database and access to it? [Y/n]

<-- ENTER
 - Dropping test database...
 ... Success!
 - Removing privileges on test database...
 ... Success!
Reloading the privilege tables will ensure that all changes made so far
will take effect immediately.
Reload privilege tables now? [Y/n]

<-- ENTER
 ... Success!
Cleaning up...
All done! If you've completed all of the above steps, your MariaDB
installation should now be secure.
Thanks for using MariaDB!
[root@server1 tmp]#
现在我们配置 phpMyAdmin。创建这个 phpMyAdmin 配置文件:
nano /etc/httpd/conf.d/phpmyadmin.conf将以下内容添加到文件中:
# phpMyAdmin - Web based MySQL browser written in php
#
# Allows only localhost by default
#
# But allowing phpMyAdmin to anyone other than localhost should be considered
# dangerous unless properly secured by SSL

Alias /phpMyAdmin /usr/share/phpmyadmin
Alias /phpmyadmin /usr/share/phpmyadmin

<Directory /usr/share/phpmyadmin/>
   <IfModule mod_authz_core.c>
     # Apache 2.4

  #  <RequireAny>
     #  Require ip 127.0.0.1
     #  Require ip ::1
  #  </RequireAny>

   </IfModule>
   <IfModule !mod_authz_core.c>
     # Apache 2.2
     Order Deny,Allow
     Deny from All
     Allow from 127.0.0.1
     Allow from ::1
   </IfModule>
</Directory>
接下来,我们将 phpMyAdmin 中的认证方式从 cookie 改为 http:
cp -pf /usr/share/phpmyadmin/config.sample.inc.php /usr/share/phpmyadmin/config.inc.php
nano /usr/share/phpmyadmin/config.inc.php
[...] /* Authentication type */ $cfg['Servers'][$i]['auth_type'] = 'http'; [...]
然后我们为 Apache 创建系统启动链接并启动它:
systemctl enable httpd
systemctl restart httpd
现在你可以在浏览器中访问 http://server1.example.com/phpmyadmin/ 或 http://192.168.0.100/phpmyadmin/,并使用用户名 root 和你新的 MySQL root 密码登录。
11 安装 Amavisd-new、SpamAssassin、ClamAV 和 Postgrey
要安装 amavisd-new、SpamAssassin 和 ClamAV,请运行以下命令:
dnf -y install amavisd-new spamassassin clamav-server clamav-data clamav-update clamav-filesystem clamav clamav-scanner-systemd clamav-devel clamav-lib clamav-server-systemd unzip bzip2 perl-DBD-mysql postgrey re2c然后我们启动 freshclam、amavisd 和 clamd.amavisd:
sa-update
freshclam
systemctl enable amavisd.service
systemctl start amavisd.service
systemctl start
[email protected]
systemctl enable postgrey.service
systemctl start postgrey.service
下一步,我们配置 postgrey。在编辑器中打开文件 /etc/sysconfig/postgrey:
nano /etc/sysconfig/postgrey并将该行:
POSTGREY_TYPE="--unix=/var/spool/postfix/postgrey/socket"
改为
POSTGREY_TYPE="--inet=10023"
保存文件并重启 postgrey:
service postgrey restart要配置 amavisd,请编辑文件 /etc/clamd.d/amavisd.conf:
nano /etc/clamd.d/amavisd.conf并将该行:
LocalSocket /run/clamd.amavisd/clamd.sock
改为
LocalSocket /var/spool/amavisd/clamd.sock
保存更改后的配置文件并重启 ClamAV:
systemctl restart
[email protected]
现在我们必须为 freshclam 服务创建一个系统单元。创建新文件 /usr/lib/systemd/system/freshclam.service:
nano /usr/lib/systemd/system/freshclam.service并在该文件中输入以下内容:
[Unit]
Description = ClamAV Scanner
After = network.target

[Service]
Type = forking
# if you want to scan more than one in a day change the number 1 with your desired number in below line.
ExecStart = /usr/bin/freshclam -d -c 1
Restart = on-failure
PrivateTmp =true

[Install]
WantedBy=multi-user.target
保存文件,然后启用并启动该服务。
systemctl enable freshclam.service
systemctl start freshclam.service
systemctl status freshclam.service
12 安装带 mod_php、mod_fcgi/PHP、PHP-FPM 的 Apache
ISPConfig 3 允许你按每个网站分别使用 mod_php、mod_fcgi/PHP、cgi/PHP 和 PHP-FPM。
我们可以按如下方式安装带 mod_php、mod_fcgid 和 PHP 的 Apache2:
dnf -y install php php-devel php-gd php-imap php-ldap php-mysql php-odbc php-pear php-xml php-xmlrpc php-pecl-apc php-mbstring php-mcrypt php-snmp php-soap php-tidy curl curl-devel perl-libwww-perl ImageMagick libxml2 libxml2-devel mod_fcgid php-cli httpd-devel php-fpm php-intl php-imagick php-pspell wget接下来,我们打开 /etc/php.ini……
nano /etc/php.ini……并更改错误报告设置(使通知不再显示)、设置时区,并取消注释 cgi.fix_pathinfo=1:
[...]
;error_reporting = E_ALL & ~E_DEPRECATED
error_reporting = E_ALL & ~E_NOTICE & ~E_DEPRECATED & ~E_STRICT
[...]
; cgi.fix_pathinfo provides *real* PATH_INFO/PATH_TRANSLATED support for CGI.  PHP's
; previous behaviour was to set PATH_TRANSLATED to SCRIPT_FILENAME, and to not grok
; what PATH_INFO is.  For more information on PAppp.tldTH_INFO, see the cgi specs.  Setting
; this to 1 will cause PHP CGI to fix its paths to conform to the spec.  A setting
; of zero causes PHP to behave as before.  Default is 1.  You should fix your scripts
; to use SCRIPT_FILENAME rather than PATH_TRANSLATED.
; http://www.php.net/manual/en/ini.core.php#ini.cgi.fix-pathinfo
cgi.fix_pathinfo=1
[...]
date.timezone = 'Europe/Berlin'
[...]
启用 httpd 和 PHP-FPM 使其在系统启动时自动运行,并启动 PHP-FPM 服务。
systemctl start php-fpm.service
systemctl enable php-fpm.service
systemctl enable httpd.service
最后,我们重启 Apache:
systemctl restart httpd.service现在我们将添加对 Let's Encrypt 的支持。ISPConfig 现在使用 acme.sh 作为 Let's Encrypt 客户端。使用以下命令安装 acme.sh:
curl https://get.acme.sh | sh -s13 安装 mod_python
Apache 模块 mod_python 没有可用的 RPM 包,因此我们将从源代码编译它。第一步是安装 Python 开发文件,并以 .tar.gz 文件的形式下载当前的 mod_python 版本
dnf -y install python3-develcd /usr/local/src/
wget https://fossies.org/linux/www/apache_httpd_modules/mod_python-3.5.0.tgz
tar xfz mod_python-3.5.0.tgz
cd mod_python-3.5.0然后配置并编译该模块。
./configure --with-python=/usr/bin/python3
make
编译后的模块中存在一个错误,将导致安装失败并报错 " version = "fatal: Not a git repository (or any of the parent directories): .git "。要修复该问题,请运行这条 sed 命令(该命令是一行!)。
sed -e 's/(git describe --always)/(git describe --always 2>\/dev\/null)/g' -e 's/`git describe --always`/`git describe --always 2>\/dev\/null`/g' -i $( find . -type f -name Makefile\* -o -name version.sh )然后用这条命令安装该模块。
make install并在 Apache 中启用该模块:
echo 'LoadModule python_module modules/mod_python.so' > /etc/httpd/conf.modules.d/10-python.conf
systemctl restart httpd.service
14 安装 PureFTPd
PureFTPd 可以用以下命令安装:
dnf -y install pure-ftpd然后创建系统启动链接并启动 PureFTPd:
systemctl enable pure-ftpd.service
systemctl start pure-ftpd.service
现在我们配置 PureFTPd 以允许 FTP 和 TLS 会话。FTP 是一种非常不安全的协议,因为所有密码和所有数据均以明文传输。通过使用 TLS,整个通信都可以被加密,从而使 FTP 安全得多。
TLS 需要 OpenSSL;要安装 OpenSSL,我们只需运行:
dnf install openssl打开 /etc/pure-ftpd/pure-ftpd.conf……
nano /etc/pure-ftpd/pure-ftpd.conf如果你想允许 FTP 和 TLS 会话,请去掉 TLS 行前面的 #,将 TLS 设置为 1。强烈建议启用 TLS。
[...]
# This option can accept three values :
# 0 : disable SSL/TLS encryption layer (default).
# 1 : accept both traditional and encrypted sessions.
# 2 : refuse connections that don't use SSL/TLS security mechanisms,
#     including anonymous sessions.
# Do _not_ uncomment this blindly. Be sure that :
# 1) Your server has been compiled with SSL/TLS support (--with-tls),
# 2) A valid certificate is in place,
# 3) Only compatible clients will log in.

TLS                      1
[...]
为了使用 TLS,我们必须创建一个 SSL 证书。我在 /etc/ssl/private/ 中创建它,因此先创建该目录:
mkdir -p /etc/ssl/private/之后,我们可以按如下方式生成 SSL 证书:
openssl req -x509 -nodes -days 7300 -newkey rsa:2048 -keyout /etc/ssl/private/pure-ftpd.pem -out /etc/ssl/private/pure-ftpd.pem国家名称(2 个字母代码)[XX]: <-- 输入你的国家名称(例如 "DE")。省/州名称(全称)[]: <-- 输入你的省/州名称。地区名称(例如城市)[Default City]: <-- 输入你的城市。组织名称(例如公司)[Default Company Ltd]: <-- 输入你的组织名称(例如你的公司名称)。组织单位名称(例如部门)[]: <-- 输入你的组织单位名称(例如 "IT Department")。通用名称(例如你的姓名或服务器的主机名)[]: <-- 输入系统的完全限定域名(例如 "server1.example.com")。电子邮件地址 []: <-- 输入你的电子邮件地址。
更改 SSL 证书的权限:
chmod 600 /etc/ssl/private/pure-ftpd.pem创建一个 DHParam 文件:
openssl dhparam -out /etc/ssl/private/pure-ftpd-dhparams.pem 2048最后,重启 PureFTPd:
systemctl restart pure-ftpd.service就是这样。现在你可以尝试使用 FTP 客户端进行连接;不过,你应将 FTP 客户端配置为使用 TLS。
15 安装 BIND
我们可以按如下方式安装 BIND:
dnf -y install bind bind-utils haveged备份现有的 /etc/named.conf 文件,并按如下方式创建一个新文件:
cp /etc/named.conf /etc/named.conf_bak
cat /dev/null > /etc/named.conf
nano /etc/named.conf
//
// named.conf
//
// Provided by Red Hat bind package to configure the ISC BIND named(8) DNS
// server as a caching only nameserver (as a localhost DNS resolver only).
//
// See /usr/share/doc/bind*/sample/ for example named configuration files.
//
options {
listen-on port 53 { any; };
listen-on-v6 port 53 { any; };
directory "/var/named";
dump-file "/var/named/data/cache_dump.db";
statistics-file "/var/named/data/named_stats.txt";
memstatistics-file "/var/named/data/named_mem_stats.txt";
allow-query { any; };
allow-recursion {"none";};
recursion no;
};
logging {
channel default_debug {
file "data/named.run";
severity dynamic;
};
};
zone "." IN {
type hint;
file "named.ca";
};
include "/etc/named.conf.local";
创建文件 /etc/named.conf.local,它被包含在 /etc/named.conf 的末尾(如果你在 ISPConfig 中创建 DNS 区域,/etc/named.conf.local 之后将由 ISPConfig 填充):
touch /etc/named.conf.local然后我们创建启动链接并启动 BIND:
systemctl enable named.service
systemctl start named.service
systemctl enable haveged.service
systemctl start haveged.service
16 安装 AWStats
AWStats 可按如下方式安装:
dnf -y install awstats perl-DateTime-Format-HTTP perl-DateTime-Format-Builder替代的网站统计应用程序 'webalizer' 已不再适用于 CentOS 8,因此你只能使用 AWStats。
17 安装 Jailkit
Jailkit 用于对 SSH 用户和 cron 任务进行 chroot 限制。它可按如下方式安装:
ln -s /usr/bin/python2 /usr/bin/python
cd /tmp
wget http://olivier.sessink.nl/jailkit/jailkit-2.21.tar.gz
tar xvfz jailkit-2.21.tar.gz
cd jailkit-2.21
./configure
make
make install
cd ..
rm -rf jailkit-2.21*
18 安装 Fail2Ban
这是可选的,但建议安装,因为 ISPConfig 监控器会尝试显示日志。
dnf -y install iptables-services fail2ban fail2ban-systemd
systemctl stop firewalld.service
systemctl mask firewalld.service
systemctl disable firewalld.service
接下来我们创建 /etc/fail2ban/jail.local 文件,并启用对 ssh、email 和 ftp 服务的监控。
nano /etc/fail2ban/jail.local将以下内容添加到 jail.local 文件中:
[sshd]
enabled = true
action = iptables[name=sshd, port=ssh, protocol=tcp]
[pure-ftpd]
enabled = true
action = iptables[name=FTP, port=ftp, protocol=tcp]
maxretry = 3
[dovecot]
enabled = true
action = iptables-multiport[name=dovecot, port="pop3,pop3s,imap,imaps", protocol=tcp]
maxretry = 5
[postfix-sasl]
enabled = true
action = iptables-multiport[name=postfix-sasl, port="smtp,smtps,submission", protocol=tcp]
maxretry = 3
然后为 fail2ban 创建系统启动链接并启动它:
systemctl enable fail2ban.service
systemctl start fail2ban.service
19 安装 rkhunter
rkhunter 可按如下方式安装:
dnf -y install rkhunter20 安装 Mailman
如果你想在服务器上用 Mailman 管理邮件列表,那么现在就安装 mailman。ISPConfig 支持 Mailman,因此之后你就可以通过 ISPConfig 创建新的邮件列表。
dnf -y install mailman在启动 Mailman 之前,必须先创建一个名为 mailman 的首个邮件列表:
touch /var/lib/mailman/data/aliases
postmap /var/lib/mailman/data/aliases
/usr/lib/mailman/bin/newlist mailman
ln -s /usr/lib/mailman/mail/mailman /usr/bin/mailman
[root@server1 tmp]# /usr/lib/mailman/bin/newlist mailman 输入管理该邮件列表人员的电子邮件:<-- 管理员电子邮件地址,例如 [email protected] 初始 mailman 密码:<-- mailman 列表的管理员密码 要完成邮件列表的创建,你必须通过添加以下行来编辑 /etc/aliases(或等效)文件,并可能需要运行 `newaliases' 程序:## mailman 邮件列表 mailman: "|/usr/lib/mailman/mail/mailman post mailman" mailman-admin: "|/usr/lib/mailman/mail/mailman admin mailman" mailman-bounces: "|/usr/lib/mailman/mail/mailman bounces mailman" mailman-confirm: "|/usr/lib/mailman/mail/mailman confirm mailman" mailman-join: "|/usr/lib/mailman/mail/mailman join mailman" mailman-leave: "|/usr/lib/mailman/mail/mailman leave mailman" mailman-owner: "|/usr/lib/mailman/mail/mailman owner mailman" mailman-request: "|/usr/lib/mailman/mail/mailman request mailman" mailman-subscribe: "|/usr/lib/mailman/mail/mailman subscribe mailman" mailman-unsubscribe: "|/usr/lib/mailman/mail/mailman unsubscribe mailman" 按回车键通知 mailman 所有者……<-- ENTER [root@server1 tmp]#
之后打开 /etc/aliases……
nano /etc/aliases……并添加以下行:
[...]
mailman:              "|/usr/lib/mailman/mail/mailman post mailman"
mailman-admin:        "|/usr/lib/mailman/mail/mailman admin mailman"
mailman-bounces:      "|/usr/lib/mailman/mail/mailman bounces mailman"
mailman-confirm:      "|/usr/lib/mailman/mail/mailman confirm mailman"
mailman-join:         "|/usr/lib/mailman/mail/mailman join mailman"
mailman-leave:        "|/usr/lib/mailman/mail/mailman leave mailman"
mailman-owner:        "|/usr/lib/mailman/mail/mailman owner mailman"
mailman-request:      "|/usr/lib/mailman/mail/mailman request mailman"
mailman-subscribe:    "|/usr/lib/mailman/mail/mailman subscribe mailman"
mailman-unsubscribe:  "|/usr/lib/mailman/mail/mailman unsubscribe mailman"
运行
newaliases然后重启 Postfix:
systemctl restart postfix.service现在打开 Mailman 的 Apache 配置文件 /etc/httpd/conf.d/mailman.conf……
nano /etc/httpd/conf.d/mailman.conf……并添加这一行 ScriptAlias /cgi-bin/mailman/ /usr/lib/mailman/cgi-bin/。注释掉 Alias /pipermail/ /var/lib/mailman/archives/public/,并添加这一行 Alias /pipermail /var/lib/mailman/archives/public/:
#
#  httpd configuration settings for use with mailman.
#

ScriptAlias /mailman/ /usr/lib/mailman/cgi-bin/
ScriptAlias /cgi-bin/mailman/ /usr/lib/mailman/cgi-bin/
<Directory /usr/lib/mailman/cgi-bin/>
    AllowOverride None
    Options ExecCGI
    Order allow,deny
    Allow from all
</Directory>


#Alias /pipermail/ /var/lib/mailman/archives/public/
Alias /pipermail /var/lib/mailman/archives/public/
<Directory /var/lib/mailman/archives/public>
    Options Indexes MultiViews FollowSymLinks
    AllowOverride None
    Order allow,deny
    Allow from all
    AddDefaultCharset Off
</Directory>

# Uncomment the following line, to redirect queries to /mailman to the
# listinfo page (recommended).

# RedirectMatch ^/mailman[/]*$ /mailman/listinfo
重启 Apache:
systemctl restart httpd.service为 Mailman 创建系统启动链接并启动它:
systemctl enable mailman.service
systemctl start mailman.service
安装 ISPConfig 3 之后,你可以按如下方式访问 Mailman:
你可以对所有 Apache 虚拟主机使用别名 /cgi-bin/mailman(请注意,对于你要从中访问 Mailman 的所有虚拟主机,都必须禁用 suExec 和 CGI!),这意味着你可以在 http://
在 http://
21 安装 Roundcube 网页邮箱
要安装 RoundCube 网页邮箱客户端,请用 wget 将最新版本下载到 /tmp 文件夹:
cd /tmp
wget https://github.com/roundcube/roundcubemail/releases/download/1.4.3/roundcubemail-1.4.3-complete.tar.gz
解压 tar.gz 压缩包,并将 RoundCube 源代码移动到 /usr/share/roundcubemail
tar xfz roundcubemail-1.4.3-complete.tar.gz
mkdir /usr/share/roundcubemail
mv /tmp/roundcubemail-1.4.3/* /usr/share/roundcubemail/
chown -R root:root /usr/share/roundcubemail
chown apache /usr/share/roundcubemail/temp
chown apache /usr/share/roundcubemail/logs
用 nano 编辑器创建 roundcubemail.conf 配置文件:
nano /etc/httpd/conf.d/roundcubemail.conf并将以下内容添加到该文件中:
#
# Round Cube Webmail is a browser-based multilingual IMAP client
#

Alias /roundcubemail /usr/share/roundcubemail
Alias /webmail /usr/share/roundcubemail

# Define who can access the Webmail
# You can enlarge permissions once configured

<Directory /usr/share/roundcubemail/>
        Options none
        AllowOverride Limit
        Require all granted
</Directory>

# Define who can access the installer
# keep this secured once configured

<Directory /usr/share/roundcubemail/installer>
        Options none
        AllowOverride Limit
        Require all granted
</Directory>


# Those directories should not be viewed by Web clients.
<Directory /usr/share/roundcubemail/bin/>
    Order Allow,Deny
    Deny from all
</Directory>
<Directory /usr/share/roundcubemail/plugins/enigma/home/>
    Order Allow,Deny
    Deny from all
</Directory>
重启 Apache:
systemctl restart httpd.service现在我们需要为 RoundCube 邮件创建一个数据库,按如下方式初始化:
mysql -u root -p在 MariaDB 提示符下使用:
CREATE DATABASE roundcubedb;
CREATE USER roundcubeuser@localhost IDENTIFIED BY 'roundcubepassword';
GRANT ALL PRIVILEGES on roundcubedb.* to roundcubeuser@localhost ;
FLUSH PRIVILEGES;
exit
我使用的 RoundCube 数据库详细信息仅作为示例,出于安全原因,请根据你的选择替换这些值。
现在我们将在浏览器中访问 http://192.168.0.100/roundcubemail/installer 来安装 RoundCube
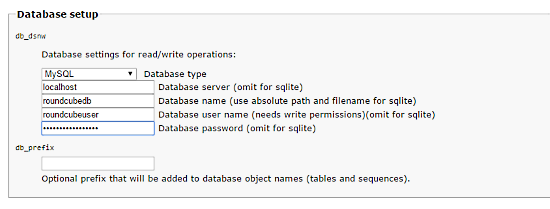
现在创建 config.inc.php 文件:
nano
/usr/share/roundcubemail/config
/config.inc.php
<?php /* Local configuration for Roundcube Webmail */ // ---------------------------------- // SQL DATABASE // ---------------------------------- // Database connection string (DSN) for read+write operations // Format (compatible with PEAR MDB2): db_provider://user:password@host/database // Currently supported db_providers: mysql, pgsql, sqlite, mssql, sqlsrv, oracle // For examples see http://pear.php.net/manual/en/package.database.mdb2.intro-dsn.php // NOTE: for SQLite use absolute path (Linux): 'sqlite:////full/path/to/sqlite.db?mode=0646' // or (Windows): 'sqlite:///C:/full/path/to/sqlite.db' $config['db_dsnw'] = 'mysql://roundcubeuser:roundcubepassword@localhost/roundcubedb'; // ---------------------------------- // IMAP // ---------------------------------- // The IMAP host chosen to perform the log-in. // Leave blank to show a textbox at login, give a list of hosts // to display a pulldown menu or set one host as string. // To use SSL/TLS connection, enter hostname with prefix ssl:// or tls:// // Supported replacement variables: // %n - hostname ($_SERVER['SERVER_NAME']) // %t - hostname without the first part // %d - domain (http hostname $_SERVER['HTTP_HOST'] without the first part) // %s - domain name after the '@' from e-mail address provided at login screen // For example %n = mail.domain.tld, %t = domain.tld // WARNING: After hostname change update of mail_host column in users table is // required to match old user data records with the new host. $config['default_host'] = 'localhost'; $config['smtp_server'] = 'localhost'; $config['smtp_port'] = 25; // provide an URL where a user can get support for this Roundcube installation // PLEASE DO NOT LINK TO THE ROUNDCUBE.NET WEBSITE HERE! $config['support_url'] = ''; // This key is used for encrypting purposes, like storing of imap password // in the session. For historical reasons it's called DES_key, but it's used // with any configured cipher_method (see below). $config['des_key'] = 'pb0UucO0eqjgvhrqYlFTBVjE'; // ---------------------------------- // PLUGINS // ---------------------------------- // List of active plugins (in plugins/ directory) $config['plugins'] = array(); // Set the spell checking engine. Possible values: // - 'googie' - the default (also used for connecting to Nox Spell Server, see 'spellcheck_uri' setting) // - 'pspell' - requires the PHP Pspell module and aspell installed // - 'enchant' - requires the PHP Enchant module // - 'atd' - install your own After the Deadline server or check with the people at http://www.afterthedeadline.com before using their API // Since Google shut down their public spell checking service, the default settings // connect to http://spell.roundcube.net which is a hosted service provided by Roundcube. // You can connect to any other googie-compliant service by setting 'spellcheck_uri' accordingly. $config['spellcheck_engine'] = 'pspell'; $config['enable_installer'] = true;
然后在网页安装程序中点击 "continue"。在接下来的页面上,点击 "Initialize database" 按钮。
最后,禁用 Roundcubemail 安装程序。更改 RoundCube 的 config.inc.php 配置文件
nano
/usr/share/roundcubemail/config
/config.inc.php
并将该行:
$config['enable_installer'] = true;改为:
$config['enable_installer'] = false;现在,Roundcube 可以通过服务器上的别名 /webmail 和 /roundcubemail 访问:
http://192.168.0.100/webmail
RoundCube 的登录名是你在 ISPConfig 中稍后创建的电子邮件账户的电子邮件地址和密码。
22 安装 ISPConfig 3.2
ISPConfig 安装程序将为你配置所有服务,如 Postfix、Dovecot 等。
现在你还可以让安装程序为 ISPConfig 控制面板创建一个 SSL 虚拟主机,以便使用 https:// 而非 http:// 访问 ISPConfig。要实现这一点,只需在看到以下问题时按回车键:Do you want a secure (SSL) connection to the ISPConfig web interface (y,n) [y]:。
要安装 ISPConfig 3.2 每日构建版,请执行以下操作:
cd /tmp
wget -O ispconfig.tar.gz https://www.ispconfig.org/downloads/ISPConfig-3-stable.tar.gz
tar xfz
ispconfig.tar.gz
cd ispconfig3*/install/
下一步是运行:
php -q install.php这将启动 ISPConfig 3 安装程序。安装程序将为你配置所有服务,如 Postfix、Dovecot 等。
[root@server1 install]# php install.php
--------------------------------------------------------------------------------
_____ ___________ _____ __ _ ____
|_ _/ ___| ___ \ / __ \ / _(_) /__ \
| | \ `--.| |_/ / | / \/ ___ _ __ | |_ _ __ _ _/ /
| | `--. \ __/ | | / _ \| '_ \| _| |/ _` | |_ |
_| |_/\__/ / | | \__/\ (_) | | | | | | | (_| | ___\ \
\___/\____/\_| \____/\___/|_| |_|_| |_|\__, | \____/
__/ |
|___/
--------------------------------------------------------------------------------
>> Initial configuration
Operating System: CentOS 8.2
Following will be a few questions for primary configuration so be careful.
Default values are in [brackets] and can be accepted with <ENTER>.
Tap in "quit" (without the quotes) to stop the installer.
Select language (en,de) [en]:
<-- Hit Enter
Installation mode (standard,expert) [standard]:
<-- Hit Enter
Full qualified hostname (FQDN) of the server, eg server1.domain.tld [server1.example.com]:
<-- Hit Enter
MySQL server hostname [localhost]:
<-- Hit Enter
MySQL server port [3306]:
<-- Hit Enter
MySQL root username [root]:
<-- Hit Enter
MySQL root password []:
<-- Ente the MySQL root password here
MySQL database to create [dbispconfig]:
<-- Hit Enter
MySQL charset [utf8]:
<-- Hit Enter
Configuring Postgrey
Configuring Postfix
Generating a 4096 bit RSA private key
................................++
.....................................................................................................................................................................................................................................................................................................................................................++
writing new private key to 'smtpd.key'
-----
You are about to be asked to enter information that will be incorporated
into your certificate request.
What you are about to enter is what is called a Distinguished Name or a DN.
There are quite a few fields but you can leave some blank
For some fields there will be a default value,
If you enter '.', the field will be left blank.
-----
Country Name (2 letter code) [XX]:
<-- Enter 2 Letter country code, e.g. US
State or Province Name (full name) []:
<-- Enter anme of State or Province
Locality Name (eg, city) [Default City]:
<-- Name of city
Organization Name (eg, company) [Default Company Ltd]:
<-- Company name
Organizational Unit Name (eg, section) []:
<-- Hit Enter
Common Name (eg, your name or your server's hostname) []:
<-- Enter server hostname here, in my case: server1.example.com
Email Address []:
<-- Enter Email address
Configuring mailman
Configuring Dovecot
Configuring Spamassassin
Configuring Amavisd
Configuring Getmail
Configuring Jailkit
Configuring Pureftpd
Configuring BIND
Configuring Apache
Configuring vlogger
[INFO] service OpenVZ not detected
Configuring Bastille Firewall
[INFO] service Metronome XMPP Server not detected
Configuring Fail2ban
Configuring Apps vhost
Installing ISPConfig
ISPConfig Port [8080]:
<-- Hit Enter
Admin password [fad579a6]:
<-- Enter new password for ISPConfig admin user
Re-enter admin password []:
<-- Repeat the password
Do you want a secure (SSL) connection to the ISPConfig web interface (y,n) [y]:
<-- Hit Enter
Generating RSA private key, 4096 bit long modulus
.................................................................................++
.....++
e is 65537 (0x10001)
You are about to be asked to enter information that will be incorporated
into your certificate request.
What you are about to enter is what is called a Distinguished Name or a DN.
There are quite a few fields but you can leave some blank
For some fields there will be a default value,
If you enter '.', the field will be left blank.
-----
Country Name (2 letter code) [XX]:
<-- Enter 2 Letter country code, e.g. US
State or Province Name (full name) []:
<-- Enter anme of State or Province
Locality Name (eg, city) [Default City]:
<-- Name of city
Organization Name (eg, company) [Default Company Ltd]:
<-- Company name
Organizational Unit Name (eg, section) []:
<-- Hit Enter
Common Name (eg, your name or your server's hostname) []:
<-- Enter server hostname here, in my case: server1.example.com
Email Address []:
<-- Enter Email address
Please enter the following 'extra' attributes
to be sent with your certificate request
A challenge password []:
<-- Hit Enter
An optional company name []:
<-- Hit Enter
writing RSA key
Configuring DBServer
Installing ISPConfig crontab
Installing ISPConfig crontab
no crontab for root
no crontab for getmail
Detect IP addresses
Restarting services ...
Installation completed.
安装程序会自动配置所有底层服务,因此无需手动配置。
23 首次登录 ISPConfig
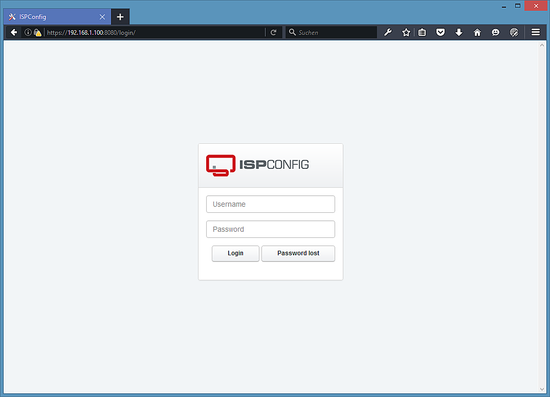
之后你可以通过 http(s)://server1.example.com:8080/ 或 http(s)://192.168.0.100:8080/ 访问 ISPConfig 3(使用 http 还是 https 取决于你在安装过程中的选择)。
使用用户名 admin 和密码 admin 登录(首次登录后应更改默认密码):
23.1 ISPConfig 3 手册
为了学习如何使用 ISPConfig 3,我强烈建议下载 ISPConfig 3 手册。
该手册有 300 多页,涵盖了 ISPConfig 背后的概念(管理员、经销商、客户),解释了如何安装和更新 ISPConfig 3,包含了 ISPConfig 中所有表单和表单字段的参考以及有效输入的示例,并提供了 ISPConfig 3 中最常见任务的教程。它还列出了如何使你的服务器更安全,并在末尾附有故障排除章节。
24 以虚拟机形式下载
此设置提供 ova/ovf 格式的虚拟机下载(兼容 VMWare 和 Virtualbox),供订阅用户使用。
虚拟机的登录详细信息
- root 密码是:example
- ISPConfig "admin" 用户的密码是:example
- 还有一个名为 "example"、密码为 example 的 shell 用户
请在首次登录时更改这两个密码。
- 虚拟机的 IP 地址是 192.168.0.100
25 链接
- CentOS:http://www.centos.org/
- ISPConfig:http://www.ispconfig.org/