
本页内容
- 先决条件
- 安装构建依赖
- 安装 Apache Tomcat 9
- 编译 Guacamole-server
- 配置 Guacamole-Server
- 安装 Guacamole 客户端 Web 应用程序
- 为 Guacamole 设置 Nginx 反向代理
- 验证 Apache Guacamole 安装
- 结论
Apache Guacamole 是一个免费开源的远程桌面网关,允许你通过 SSH、RDP 和 VNC 等不同协议远程连接到你的计算机/服务器。Apache Guacamole 由 Apache Software Foundation 维护,并采用 Apache License 2.0 许可。
Apache Guacamole 是一个无客户端的远程桌面网关。你可以随时随地仅通过 Web 浏览器访问 Apache Guacamole。如果你拥有多个使用不同协议的远程操作系统,例如使用 RDP 的 Windows、使用 VNC 和 SSH 的 Linux 系统,推荐使用 Apache Guacamole。
在本教程中,你将在 Debian 11 Bullseye 上安装并配置 Apache Guacamole。这包括安装一些软件包依赖和 Apache Tomcat 9,然后构建 Guacamole-server 并安装 Java 应用程序 Guacamole web 应用程序。最后,你将为 Guacamole web 应用程序设置 Nginx 作为反向代理,只要你有 Web 浏览器,就可以从任何地方访问你的服务器。
先决条件
要完成本教程,你需要满足以下要求:
- 一台运行 Debian 11 Bullseye、至少 2GB RAM 的服务器。
- 一个具有 root 权限的用户或非 root 用户。
- 具备 nano 编辑器的基础知识。或者你可以使用你偏好的编辑器,例如 vim。
安装构建依赖
首先,你将安装一些用于构建 Apache Guacamole server 的构建依赖。这包括一些基础软件包,例如支持 VNC 协议的 ' libvncserver-dev '、支持 SSH 协议的 ' libssh2-1 '、支持 RDP 协议的 ' freerdp2-dev ',以及支持 Kubernetes 的 ' libwebsockets-dev '。
出于考虑,你将不安装用于支持 Telnet 的 'libtelnet-dev'。这是因为 telnet 被认为是一种老旧且不安全的协议。
1. 现在,运行下面的 apt 命令更新你的软件包列表。
sudo apt update2. 之后,运行以下命令安装用于构建 Apache Guacamole server 的依赖。
sudo apt install -y freerdp2-dev libavcodec-dev libavformat-dev libavutil-dev libswscale-dev libcairo2-dev libjpeg62-turbo-dev libjpeg-dev libpng-dev libtool-bin libpango1.0-dev libpango1.0-0 libssh2-1 libwebsockets16 libwebsocketpp-dev libossp-uuid-dev libssl-dev libwebp-dev libvorbis-dev libpulse-dev libwebsockets-dev libvncserver-dev libssh2-1-dev openssl此命令可能需要一些时间才能完成,具体取决于你服务器的网络连接。
安装 Apache Tomcat 9
安装构建依赖之后,你将安装 Apache Tomcat 9。该软件包是 Guacamole web 应用程序所必需的,后者是一个用 Java 编写的 Web 应用程序。
1. 运行以下命令将 Apache Tomcat 9 安装到你的系统。
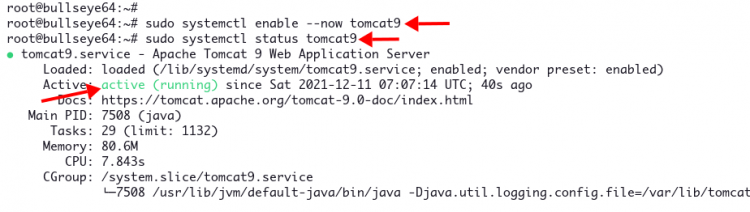
sudo apt install -y tomcat9 tomcat9-admin tomcat9-common tomcat9-user2. 安装 Apache Tomcat 9 之后,运行下面的命令启动并启用 Apache Tomcat 服务。在基于 Debian 的系统上,Apache Tomcat 9 附带名为 ' tomcat9 ' 的服务。
sudo systemctl enable --now tomcat93. 现在,如果一切看起来正常,运行下面的命令验证 ' tomcat9 ' 服务的状态。
sudo systemctl status tomcat9你将看到以下输出。请确保 ' tomcat9 ' 服务处于 ' active (running) ' 状态。
编译 Guacamole-server
在本节中,你将下载并编译 Guacamole-server。这是 Apache Guacamole 的主要组件,包含用于连接远程服务器和桌面的库。Guacamole-server 包含 C 库 'libguacd' 以及所有受支持协议的库,还有 Guacamole 的核心 guacd。
guacd 处理所有从 guacamole web 应用程序隧道传输过来的客户端连接,然后代表它们连接到远程服务器和桌面。通过构建和编译 Guacamole-server,你的系统上将有一个新服务 'guacd'。
1. 首先将工作目录切换到 ' /usr/src '。所有用于构建和编译的源代码都放在这个目录中。
cd /usr/src2. 现在,运行下面的 wget 命令下载 Guacamole-server 源代码。请务必查看 Guacamole Download 页面并复制最新版本的 Guacamole-server。在撰写本文时,最新版本是 1.3.0。
wget https://dlcdn.apache.org/guacamole/1.3.0/source/guacamole-server-1.3.0.tar.gz3. 然后,解压源代码,你会得到一个新目录 ' guacamole-server-VERSION-NUMBER' 。进入该目录。
tar -xzvf guacamole-server-1.3.0.tar.gz
cd guacamole-server-*/
4. 现在,运行以下命令验证构建 Guacamole-server 的所有系统要求并设置你的环境。选项 ' --with-systemd-dir=/etc/systemd/system/' 用于设置 systemd 服务文件,该文件将位于目录 ' /etc/systemd/system/ ' 中。
./configure --with-systemd-dir=/etc/systemd/system/你将看到类似如下的输出:
------------------------------------------------
guacamole-server version 1.3.0
------------------------------------------------
   Library status:
     freerdp2 ............ yes
     pango ............... yes
     libavcodec .......... yes
     libavformat.......... yes
     libavutil ........... yes
     libssh2 ............. yes
     libssl .............. yes
     libswscale .......... yes
     libtelnet ........... no
     libVNCServer ........ yes
     libvorbis ........... yes
     libpulse ............ yes
     libwebsockets ....... yes
     libwebp ............. yes
     wsock32 ............. no
   Protocol support:
      Kubernetes .... yes
      RDP ........... yes
      SSH ........... yes
      Telnet ........ no
      VNC ........... yes
   Services / tools:
      guacd ...... yes
      guacenc .... yes
      guaclog .... yes
   FreeRDP plugins: /usr/lib/x86_64-linux-gnu/freerdp2
   Init scripts: no
   Systemd units: /etc/systemd/system/
Type "make" to compile guacamole-server.
查看 ' Libraries status ' 和 ' Protocol support ' 部分。你可以通过安装额外的依赖和库来调整协议支持。
5. 接下来,运行下面的命令编译并安装 Guacamole-server。
make
make install
编译和安装过程可能需要一些时间才能完成。
6. 现在,一切完成后,运行以下命令应用所有新的系统库。
sudo ldconfig在本节中,你已经安装了 Guacamole-server 软件包。接下来,你将为 Guacamole-server 创建一些必要的配置。
配置 Guacamole-Server
要使 Guacamole-server 正常工作,你将创建配置目录 ' /etc/guacamole/ ',然后创建新文件 ' guacamole.properties ' 作为默认的 Guacamole-server 配置,文件 ' logback.xml' 用于 Guacamole 日志系统,文件 ' user-mapping.xml' 用于定义 Guacamole 用户认证以及到远程服务器和桌面的连接。
1. 首先,运行以下命令创建新目录 ' /etc/guacamole/ ',并在其中创建额外的目录 ' extensions ' 和 ' lib'。然后将环境变量 ' GUACAMOLE_HOME=/etc/guacamole ' 添加到文件 '/etc/default/tomcat9'。这将告诉 Tomcat 9 servlet 容器在 '/etc/guacamole/ ' 中查找 ' GUACAMOLE_HOME ' 目录。
mkdir -p /etc/guacamole/{extensions,lib}
echo 'GUACAMOLE_HOME=/etc/guacamole' >> /etc/default/tomcat9
2. 现在,使用 nano 或你偏好的编辑器创建主配置 ' guacamole.properties '。
sudo nano /etc/guacamole/guacamole.properties输入以下配置:
# Hostname and port of guacamole proxy
guacd-hostname: localhost
guacd-port:     4822
# user mapping and user connections
user-mapping:    /etc/guacamole/user-mapping.xml
- 选项 'guacd-hostname' 定义 guacd 服务将运行所在的主机名或 IP 地址。本教程使用 localhost 来运行 guacd 服务。
- 选项 ' guacd-port ' 定义 guacd 服务的默认端口。本教程使用端口 ' 4822 ' 用于 guacd 服务。
- 选项 'user-mapping' 定义用于用户认证和可用连接列表的文件配置。本教程使用文件 '/ etc/guacamole/user-mapping.xml' 为 Guacamole-server 定义用户和连接。你可能有兴趣使用其他认证方法,请查看 Guacamole Documentation。
保存并关闭文件。
3. 接下来,为日志记录和调试创建新配置 ' loogback.xml '。默认情况下,Guacamole 只会将日志记录到控制台。使用此配置可让 Guacamole 通过 Logback 日志框架进行日志记录。
sudo nano /etc/guacamole/logback.xml添加以下配置行。
<configuration>
    <!-- Appender for debugging -->
    <appender name="GUAC-DEBUG" class="ch.qos.logback.core.ConsoleAppender">
        <encoder>
            <pattern>%d{HH:mm:ss.SSS} [%thread] %-5level %logger{36} - %msg%n</pattern>
        </encoder>
    </appender>
    <!-- Log at DEBUG level -->
    <root level="debug">
        <appender-ref ref="GUAC-DEBUG"/>
    </root>
</configuration>
保存并关闭配置文件。
4. 现在,你将生成一个新的 md5 密码哈希,并为 Guacamole 用户认证和连接创建一个新文件。
运行以下命令生成 md5 密码哈希。并确保将密码更改为你自己的强密码。
echo -n StrongPasswordUserJohnDoe | openssl md5你将看到 mod5 哈希密码的输出。将它复制到你的笔记中。
(stdin)= aca22211ffcfb8aa8ad7627195ad4fce
5. 之后,使用 nano 编辑器创建一个新文件 ' user-mapping.xml '。
sudo nano /etc/guacamole/user-mapping.xml输入以下这些配置。并确保更改 'username' 和 ' password '。此外,查看 '
<user-mapping>
    <!-- Another user, but using md5 to hash the password
         (example below uses the md5 hash of "PASSWORD") -->
    <authorize
            username="johndoe"
            password="aca22211ffcfb8aa8ad7627195ad4fce"
            encoding="md5">
        <!-- First authorized connection -->
        <connection name="SSH localhost">
            <protocol>ssh</protocol>
            <param name="hostname">localhost</param>
            <param name="port">22</param>
            <param name="username">johndoe</param>
            <param name="password">SSHPASSWORD</param>
        </connection>
        <!-- Second authorized connection -->
        <connection name="localhost">
            <protocol>vnc</protocol>
            <param name="hostname">localhost</param>
            <param name="port">5901</param>
            <param name="password">VNCPASS</param>
        </connection>
        <!-- Third authorized connection -->
        <connection name="otherhost">
            <protocol>vnc</protocol>
            <param name="hostname">otherhost</param>
            <param name="port">5900</param>
            <param name="password">VNCPASS</param>
        </connection>
    </authorize>
</user-mapping>
保存并关闭文件。
现在你已经完成了 Guacamole-server 的配置。接下来,你将安装并配置 Guacamole web 应用程序,也就是你将在浏览器中看到的 Web 应用程序。
安装 Guacamole 客户端 Web 应用程序
在本节中,你将把 Guacamole web 应用程序安装到你的系统。这可以通过下载 Guacamole web 应用程序已编译的二进制文件并将其部署到 Tomcat 的 'webaps' 目录来完成。
1. 将工作目录切换到 ' /usr/src',并使用 wget 命令下载已编译的 Guacamole web 应用程序 ' .war '。请务必访问 Guacamole download 页面并复制最新版本 Guacamole web 应用程序的链接。
cd /usr/src
wget https://dlcdn.apache.org/guacamole/1.3.0/binary/guacamole-1.3.0.war
2. 现在,运行以下命令将 Java 二进制应用程序 ' guacamole-VERSION.war ' 部署到 Tomcat 目录 ' /var/lib/tomcat9/webapps/'。这使得 Guacamole web 应用程序可以通过 Apache Tomcat servlet 容器访问。
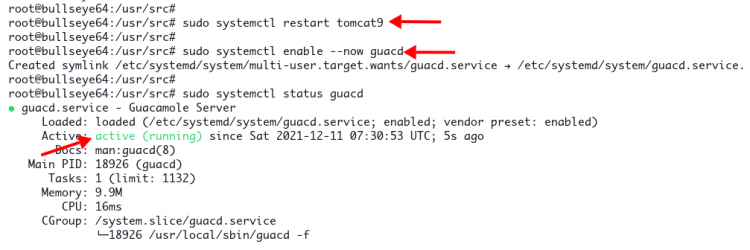
sudo cp guacamole-1.3.0.war /var/lib/tomcat9/webapps/guacamole.war3. 之后,重启 Tomcat 9 服务以应用新的 Web 应用程序。
sudo systemctl restart tomcat94. 接下来,运行下面的命令启动并启用 ' guacd ' 服务。
sudo systemctl enable --now guacd然后使用以下命令验证它。
sudo systemctl status guacd你将看到如下截图所示的输出。
至此,你已经完成了 Guacamole-server 应用程序(后端)和 Guacamole web 应用程序(前端)的安装。接下来,你将为 Guacamole web 应用程序设置 Nginx 作为反向代理。
为 Guacamole 设置 Nginx 反向代理
在本节中,你将安装 Nginx Web 服务器并将其配置为 Guacamole web 应用程序的反向代理。这允许你为 Guacamole web 应用程序设置域名,并使用 SSL 证书对其进行保护。
1. 首先,运行以下 ' apt ' 命令安装 Nginx 软件包。
sudo apt install nginx -y2. 安装完所有 Nginx 软件包后,在目录 ' /etc/nginx/sites-available ' 中创建一个新的虚拟主机文件 'guacamole'。所有与 Guacamole 反向代理相关的配置都将存储在此文件中。
sudo nano /etc/nginx/sites-available/guacamole输入以下配置。并确保更改域名和 SSL 证书的路径。本示例使用域名 ' example.io',SSL 私钥 ' privkey.pem ' 和公钥 ' fullchain.pem ',两个证书都位于目录 '/etc/letsencrypt/live/exmaple.io/' 中。
server {
    listen      80;
    server_name example.io;
    rewrite     ^   https://$server_name$request_uri? permanent;
}
server {
    listen      443 ssl http2;
    server_name example.io;
    root /var/www/html;
    index index.html;
    location / {
       try_files $uri $uri/ =404;
    }
    ssl_certificate /etc/letsencrypt/live/example.io/fullchain.pem;
    ssl_certificate_key /etc/letsencrypt/live/example.io/privkey.pem;
    access_log /var/log/nginx/guacamole-access.log;
    error_log /var/log/nginx/guacamole-error.log;
    location /guacamole/ {
        proxy_pass http://127.0.0.1:8080/guacamole/;
        proxy_buffering off;
        proxy_http_version 1.1;
        proxy_set_header X-Forwarded-For $proxy_add_x_forwarded_for;
        proxy_set_header Upgrade $http_upgrade;
        proxy_set_header Connection $http_connection;
        access_log off;
    }
}
保存并关闭文件。
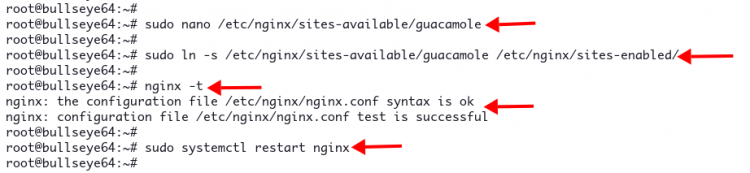
3. 现在,通过创建到目录 ' /etc/nginx/sites-enabled/ ' 的新符号链接来激活虚拟主机文件 ' guacamole '。然后验证所有 Nginx 配置,检查是否存在语法错误。
sudo ln -s /etc/nginx/sites-available/guacamole /etc/nginx/sites-enabled/
sudo nginx -t
你将看到输出 ' Syntax OK ',这表示配置没有错误。
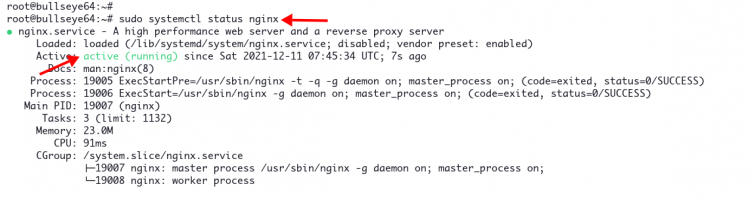
4. 接下来,重启 Nginx 服务以应用新配置,然后运行以下命令验证其状态。
sudo systemctl restart nginx
sudo systemtl status nginx
你将看到类似如下截图的输出。Nginx 服务处于 ' active (running) ' 状态。
5. 此外,如果你想在不同的子 URL 中部署 Guacamole web 应用程序,请将选项 ' location /guacamole/ { ... } ' 更改为新路径 ' location /new-path/ { ... } ',并将选项 ' proxy_cookie_path ' 添加到你的新路径,如下所示。
location /new-path/ {
    proxy_pass http://127.0.0.1:8080/guacamole/;
    proxy_buffering off;
    proxy_http_version 1.1;
    proxy_set_header X-Forwarded-For $proxy_add_x_forwarded_for;
    proxy_set_header Upgrade $http_upgrade;
    proxy_set_header Connection $http_connection;
    proxy_cookie_path /guacamole/ /new-path/;
    access_log off;
}
在本节中,你已经完成了 Nginx 的安装以及作为 Guacamole web 应用程序反向代理的配置。至此,你的 Apache Guacamole 安装已完成,并且可以通过你的域名访问。
验证 Apache Guacamole 安装
在本节中,你将验证 Apache Guacamole 的安装。
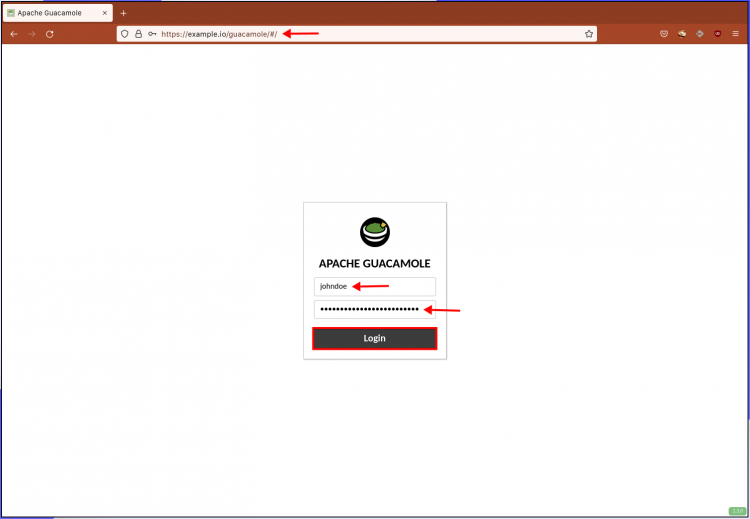
首先,打开你的 Web 浏览器,输入你的 Guacamole 安装的域名并带上默认路径 ' /guacamole' 。
https://example.io/guacamole/
现在,你将看到下面的 Guacamole 登录页面。输入你在文件 ' user-mapping.xml' 中配置的用户名和密码,然后点击 Login 按钮。
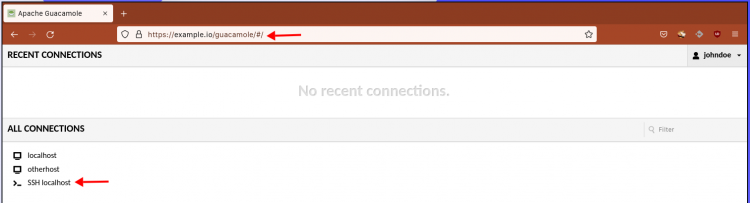
登录后,你将看到为你的用户定义的连接列表。
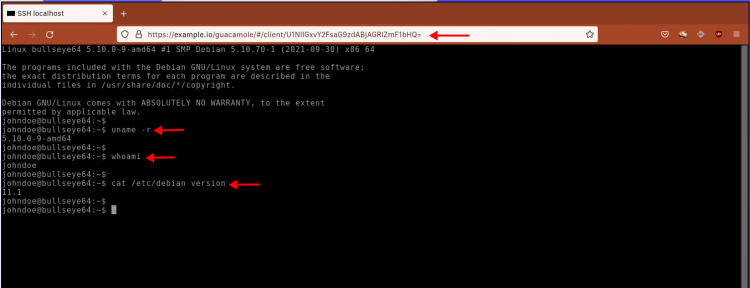
点击连接名称以连接到目标服务器。本示例将使用 SSH 协议连接到本地服务器。
现在,你将在你的服务器上看到一个新的 ssh 终端会话。
结论
恭喜!在本教程中,你已经学习了如何在 Debian 11 Bullseye 上安装 Apache Guacamole。此外,你还学习了如何使用配置文件 ' user-mapping.xml ' 设置用户认证和连接,以及为 Guacamole web 应用程序设置 Nginx 作为反向代理,这使你能够使用域名运行 Guacamaloe 并使用 SSL 证书对其进行保护。