
在本页
- 先决条件
- 安装 Docker 和 Docker Compose
- 在 Debian 11 上安装 Bitwarden
- 访问 Bitwarden Web 界面
- 结论
Bitwarden 是一款免费且开源的密码管理器,它将网站凭据存储在加密的保险库中。它允许您存储所有登录凭据,并在所有设备之间保持同步。它专为个人、团队和商业组织设计,用于从集中位置管理其凭据。Bitwarden 为台式 PC 以及智能手机和平板电脑提供客户端应用程序。它还提供一个密码生成器,用于生成强大且安全的密码。
在本文中,我们将向您展示如何在 Debian 11 上安装 Bitwarden 密码管理器。
先决条件
- 一台运行 Ubuntu 20.04 的服务器。
- 服务器上已配置 root 密码。
安装 Docker 和 Docker Compose
Bitwarden 提供一个免费版本,您可以使用 Docker 安装它。默认情况下,最新版本的 Docker 不包含在 Debian 11 的默认存储库中。因此您需要从 Docker 的官方存储库安装它。
首先,使用以下命令安装所有必需的依赖项:
apt-get install apt-transport-https ca-certificates curl gnupg-agent software-properties-common所有依赖项安装完成后,使用以下命令下载并添加 GPG 密钥:
curl -fsSL https://download.docker.com/linux/debian/gpg | gpg --dearmor -o /usr/share/keyrings/docker-archive-keyring.gpg接下来,使用以下命令将 Docker CE 存储库添加到 APT:
echo "deb [arch=amd64 signed-by=/usr/share/keyrings/docker-archive-keyring.gpg] https://download.docker.com/linux/debian $(lsb_release -cs) stable" | tee /etc/apt/sources.list.d/docker.list接下来,使用以下命令更新存储库并安装 Docker CE:
apt-get update -y
apt-get install docker-ce docker-ce-cli containerd.io -y
安装完成后,您可以使用以下命令验证 Docker CE 版本:
docker --version您将获得以下输出:
Docker version 20.10.9, build c2ea9bc
您还可以使用以下命令检查 Docker 的状态:
systemctl status docker您应该会看到以下输出:
? docker.service - Docker Application Container Engine
     Loaded: loaded (/lib/systemd/system/docker.service; enabled; vendor preset: enabled)
     Active: active (running) since Sat 2021-10-25 09:33:15 UTC; 14min ago
TriggeredBy: ? docker.socket
       Docs: https://docs.docker.com
   Main PID: 11656 (dockerd)
      Tasks: 29
     Memory: 1.0G
     CGroup: /system.slice/docker.service
             ??11656 /usr/bin/dockerd -H fd:// --containerd=/run/containerd/containerd.sock
             ??27717 /usr/bin/docker-proxy -proto tcp -host-ip 0.0.0.0 -host-port 80 -container-ip 172.18.0.5 -container-port 8052

Oct 25 09:33:14 ubuntu2004 dockerd[11656]: time="2021-10-03T09:33:14.865741428Z" level=info msg="Default bridge (docker0) is assigned with an >
Oct 25 09:33:14 ubuntu2004 dockerd[11656]: time="2021-10-03T09:33:14.951326143Z" level=info msg="Loading containers: done."
Oct 25 09:33:14 ubuntu2004 dockerd[11656]: time="2021-10-03T09:33:14.974570590Z" level=info msg="Docker daemon" commit=4484c46d9d graphdriver(>
Oct 25 09:33:14 ubuntu2004 dockerd[11656]: time="2021-10-03T09:33:14.974729712Z" level=info msg="Daemon has completed initialization"
Oct 25 09:33:15 ubuntu2004 dockerd[11656]: time="2021-10-03T09:33:15.030128906Z" level=info msg="API listen on /run/docker.sock"
Oct 25 09:33:15 ubuntu2004 systemd[1]: Started Docker Application Container Engine.
Oct 25 09:45:52 ubuntu2004 dockerd[11656]: time="2021-10-03T09:45:52.583474433Z" level=info msg="ignoring event" module=libcontainerd namespac>
Oct 25 09:45:52 ubuntu2004 dockerd[11656]: time="2021-10-03T09:45:52.619380786Z" level=info msg="ignoring event" module=libcontainerd namespac>
Oct 25 09:45:52 ubuntu2004 dockerd[11656]: time="2021-10-03T09:45:52.635359740Z" level=info msg="ignoring event" module=libcontainerd namespac>
Oct 25 09:45:52 ubuntu2004 dockerd[11656]: time="2021-10-03T09:45:52.637507396Z" level=info msg="ignoring event" module=libcontainerd namespac
接下来,使用以下命令下载最新版本的 Docker Composer:
wget https://github.com/docker/compose/releases/download/v2.0.1/docker-compose-linux-x86_64接下来,使用以下命令将下载的二进制文件复制到系统路径:
mv docker-compose-linux-x86_64 /usr/bin/docker-compose接下来,为 Docker Compose 二进制文件设置执行权限:
chmod 755 /usr/bin/docker-compose在 Debian 11 上安装 Bitwarden
首先,访问 Bitwarden 网站并提供您的电子邮件地址,如下所示:
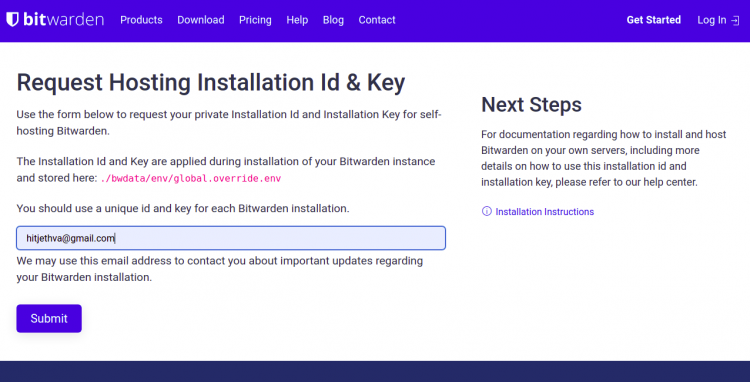
接下来,点击提交按钮。您将在以下屏幕上获得安装 id 和密钥。请记下它们,因为您在安装过程中稍后会需要它们。
现在,使用以下命令下载 Bitwarden 安装脚本:
curl -Lso bitwarden.sh https://go.btwrdn.co/bw-sh脚本下载完成后,使用以下命令设置执行权限:
chmod +x bitwarden.sh接下来,使用以下命令开始安装:
./bitwarden.sh install系统将要求您提供域名或 IP 地址和保险库,如下所示:
 _     _ _                         _
| |__ (_) |___      ____ _ _ __ __| | ___ _ __
| '_ \| | __\ \ /\ / / _` | '__/ _` |/ _ \ '_ \
| |_) | | |_ \ V  V / (_| | | | (_| |  __/ | | |
|_.__/|_|\__| \_/\_/ \__,_|_|  \__,_|\___|_| |_|

Open source password management solutions
Copyright 2015-2021, 8bit Solutions LLC
https://bitwarden.com, https://github.com/bitwarden

===================================================

bitwarden.sh version 1.43.0
Docker version 20.10.9, build c2ea9bc
docker-compose version 1.25.0, build unknown

(!) Enter the domain name for your Bitwarden instance (ex. bitwarden.example.com): 69.28.84.207

(!) Do you want to use Let's Encrypt to generate a free SSL certificate? (y/n): n

(!) Enter the database name for your Bitwarden instance (ex. vault): vault
提供所有必需的信息,然后按 Enter 键。系统将要求您提供安装 id 和密钥,如下所示:
Digest: sha256:29bd0777de8b902bd26a67f74c832c8032f1bea41e716277a98f7d439a8f2912
Status: Downloaded newer image for bitwarden/setup:1.43.0
docker.io/bitwarden/setup:1.43.0

(!) Enter your installation id (get at https://bitwarden.com/host): xxxxxxx-xxxxxx-xxxx-xxxx-xxxxxxxxxx

(!) Enter your installation key: xxxxxxxxxxx

(!) Do you have a SSL certificate to use? (y/n): n

(!) Do you want to generate a self-signed SSL certificate? (y/n): y
提供所有必需的信息,然后按 Enter 键开始安装。安装完成后,您将获得以下输出:
Generating self signed SSL certificate.
Generating a RSA private key
.....++++
...........................................................................................................................++++
writing new private key to '/bitwarden/ssl/self/69.28.84.207/private.key'
-----
Generating key for IdentityServer.
Generating a RSA private key
........................................................................................................................................................................++++
..............................................................................................................++++
writing new private key to 'identity.key'
-----

!!!!!!!!!! WARNING !!!!!!!!!!
You are using an untrusted SSL certificate. This certificate will not be
trusted by Bitwarden client applications. You must add this certificate to
the trusted store on each device or else you will receive errors when trying
to connect to your installation.

Building nginx config.
Building docker environment files.
Building docker environment override files.
Building FIDO U2F app id.
Building docker-compose.yml.

Installation complete

If you need to make additional configuration changes, you can modify
the settings in `./bwdata/config.yml` and then run:
`./bitwarden.sh rebuild` or `./bitwarden.sh update`

Next steps, run:
`./bitwarden.sh start`
接下来,使用以下命令启动 Bitwarden:
./bitwarden.sh start您将获得以下输出:
 _     _ _                         _
| |__ (_) |___      ____ _ _ __ __| | ___ _ __
| '_ \| | __\ \ /\ / / _` | '__/ _` |/ _ \ '_ \
| |_) | | |_ \ V  V / (_| | | | (_| |  __/ | | |
|_.__/|_|\__| \_/\_/ \__,_|_|  \__,_|\___|_| |_|

Open source password management solutions
Copyright 2015-2021, 8bit Solutions LLC
https://bitwarden.com, https://github.com/bitwarden

===================================================

bitwarden.sh version 1.43.0
Docker version 20.10.9, build c2ea9bc
docker-compose version 1.25.0, build unknown

Pulling mssql         ... done
Pulling web           ... done
Pulling attachments   ... done
Pulling api           ... done
Pulling identity      ... done
Pulling sso           ... done
Pulling admin         ... done
Pulling portal        ... done
Pulling icons         ... done
Pulling notifications ... done
Pulling events        ... done
Pulling nginx         ... done

Creating network "docker_default" with the default driver
Creating network "docker_public" with the default driver
Creating bitwarden-web           ... done
Creating bitwarden-mssql         ... done
Creating bitwarden-sso           ... done
Creating bitwarden-icons         ... done
Creating bitwarden-attachments   ... done
Creating bitwarden-identity      ... done
Creating bitwarden-notifications ... done
Creating bitwarden-api           ... done
Creating bitwarden-events        ... done
Creating bitwarden-admin         ... done
Creating bitwarden-portal        ... done
Creating bitwarden-nginx         ... done
1.43.0: Pulling from bitwarden/setup
Digest: sha256:29bd0777de8b902bd26a67f74c832c8032f1bea41e716277a98f7d439a8f2912
Status: Image is up to date for bitwarden/setup:1.43.0
docker.io/bitwarden/setup:1.43.0


Bitwarden is up and running!
===================================================

visit https://69.28.84.207
to update, run `./bitwarden.sh updateself` and then `./bitwarden.sh update`
完成后,您可以继续下一步。
访问 Bitwarden Web 界面
现在,打开您的 Web 浏览器,使用 URL https://your-server-ip 访问 Bitwarden Web 界面。您将获得以下页面:
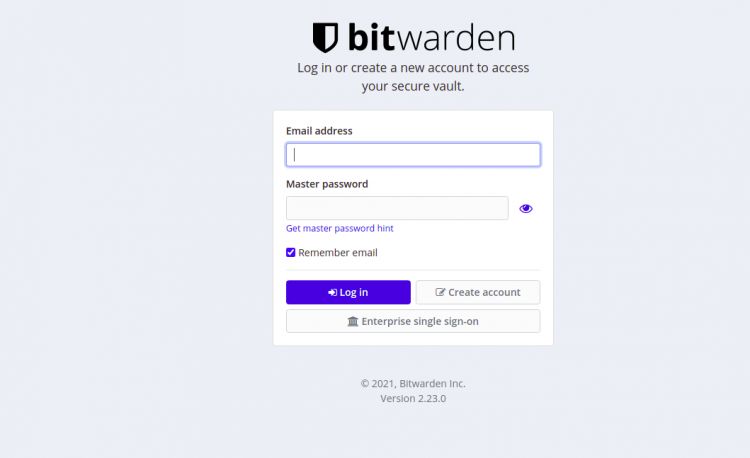
点击 Create Account 按钮。您将获得以下页面:
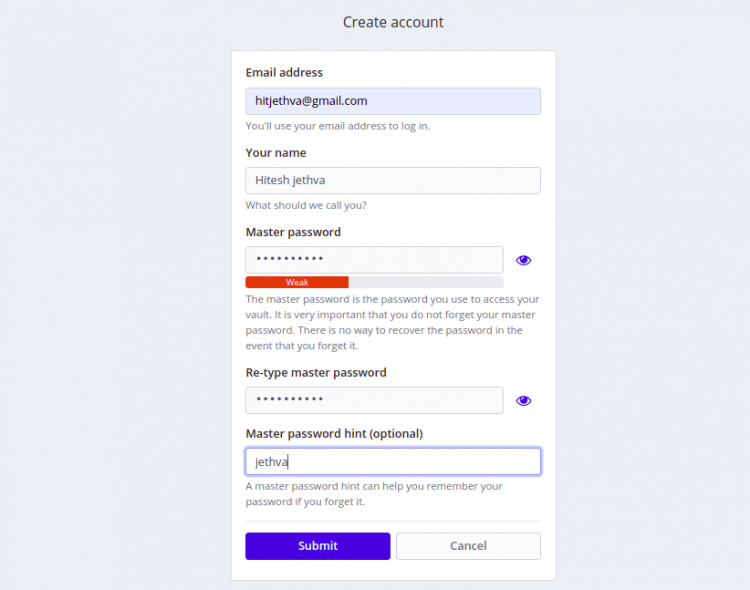
提供您的电子邮件、姓名、主密码,然后点击 Submit 按钮。您将看到 Bitwarden 登录屏幕:
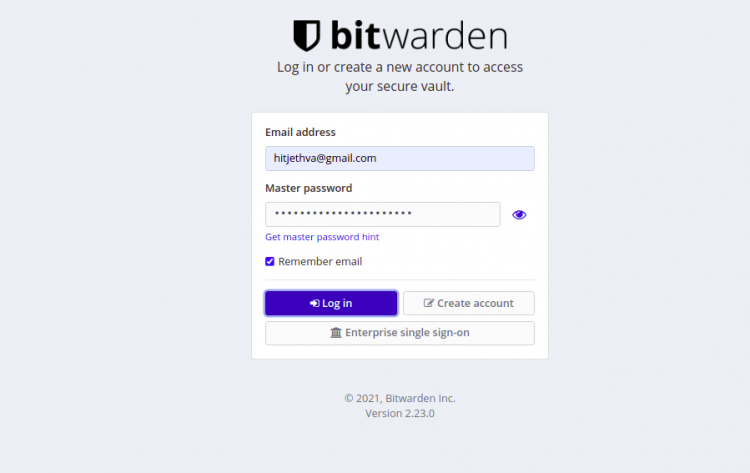
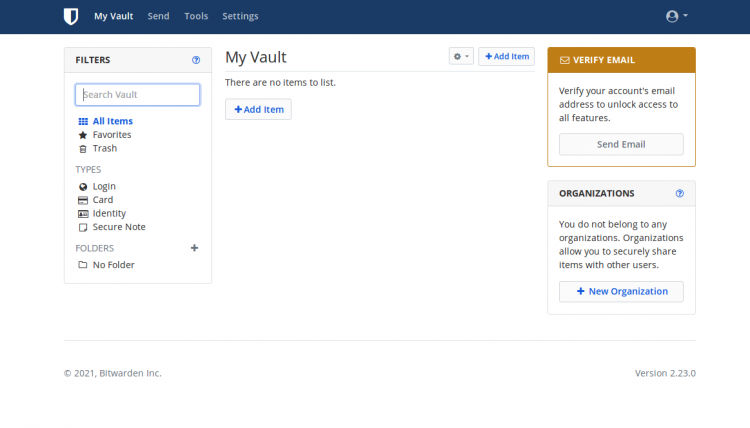
提供您的电子邮件地址、密码,然后点击 Login 按钮。您应该会在以下页面上看到 Bitwarden 仪表板:
结论
恭喜!您已成功在 Debian 11 上安装 Bitwarden 密码管理器。您现在可以在您的组织中实施此方案,并开始从集中位置管理所有凭据。如果您有任何问题,请随时问我。