
本教程适用于以下操作系统版本
- Debian 11 (Bullseye)
- Debian 10 (Buster)
本页内容
- 先决条件
- 入门
- 在 Debian 11 上安装 ClickHouse
- 管理 ClickHouse 服务
- 如何使用 ClickHouse
- 启用 ClickHouse Web UI
- 访问 ClickHouse Web UI
- 结论
ClickHouse 是一个免费的、开源的、面向列的数据库管理系统。它用于在线分析处理,并允许您使用 SQL 查询实时生成分析报告。它以按列而非按行分组的块来存储记录。因此,在完成查询时读取数据时花费的时间更少。此外,对于某些工作负载,面向列的数据库比传统的基于行的系统能更快地计算并返回结果。
在本文中,我们将向您展示如何在 Debian 11 上安装 ClickHoust 数据库。
先决条件
- 一台运行 Debian 11 的服务器。
- 您的服务器上已配置 root 密码。
入门
在开始之前,您需要将系统软件包更新到最新版本。您可以通过运行以下命令来更新它们:
apt-get update -y所有软件包更新完成后,使用以下命令安装其他所需的软件包:
apt-get install curl gnupg2 wget git apt-transport-https ca-certificates -y所有所需的软件包安装完成后,您可以继续执行下一步。
在 Debian 11 上安装 ClickHouse
默认情况下,ClickHouse 软件包不包含在 Debian 11 的默认仓库中。因此您需要将 ClickHouse 仓库添加到您的系统中。
首先,使用以下命令下载并添加 GPG 密钥:
apt-key adv --keyserver keyserver.ubuntu.com --recv E0C56BD4您将得到以下输出:
Executing: /tmp/apt-key-gpghome.WyTt1Mpvh7/gpg.1.sh --keyserver keyserver.ubuntu.com --recv E0C56BD4
gpg: key C8F1E19FE0C56BD4: public key "ClickHouse Repository Key <
[email protected]
>" imported
gpg: Total number processed: 1
gpg:               imported: 1
接下来,使用以下命令将 ClickHouse 仓库添加到 APT:
echo "deb http://repo.yandex.ru/clickhouse/deb/stable/ main/" | tee /etc/apt/sources.list.d/clickhouse.list接下来,使用以下命令更新仓库并安装 ClickHouse:
apt-get update -y
apt-get install clickhouse-server clickhouse-client -y
在安装过程中,系统会要求您提供 ClickHouse 管理员用户的密码,如下所示:
Enter password for default user:
Password for default user is saved in file /etc/clickhouse-server/users.d/default-password.xml.
Setting capabilities for clickhouse binary. This is optional.
 chown -R clickhouse:clickhouse '/etc/clickhouse-server'

ClickHouse has been successfully installed.

Start clickhouse-server with:
 sudo clickhouse start

Start clickhouse-client with:
 clickhouse-client --password

Synchronizing state of clickhouse-server.service with SysV service script with /lib/systemd/systemd-sysv-install.
Executing: /lib/systemd/systemd-sysv-install enable clickhouse-server
Created symlink /etc/systemd/system/multi-user.target.wants/clickhouse-server.service → /etc/systemd/system/clickhouse-server.service.
Setting up clickhouse-client (21.12.3.32) ...
安装完成后,您可以继续执行下一步。
管理 ClickHouse 服务
现在您可以使用以下命令启动 ClickHouse 服务并使其在系统重启时启动:
systemctl start clickhouse-server
systemctl enable clickhouse-server
现在您可以使用以下命令验证 ClickHouse 的状态:
systemctl status clickhouse-server您将得到以下输出:
? clickhouse-server.service - ClickHouse Server (analytic DBMS for big data)
     Loaded: loaded (/etc/systemd/system/clickhouse-server.service; enabled; vendor preset: enabled)
     Active: active (running) since Fri 2021-12-31 11:22:57 UTC; 9s ago
   Main PID: 18152 (clckhouse-watch)
      Tasks: 206 (limit: 2341)
     Memory: 108.2M
        CPU: 931ms
     CGroup: /system.slice/clickhouse-server.service
             ??18152 clickhouse-watchdog        --config=/etc/clickhouse-server/config.xml --pid-file=/run/clickhouse-server/clickhouse-serve>
             ??18153 /usr/bin/clickhouse-server --config=/etc/clickhouse-server/config.xml --pid-file=/run/clickhouse-server/clickhouse-serve>

Dec 31 11:22:57 debian11 systemd[1]: Started ClickHouse Server (analytic DBMS for big data).
Dec 31 11:22:57 debian11 clickhouse-server[18152]: Processing configuration file '/etc/clickhouse-server/config.xml'.
Dec 31 11:22:57 debian11 clickhouse-server[18152]: Logging trace to /var/log/clickhouse-server/clickhouse-server.log
Dec 31 11:22:57 debian11 clickhouse-server[18152]: Logging errors to /var/log/clickhouse-server/clickhouse-server.err.log
Dec 31 11:22:58 debian11 clickhouse-server[18153]: Processing configuration file '/etc/clickhouse-server/config.xml'.
Dec 31 11:22:58 debian11 clickhouse-server[18153]: Saved preprocessed configuration to '/var/lib/clickhouse/preprocessed_configs/config.xml'.
Dec 31 11:22:58 debian11 clickhouse-server[18153]: Processing configuration file '/etc/clickhouse-server/users.xml'.
Dec 31 11:22:58 debian11 clickhouse-server[18153]: Merging configuration file '/etc/clickhouse-server/users.d/default-password.xml'.
Dec 31 11:22:58 debian11 clickhouse-server[18153]: Saved preprocessed configuration to '/var/lib/clickhouse/preprocessed_configs/users.xml'.
如何使用 ClickHouse
在本节中,我们将向您展示如何连接到 ClickHouse、创建数据库和表。
首先,使用以下命令连接到 ClickHouse:
clickhouse-client --password系统会要求您提供默认密码,如下所示:
ClickHouse client version 21.12.3.32 (official build).
Password for user (default):

Provide the password which you have set during the installation and press the Enter key. You will get the following shell:

Connecting to localhost:9000 as user default.
Connected to ClickHouse server version 21.12.3 revision 54452.

debian11 :)
现在,使用以下命令创建一个名为 testdb 的数据库:
debian11 :) CREATE DATABASE testdb;您将得到以下输出:
CREATE DATABASE testdb

Query id: a48b3031-a363-4357-b4f9-ffd3edd73b0e

Ok.

0 rows in set. Elapsed: 0.005 sec.
接下来,使用以下命令将数据库切换到 testdb:
debian11 :) USE testdb;您将得到以下输出:
USE testdb

Query id: 827e0d94-c3eb-46ec-ba04-97386a58e531

Ok.

0 rows in set. Elapsed: 0.001 sec.
接下来,使用以下命令创建一个名为 table1 的表:
debian11 :) CREATE TABLE table1 (? id UInt64,? name String,? url String,? created DateTime?) ENGINE = MergeTree()?PRIMARY KEY id?ORDER BY id;您将得到以下输出:
CREATE TABLE table1
(
    `id` UInt64,
    `name` String,
    `url` String,
    `created` DateTime
)
ENGINE = MergeTree
PRIMARY KEY id
ORDER BY id

Query id: 922f4fe1-283f-4e5d-9966-498344b2aa4d

Ok.

0 rows in set. Elapsed: 0.006 sec.
接下来,使用以下命令向表中插入一些值:
debian11 :) INSERT INTO table1 VALUES (1, 'jay', 'https://www.example.com', '2021-12-31 00:01:01');您将得到以下输出:
INSERT INTO table1 FORMAT Values

Query id: be1c57cd-5759-47cd-8649-ce82cd0c1f7d

Ok.

1 rows in set. Elapsed: 0.005 sec.
接下来,使用以下命令添加一个新列:
debian11 :) ALTER TABLE table1 ADD COLUMN location String;您将得到以下输出:
ALTER TABLE table1
    ADD COLUMN `location` String

Query id: 106fa166-afda-4598-a32c-b50da237bfe5

Ok.

0 rows in set. Elapsed: 0.007 sec.
如果您想从表中检索数据,请运行以下命令:
debian11 :) SELECT url, name FROM table1 WHERE url = 'https://www.example.com' LIMIT 1;您将得到以下输出:
SELECT
    url,
    name
FROM table1
WHERE url = 'https://www.example.com'
LIMIT 1

Query id: 8ee433ec-0eb1-4409-b9a8-7e5794b872ce

??url?????????????????????name??
? https://www.example.com ? jay  ?
????????????????????????????????

1 rows in set. Elapsed: 0.007 sec.
要删除一列,请运行以下命令:
debian11 :) ALTER TABLE table1 DROP COLUMN location;要删除一个表,请运行以下命令:
debian11 :) DROP TABLE table1;要删除一个数据库,请运行以下命令:
debian11 :) DROP DATABASE testdb;要退出 ClickHouse shell,请运行以下命令:
debian11 :) exit;启用 ClickHouse Web UI
ClickHouse 还提供了一个基于 Web 的界面来管理数据库。但默认情况下它是禁用的。您可以通过编辑 ClickHouse 配置文件来启用它:
nano /etc/clickhouse-server/config.xml取消注释并更改以下行:
 <listen_host>0.0.0.0</listen_host>
    <http_server_default_response><![CDATA[<html ng-app="SMI2"><head><base href="http://ui.tabix.io/"></head><body><div ui-view="" class="content-ui"></div><script src="http://loader.tabix.io/master.js"></script></body></html>]]></http_server_default_response>
保存并关闭文件,然后重启 ClickHouse 服务以应用配置更改:
systemctl restart clickhouse-server访问 ClickHouse Web UI
默认情况下,ClickHouse Web UI 监听 8123 端口。您可以使用以下命令进行检查:
ss -antpl | grep 8123您应该看到以下输出:
LISTEN 0 4096 0.0.0.0:8123 0.0.0.0:* users:(("clickhouse-serv",pid=18580,fd=158))
现在,打开您的 Web 浏览器并使用 URL http://your-server-ip:8123 访问 ClickHouse Web UI。您应该看到以下屏幕:
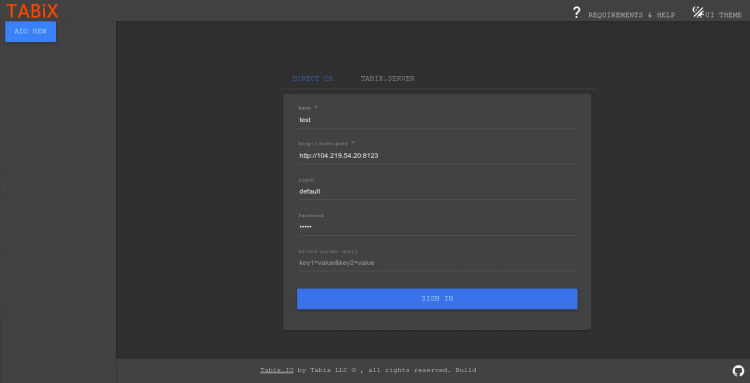
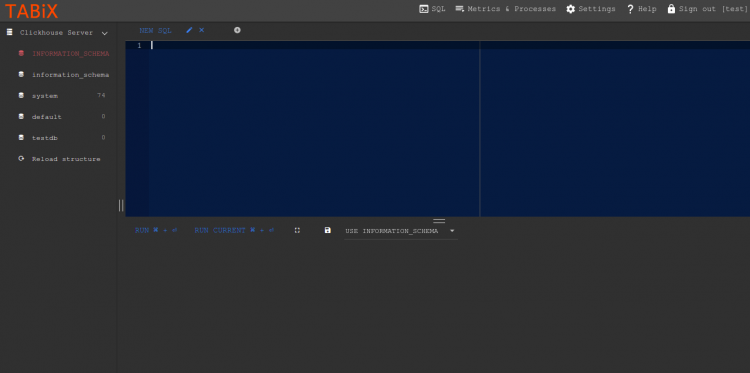
提供您的默认用户名和密码,然后单击 Sign In 按钮。登录后,您应该看到以下屏幕:
结论
在上述指南中,我们讲解了如何在 Debian 11 上安装 ClickHouse 数据库系统。我们还讲解了如何创建和管理数据库以及启用 ClickHouse Web 界面。我希望这能帮助您在生产环境中安装 ClickHouse。如果您有任何问题,请随时提问。