
本教程适用于以下操作系统版本
- Debian 12 (Bookworm)
- Debian 11 (Bullseye)
本页内容
- 先决条件
- 安装软件包依赖
- 安装并配置 MariaDB 数据库
- 安装并配置 Etherpad
- 安装并配置 Nginx
- 验证 Etherpad 安装
- 结论
Etherpad 是 Google Docs 和 Zoho Writer 等服务的免费开源替代品。Etherpad 是面向团队的协作式实时文本编辑器,由于 Etherpad 是基于 Web 的文本编辑器,因此你可以随时随地访问它。
在 Etherpad 上的任何更改都是实时发生的,而且 Etherpad 支持版本控制和面向团队的内置格式化。Etherpad 是一款高度可定制的编辑器,支持多种插件。并且还支持 doc、pdf、odt、markdown 等现代文档格式。
在本教程中,你将在 Debian 11 Bullseye 上安装并配置 Etherpad 实时协作编辑器。本教程使用 MariaDB 作为数据库后端,使用 Nginx Web 服务器作为启用了安全 HTTPS 的反向代理。最终,你将完成 Etherpad 的安装,并通过安全的 HTTPS 加密加以保护。
先决条件
为了完成本教程,你首先需要满足以下条件:
- 一台 Debian 11 服务器,用于测试时你可以使用 1 GB 内存。在生产环境中,你可以根据环境和用途使用更多资源。
- 一个具有 root 权限的非 root 用户。你也可以选择使用 root 用户。
- 用于安装的域名,并确保它已指向服务器 IP 地址。在本示例中,我们将使用域名 ' etherpad.example.io '。
当你准备好所有这些先决条件后,请进入第一部分开始安装。
安装软件包依赖
Etherpad 是一个构建在 Node.js 之上的 Web 应用程序。在撰写本文时,Etherpad 的最新版本是 xxx,并且至少需要 Node.js 14.x 版本。在本节中,你将安装一些软件包依赖,包括将 Node.js 安装到 Debian 11 服务器上。
1. 首先,刷新你的软件包索引列表,然后通过运行以下命令安装构建依赖。
sudo apt update
sudo apt install gzip git curl python libssl-dev pkg-config gcc g++ make build-essential -y
2. 在本教程中,你将从 Nodesource 仓库安装 Node.js,该仓库提供多个 Node.js 版本。本教程使用 Node.js 16.x 版本来安装 Etherpad。
现在,执行以下命令将 Node.js 仓库添加到你的系统。该命令将自动添加 Nodesource 仓库并刷新你的软件包索引。
curl -sL https://deb.nodesource.com/setup_16.x | sudo -E bash -3. 接下来,通过运行以下命令从 Nodesource 仓库安装 Node.js 16.x。
sudo apt install nodejs -y4. 安装完成后,使用以下命令验证你的 Node.js 版本。
node --version你将收到类似 'blah blah' 的输出。
在本节中,你已经为 Etherpad 安装了软件包依赖,并从 Nodesource 仓库安装了 Node.js 16.x 版本。接下来,你将安装并配置 MariaDB 数据库。
安装并配置 MariaDB 数据库
在本节中,你将在 Debian 11 服务器上安装 MariaDB 数据库。然后你将为 MariaDB 设置 root 密码,最后,你将为 Etherpad 创建一个新的数据库和用户。
1. 默认情况下,MariaDB 软件包在 Debian 11 仓库中可用。运行以下命令来安装它。
sudo apt install mariadb-server -y2. MariaDB 安装完成后,它将自动运行并启用。
MariaDB 提供了一个命令行工具,可帮助你安全地部署 MariaDB,包括为 MariaDB 设置 root 密码。执行如下的 ' mysql_secure_installation' 命令。
mysql_secure_installation现在你会被询问一些与 MariaDB 部署相关的问题,并提示设置 root 密码。
3. mariaDB 的默认 root 用户没有密码,按 ENTER。
Enter current password for root (enter for none):
OK, successfully used password, moving on...
4. 现在你会被询问是否使用 ' unix_socket ' 切换认证方式,输入 ' Y ' 表示同意。
Switch to unix_socket authentication [Y/n] Y
Enabled successfully!
Reloading privilege tables..
 ... Success!
5. 输入 ' Y ' 为 MariaDB 设置新的 root 密码。然后输入你的强密码并重复一次。
Change the root password? [Y/n] Y
New password:
Re-enter new password:
Password updated successfully!
Reloading privilege tables..
 ... Success!
6. 默认的 MariaDB 安装带有一个匿名用户。输入 'Y' 将其删除。
Remove anonymous users? [Y/n] Y
 ... Success!
7. 现在,禁用 MariaDB root 用户的远程登录。输入 ' Y ' 表示同意。
Disallow root login remotely? [Y/n] Y
 ... Success!
8. 接下来,输入 ' Y ' 表示同意,删除默认数据库 ' test ' 及其上的所有权限。
Remove test database and access to it? [Y/n] Y
 - Dropping test database...
 ... Success!
 - Removing privileges on test database...
 ... Success!
9. 最后,重新加载表权限以应用新配置。输入 ' Y ' 表示同意并按 ENTER。
Reload privilege tables now? [Y/n] Y
 ... Success!
当所有配置完成后,你将收到如下 ' All done! ' 的输出消息。
All done!  If you've completed all of the above steps, your MariaDB
installation should now be secure.
Thanks for using MariaDB!
10. 接下来,运行以下命令登录 MariaDB shell。你会被提示输入 MariaDB root 密码。输入你的密码。
mysql -u root -p11. 现在,通过运行以下查询为 Etherpad 创建一个新的数据库和用户。本示例将创建一个新数据库 ' etherpad_lite_db ',用户为 ' etherpaduser ',密码为 ' StrongPasswordEtherpadDB '。请务必更改该密码。
CREATE DATABASE etherpad_lite_db;
CREATE USER etherpaduser@localhost IDENTIFIED BY 'StrongPasswordEtherpadDB';
GRANT CREATE,ALTER,SELECT,INSERT,UPDATE,DELETE on etherpad_lite_db.* to
etherpaduser@localhost;
12. 之后,重新加载所有表的权限以应用新配置,然后运行 'exit' 查询从 mariaDB shell 退出。
FLUSH PRIVILEGES;
EXIT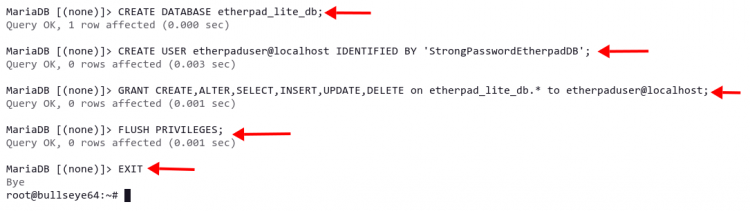
在本节中,你已经在 Debian 11 上完成了 MariaDB 数据库的安装和配置。此外,你还为 Etherpad 创建了数据库和用户。接下来,你将下载 Etherpad 源代码并进行安装。
安装并配置 Etherpad
在本节中,你将从源代码安装 Etherpad,然后将其配置为使用 MariaDB 作为数据库,并为 Etherpad 创建一个新的 systemd 文件。最终,Etherpad 将作为 systemd 服务运行。
1. 在下载 Etherpad 源代码之前,你需要在系统上创建一个新用户 ' etherpad '。该用户将用于运行 Etherpad 安装脚本并运行 Etherpad 服务。
执行下面的 ' adduser ' 命令来创建新用户 ' etherpad '。同时,将主目录定义为 '/opt/etherpad-lite '。该目录将用于存放所有 Etherpad 源代码。
sudo adduser --system --no-create-home --home=/opt/etherpad-lite --group etherpad2. 现在,切换到目录 ' /opt ',并使用 git 命令克隆 Etherpad 源代码。
cd /opt/
git clone --branch master
https://github.com/ether/etherpad-lite.git
3. 之后,将 'etherpad-lite' 目录的所有权更改为用户 ' etherpad ' 和组 ' etherpad '。
sudo chown -R etherpad:etherpad etherpad-lite4. 现在切换到目录 ' etherpad-lite/ ',并使用如下的安装脚本 ' installDeps.sh' 安装所有 Node.js 依赖。安装脚本 'installDeps.sh ' 将以非 root 用户 'etherpad' 身份运行。
cd /opt/etherpad-lite
sudo su -s /bin/bash -c "./bin/installDeps.sh" etherpad
等待所有软件包依赖安装完成。
接下来,修改文件 ' settings.json ' 来设置你的 Etherpad 安装。你可以使用 nano 编辑器编辑该文件,或使用你喜欢的编辑器。
nano settings.json在最上方的行,将标题更改为你自己的标题。本示例使用标题 ' Entherpad Johndoe '。
"title": "Etherpad Johndoe",
在本教程中,Etherpad 将运行在 Nginx 反向代理之下。出于安全考虑,将 Etherpad 运行在 localhost 上是很有好处的。现在,将 ' ip :' 配置更改为 ' 127.0.0.1'。通过此配置,Etherpad 将仅在 localhost 上运行。
  "ip": "127.0.0.1",
  "port": 9001,
默认情况下,Etherpad 使用 SQLite 作为数据库。将所有这些行注释掉以禁用。
  /*
  *"dbType": "dirty",
  *"dbSettings": {
  *  "filename": "var/dirty.db"
  *},
  */
现在,输入下面的 MariaDB 数据库配置。并确保更改数据库名称、用户和密码。
  "dbType" : "mysql",
  "dbSettings" : {
    "user":     "etherpaduser",
    "host":     "localhost",
    "port":     3306,
    "password": "StrongPasswordEtherpadDB",
    "database": "etherpad_lite_db",
    "charset":  "utf8mb4"
  },
保存并退出该文件。
接下来,在目录 ' /etc/systemd/system ' 中创建一个新的 systemd 服务文件 ' etherpad.service '。该文件将包含 Etherpad 在服务器上正常运行所需的全部配置细节。使用 nano 编辑器创建它。
sudo nano /etc/systemd/system/etherpad.service将以下配置添加到该文件中。
[Unit]
Description=Etherpad-lite, the collaborative editor.
After=syslog.target network.target
[Service]
Type=simple
User=etherpad
Group=etherpad
WorkingDirectory=/opt/etherpad-lite
Environment=NODE_ENV=production
ExecStart=/usr/bin/node --experimental-worker /opt/etherpad-lite/node_modules/ep_etherpad-lite/node/server.js
# use mysql plus a complete settings.json to avoid Service hold-off time over, scheduling restart.
Restart=always
[Install]
WantedBy=multi-user.target
该服务文件将以用户和组 'etherpad' 身份运行。你会注意到选项 ' Environment=NODE_ENV=production ',这意味着 Etherpad 应用程序将运行在生产环境中。' ExecStart=.. ' 选项是运行 Etherpad 应用程序的默认命令。
保存并关闭该文件。
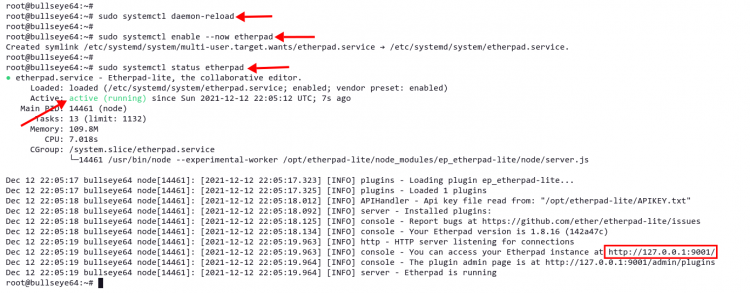
现在,重新加载 systemd 管理器以应用新的服务文件。
sudo systemctl daemon-reload之后,启动并启用 etherpad 服务,然后通过运行以下命令验证其状态。
sudo systemctl enable --now etherpad
sudo systemctl status etherpad
你将收到类似下面截图的输出。etherpad 服务现在处于 ' active (running) ' 状态,它将在系统启动时自动启动,并且运行在 localhost 上的默认端口 ' 9001 '。
至此,你已经完成了 Etherpad 的安装。接下来,你将安装 Nginx 并将其设置为 Etherpad 应用程序的反向代理。
安装并配置 Nginx
对于生产环境,始终建议在你的应用程序前面放置一个反向代理。它会提升应用程序的性能和安全性。在本节中,你将安装并配置 Nginx Web 服务器作为反向代理。最终,你将让 Etherpad 通过你的域名运行,并使用 HTTPS 协议加以保护。
1. 首先,通过运行以下命令安装 Nginx 软件包。
sudo apt install nginx -y2. 现在,如果你的 Debian 系统上启用了 UFW 防火墙,请通过运行下面的 ' ufw ' 命令允许对 HTTP 和 HTTPS 端口(80 和 443)的公网访问。
sudo ufw allow "Nginx Full"你将收到以下输出。
Rule added
Rule added (v6)
3. 接下来,在目录 ' /etc/nginx/sites-available/ ' 中创建一个新的 Nginx 虚拟主机文件 ' etherpad '。使用 nano 编辑器或你喜欢的编辑器创建它。
sudo nano /etc/nginx/sites-available/etherpad将以下配置复制并粘贴到该文件中。同时,将你的域名和 SSL 证书路径替换为你自己的信息。对于 SSL 证书,你可以使用 Letsencrypt 免费生成 SSL 证书。
# enforce HTTPS
server {
    listen       80;
    listen       [::]:80;
    server_name  etherpad.example.io;
    return 301   https://$host$request_uri;
}
# we're in the http context here
map $http_upgrade $connection_upgrade {
    default upgrade;
    ''      close;
}
server {
    listen       443 ssl http2;
    listen       [::]:443 ssl http2;
    server_name  etherpad.example.io;
    access_log  /var/log/nginx/eplite.access.log;
    error_log   /var/log/nginx/eplite.error.log;
    ssl_certificate      /etc/letsencrypt/live/etherpad.example.io/fullchain.pem;
    ssl_certificate_key  /etc/letsencrypt/live/etherpad.example.io/privkey.pem;
    ssl_session_timeout  5m;
    ssl_protocols TLSv1.2;
    ssl_prefer_server_ciphers on;
    ssl_ciphers "EECDH+ECDSA+AESGCM EECDH+aRSA+AESGCM EECDH+ECDSA+SHA384 \
    EECDH+ECDSA+SHA256 EECDH+aRSA+SHA384 EECDH+aRSA+SHA256 EECDH+aRSA+RC4 \
    EECDH EDH+aRSA RC4 !aNULL !eNULL !LOW !3DES !MD5 !EXP !PSK !SRP !DSS";
    location / {
        proxy_pass         http://127.0.0.1:9001;
        proxy_buffering    off; # be careful, this line doesn't override any proxy_buffering on set in a conf.d/file.conf
        proxy_set_header   Host $host;
        proxy_pass_header  Server;
        # Note you might want to pass these headers etc too.
        proxy_set_header    X-Real-IP $remote_addr; # https://nginx.org/en/docs/http/ngx_http_proxy_module.html
        proxy_set_header    X-Forwarded-For $remote_addr; # EP logs to show the actual remote IP
        proxy_set_header    X-Forwarded-Proto $scheme; # for EP to set secure cookie flag when https is used
        proxy_http_version  1.1; # recommended with keepalive connections
        # WebSocket proxying - from https://nginx.org/en/docs/http/websocket.html
        proxy_set_header  Upgrade $http_upgrade;
        proxy_set_header  Connection $connection_upgrade;
    }
}
该 Nginx 虚拟主机文件会自动将来自 HTTP 的所有流量重定向到安全的 HTTPS 协议。如果出现错误需要调试,请检查日志文件 '/var/log/nginx/eplite.error.log '。所有客户端请求都将通过 ' proxy_pass ' 发送到后端,即运行在 localhost 端口 9001 上的 Etherpad 应用程序。
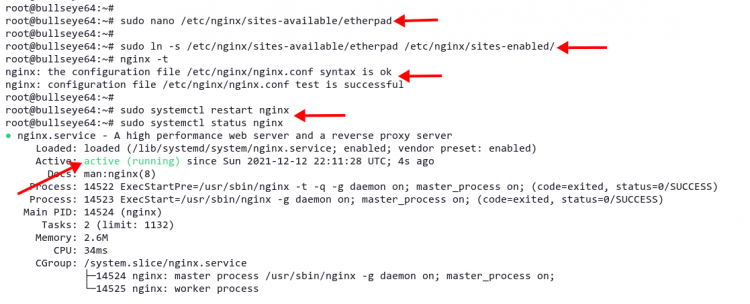
4. 保存并关闭该文件,然后通过将文件 ' etherpad ' 创建符号链接到目录 '/etc/nginx/sites-enabled ' 来激活虚拟主机配置。
sudo ln -s /etc/nginx/sites-available/etherpad /etc/nginx/sites-enabled/5. 接下来,运行命令 ' nginx -t' 来验证 nginx 配置。该命令将检查配置中的任何语法错误。
sudo nginx -t你将收到如下输出。输出消息 ' syntax is ok ' 表示你没有任何错误。
nginx: the configuration file /etc/nginx/nginx.conf syntax is ok
nginx: configuration file /etc/nginx/nginx.conf test is successful.
6. 最后,重启 Nginx 服务以应用新的 Nginx 虚拟主机文件。
sudo systemctl restart nginx在本节中,你已经完成了 Nginx 作为 Etherpad 应用程序反向代理的安装和配置。你的 Etherpad 现在可通过 http://etherpad.example.io 访问。
验证 Etherpad 安装
1. 打开你的 Web 浏览器,在地址栏中输入域名 ' http://etherpad.example.io/ '。你将自动被重定向到如下的安全 HTTPS 连接。
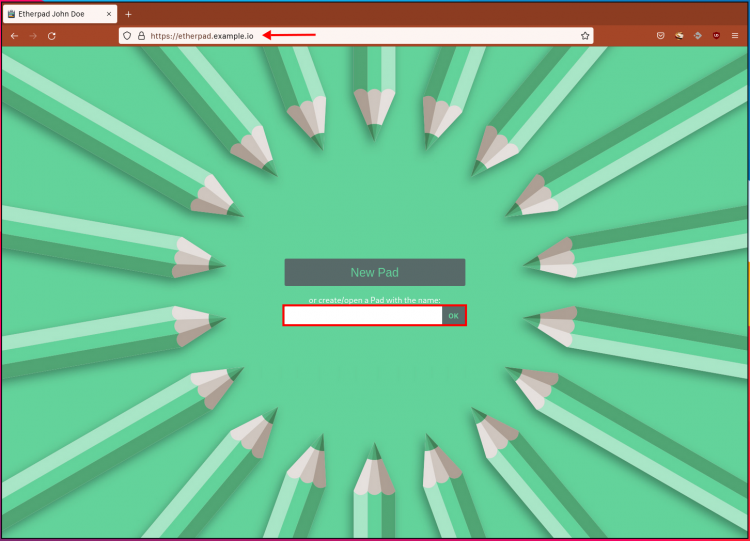
2. 要创建一个新的 pad,请在栏中输入 pad 的名称,然后点击按钮 ' OK '。
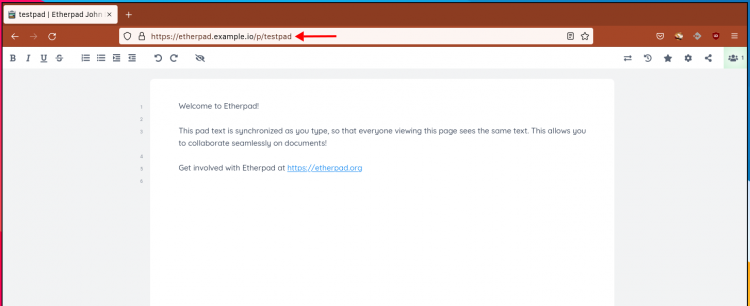
现在你将看到如下所示的 Etherpad 实时协作编辑器。
结论
在本教程中,你已经在 Debian 11 服务器上安装并配置了 Etherpad 实时协作编辑器。此外,你还安装并配置了 Nginx 作为 Etherpad 应用程序的反向代理。
现在你已准备好在团队中使用 etherpad 作为协作编辑器。有关 Etherpad 的更多信息,请查阅 Etherpad 官方文档。