
本页内容
- 准备工作
- 开始之前
- 安装 Node.js
- 安装并配置 PostgreSQL
- 安装 Ruby
- 安装并配置 Mastodon
- 为 Mastodon 创建 Systemd 服务文件
- 配置 Nginx 作为反向代理
- 使用 Let's Encrypt SSL 保护 Mastodon
- 访问 Mastodon Web 界面
Mastodon 是一款用于运行自托管社交网络服务的免费开源软件。它提供微博客功能,允许你关注其他用户并通过 Mastodon 发布消息和图片。它由 Ruby 和 JavaScript 编写,支持音频、视频和图片发布、无障碍描述、投票、内容警告、动态头像、自定义表情符号等。Mastodon 提供适用于 Android 和 iOS 等多种平台的应用程序。
在本教程中,我们将向你展示如何在 Ubuntu 22.04 上安装 Mastodon。
更新:本指南已于 2022 年 11 月 30 日更新并成功重新测试,以澄清安装步骤并修复评论中提到的问题,因为自指南撰写以来部分软件版本已发生变化。
这里还提供了一份在 Ubuntu 22.04 上安装 Mastodon 的替代安装指南,该指南使用 Docker 在 Ubuntu 上安装 Mastodon。
准备工作
- 一台运行 Ubuntu 22.04 的服务器。
- 服务器上已配置 root 密码。
- 一个已指向服务器 IP 地址的有效域名。
开始之前
首先,建议将系统软件包更新到最新版本。你可以通过运行以下命令来完成:
apt update -y
apt upgrade -y
更新系统后,你需要安装 Mastodon 所需的一些依赖项。你可以通过下列命令一次性安装它们:
apt install git software-properties-common make apt-transport-https redis-server optipng pngquant jhead jpegoptim gifsicle imagemagick ffmpeg libpq-dev libxml2-dev libxslt1-dev file g++ libprotobuf-dev protobuf-compiler pkg-config gcc autoconf bison build-essential libssl-dev libyaml-dev libreadline6-dev zlib1g-dev libncurses5-dev libffi-dev libgdbm-dev libidn11-dev libicu-dev libjemalloc-dev -y所有依赖项安装完成后,你可以进入下一步。
安装 Node.js
Mastodon 需要在系统中安装 Node.js。要安装 Node.js,请使用以下命令将 Node.js 仓库添加到你的服务器:
curl -sL https://deb.nodesource.com/setup_16.x | bash -仓库添加完成后,使用以下命令安装 Node.js 16 版本:
apt install nodejs -y接下来,下载并添加 Yarn 的 GPG 密钥,并使用以下命令启用仓库:
curl -sL https://dl.yarnpkg.com/debian/pubkey.gpg | gpg --dearmor | tee /usr/share/keyrings/yarnkey.gpg >/dev/null
echo "deb [signed-by=/usr/share/keyrings/yarnkey.gpg] https://dl.yarnpkg.com/debian stable main" | tee /etc/apt/sources.list.d/yarn.list
添加完成后,使用以下命令更新仓库并安装 Yarn:
apt update -y
apt -y install yarn
完成后,你可以进入下一步。
安装并配置 PostgreSQL
Mastodon 使用 PostgreSQL 作为数据库后端。你可以使用以下命令安装最新版本的 PostgreSQL:
apt install -y postgresql postgresql-contrib安装 PostgreSQL 后,使用以下命令启动 PostgreSQL 服务:
systemctl start postgresql接下来,登录到 PostgreSQL shell:
sudo -u postgres -i psql接下来,为 Mastodon 创建一个数据库:
CREATE DATABASE mastodon;接下来,使用以下命令创建一个数据库用户:
CREATE USER mastodon;接下来,使用以下命令为 Mastodon 用户设置密码:
ALTER USER mastodon WITH ENCRYPTED PASSWORD 'password';接下来,设置创建数据库的相应权限:
ALTER USER mastodon createdb;接下来,将该用户设置为 Mastodon 数据库的所有者:
ALTER DATABASE mastodon OWNER TO mastodon;最后,使用以下命令退出 PostgreSQL shell:
\q安装 Ruby
Mastodon 还需要在服务器上安装 Ruby 2.5 及以上版本。如果尚未安装,你可以使用以下命令进行安装:
apt install -y ruby ruby-dev安装完成后,你可以使用以下命令验证 Ruby 版本:
ruby -v你将在以下输出中看到 Ruby 版本:
ruby 3.0.2p107 (2021-07-07 revision 0db68f0233) [x86_64-linux-gnu]
安装并配置 Mastodon
接下来,你需要创建一个专用用户来运行 Mastodon。你可以使用以下命令创建该用户:
adduser mastodon --system --group --disabled-login接下来,从 Git 仓库下载最新版本的 Mastodon:
git clone https://github.com/tootsuite/mastodon.git接下来,如果不存在,则为 Mastodon 创建 /var/www/ 目录。
mkdir -p /var/www/接下来,将 Mastodon 目录移动到 /var/www 目录:
mv mastodon/ /var/www/接下来,将 Mastodon 目录的所有权更改为 mastodon:
chown -R mastodon:mastodon /var/www/mastodon/接下来,进入 /var/www/mastodon 目录并切换到最新的分支:
cd /var/www/mastodon/
sudo -u mastodon git checkout v4.0.2
你将看到以下输出:
Note: switching to 'v4.0.2'.

You are in 'detached HEAD' state. You can look around, make experimental
changes and commit them, and you can discard any commits you make in this
state without impacting any branches by switching back to a branch.

If you want to create a new branch to retain commits you create, you may
do so (now or later) by using -c with the switch command. Example:

  git switch -c


Or undo this operation with:

  git switch -

Turn off this advice by setting config variable advice.detachedHead to false

HEAD is now at 03b0f3ac8 Bump version to 4.0.2 (#20725)
接下来,使用以下命令安装 Mastodon 所需的全部依赖项:
gem install bundler
sudo -u mastodon bundle config deployment 'true'
sudo -u mastodon bundle config without 'development test'
sudo -u mastodon bundle install -j$(getconf _NPROCESSORS_ONLN)
最后,使用以下命令运行 Mastodon 安装向导:
sudo -u mastodon RAILS_ENV=production bundle exec rake mastodon:setup系统会要求你输入域名:
Type application/netcdf is already registered as a variant of application/netcdf.
Your instance is identified by its domain name. Changing it afterward will break things.
Domain name:
mastodon.linuxbuz.com
输入你的域名并按 Enter 键。系统会询问是否启用单用户模式:
Single user mode disables registrations and redirects the landing page to your public profile.
Do you want to enable single user mode?
No
输入 No 并按 Enter 键。系统会询问是否使用 Docker 运行 Mastodon:
Are you using Docker to run Mastodon?
no
输入 no 并按 Enter 键。系统会要求你提供 PostgreSQL 数据库详细信息:
PostgreSQL host: /var/run/postgresql
PostgreSQL port:
5432

Name of PostgreSQL database:
mastodon

Name of PostgreSQL user:
mastodon

Password of PostgreSQL user:
输入你的 PostgreSQL 数据库详细信息并按 Enter 键。系统会要求你提供 Redis 服务器详细信息:
Database configuration works! ????

Redis host:
localhost

Redis port:
6379

Redis password:
输入你的 Redis 主机、端口,并将密码字段留空,然后按 Enter 键。系统会询问是否将文件存储在云端:
Redis configuration works! ????

Do you want to store uploaded files on the cloud?
No
输入 No 并按 Enter 键。系统会询问是否从 localhost 发送邮件:
Do you want to send e-mails from localhost?
yes

E-mail address to send e-mails "from": Mastodon <
[email protected]
>
Send a test e-mail with this configuration right now?
no
输入所有必需的详细信息并按 Enter 键。系统会询问是否保存所有配置:
This configuration will be written to .env.production
Save configuration? (Y/n)
Y
输入 Y 并按 Enter 键。系统会询问是否准备数据库:
Now that configuration is saved, the database schema must be loaded.
If the database already exists, this will erase its contents.
Prepare the database now? (Y/n)
Y
输入 Y 并按 Enter 键。系统会询问是否编译 CSS/JS 资源。
The final step is compiling CSS/JS assets.
This may take a while and consume a lot of RAM.
Compile the assets now? (Y/n)
Y
输入 Y 并按 Enter 键。系统会要求你设置管理员密码:
All done! You can now power on the Mastodon server ????

Do you want to create an admin user straight away?
Yes

Username:
admin

E-mail:
[email protected]


You can login with the password:
9835fbd5e569ad149610862178580da7

You can change your password once you login.
输入你的管理员用户名和邮箱,按 Enter 键即可完成安装。
为 Mastodon 创建 Systemd 服务文件
Mastodon 自带预配置好的 systemd 文件用于管理 Mastodon 服务。你需要将它们复制到 /etc/sysetmd/system/ 目录。
cp /var/www/mastodon/dist/mastodon*.service /etc/systemd/system/接下来,你需要在服务文件中将 Mastodon 的工作目录从 /home/mastodon/live/ 更改为 /var/www/mastodon/。你可以使用以下命令完成:
sed -i 's/home\/mastodon\/live/var\/www\/mastodon/g' /etc/systemd/system/mastodon-*.service你还需要在服务文件中将 /home/mastodon/.rbenv/shims/bundle 更改为 /usr/local/bin/bundle:
sed -i 's/home\/mastodon\/.rbenv\/shims/usr\/local\/bin/g' /etc/systemd/system/mastodon-*.service接下来,重新加载 systemd 以应用配置更改:
systemctl daemon-reload接下来,启动并启用所有 Mastodon 服务:
systemctl enable --now mastodon-web mastodon-sidekiq mastodon-streaming你可以使用以下命令检查所有服务的状态:
systemctl status mastodon-web mastodon-sidekiq mastodon-streaming输出:
? mastodon-web.service - mastodon-web
     Loaded: loaded (/etc/systemd/system/mastodon-web.service; enabled; vendor preset: enabled)
     Active: active (running) since Wed 2022-11-30 03:07:13 UTC; 19s ago
   Main PID: 10201 (ruby3.0)
      Tasks: 29 (limit: 464140)
     Memory: 249.0M
     CGroup: /system.slice/mastodon-web.service
             ??10201 "puma 5.6.5 (tcp://127.0.0.1:3000) [mastodon]" "" "" "" "" "" "" "" "" "" "" "" "" "" "" "" "" "" "" "" "" "" "" "" "" ">
             ??10228 "puma: cluster worker 0: 10201 [mastodon]" "" "" "" "" "" "" "" "" "" "" "" "" "" "" "" "" "" "" "" "" "" "" "" "" "" "">
             ??10232 "puma: cluster worker 1: 10201 [mastodon]" "" "" "" "" "" "" "" "" "" "" "" "" "" "" "" "" "" "" "" "" "" "" "" "" "" "">

Nov 30 03:07:15 ubuntu22042 bundle[10201]: [10201] *  Max threads: 5
Nov 30 03:07:15 ubuntu22042 bundle[10201]: [10201] *  Environment: production
Nov 30 03:07:15 ubuntu22042 bundle[10201]: [10201] *   Master PID: 10201
Nov 30 03:07:15 ubuntu22042 bundle[10201]: [10201] *      Workers: 2
Nov 30 03:07:15 ubuntu22042 bundle[10201]: [10201] *     Restarts: (?) hot (?) phased
Nov 30 03:07:15 ubuntu22042 bundle[10201]: [10201] * Preloading application
Nov 30 03:07:27 ubuntu22042 bundle[10201]: [10201] * Listening on http://127.0.0.1:3000
Nov 30 03:07:27 ubuntu22042 bundle[10201]: [10201] Use Ctrl-C to stop
Nov 30 03:07:27 ubuntu22042 bundle[10201]: [10201] - Worker 0 (PID: 10228) booted in 0.04s, phase: 0
Nov 30 03:07:27 ubuntu22042 bundle[10201]: [10201] - Worker 1 (PID: 10232) booted in 0.01s, phase: 0

? mastodon-sidekiq.service - mastodon-sidekiq
     Loaded: loaded (/etc/systemd/system/mastodon-sidekiq.service; enabled; vendor preset: enabled)
     Active: active (running) since Wed 2022-11-30 03:07:13 UTC; 19s ago
   Main PID: 10199 (ruby3.0)
      Tasks: 32 (limit: 464140)
     Memory: 247.1M
     CGroup: /system.slice/mastodon-sidekiq.service
             ??10199 "sidekiq 6.5.7 mastodon [0 of 25 busy]" "" "" "" "" "" "" "" "" "" "" "" "" "" "" "" "" "" "" "" "" "" "" "" "" "" "" "">

Nov 30 03:07:29 ubuntu22042 bundle[10199]: 2022-11-30T03:07:29.202Z pid=10199 tid=cc7 uniquejobs=upgrade_locks INFO: Start - Converting v6 lo>
Nov 30 03:07:29 ubuntu22042 bundle[10199]: 2022-11-30T03:07:29.202Z pid=10199 tid=cc7 uniquejobs=upgrade_locks INFO: Done - Converting v6 loc>
Nov 30 03:07:29 ubuntu22042 bundle[10199]: 2022-11-30T03:07:29.202Z pid=10199 tid=cc7 uniquejobs=upgrade_locks INFO: Start - Deleting v6 keys
Nov 30 03:07:29 ubuntu22042 bundle[10199]: 2022-11-30T03:07:29.203Z pid=10199 tid=cc7 uniquejobs=upgrade_locks INFO: Done - Deleting v6 keys
默认情况下,Mastodon 监听 3000 端口。你可以使用以下命令进行验证:
ss -lnpt | grep 3000输出:
LISTEN 0 1024 127.0.0.1:3000 0.0.0.0:* users:(("ruby3.0",pid=10232,fd=5),("ruby3.0",pid=10228,fd=5),("ruby3.0",pid=10201,fd=5))
配置 Nginx 作为反向代理
首先,使用以下命令安装 Nginx Web 服务器软件包:
apt install nginx -y接下来,将 Nginx 虚拟主机配置文件复制到 Nginx 目录:
cp /var/www/mastodon/dist/nginx.conf /etc/nginx/conf.d/mastodon.conf接下来,编辑 Mastodon 虚拟主机配置文件:
nano /etc/nginx/conf.d/mastodon.conf在端口 80 的 server 块和端口 443 的 server 块中,找到以下行:
server_name example.com;
将它们替换为以下行:
server_name mastodon.linuxbuz.com;
在端口 80 的 server 块和端口 443 的 server 块中,找到以下行。
root /home/mastodon/live/public;
将其替换为以下行:
root /var/www/mastodon/public;
找到以下两行。
# ssl_certificate /etc/letsencrypt/live/example.com/fullchain.pem;
# ssl_certificate_key /etc/letsencrypt/live/example.com/privkey.pem;
将它们修改为以下内容,以便 Nginx 暂时使用自签名的 TLS 证书。我们稍后将获取有效的 Let's Encrypt 证书。
ssl_certificate /etc/ssl/certs/ssl-cert-snakeoil.pem;
ssl_certificate_key /etc/ssl/private/ssl-cert-snakeoil.key;
保存并关闭文件,然后为 Nginx 创建缓存目录:
mkdir -p /var/nginx/cache/接下来,检查 Nginx 是否存在语法错误:
nginx -t你将看到以下输出:
nginx: the configuration file /etc/nginx/nginx.conf syntax is ok
nginx: configuration file /etc/nginx/nginx.conf test is successful
接下来,重启 Nginx 服务以应用更改:
systemctl restart nginx使用 Let's Encrypt SSL 保护 Mastodon
要在 Mastodon 网站上启用 HTTPS,你需要在服务器上安装 Certbot 软件包。
首先,使用以下命令安装 Snap 包管理器:
apt install snapd接下来,将 Snap 包更新到最新版本:
snap install core
snap refresh core
接下来,使用以下命令安装 Certbot 软件包:
snap install --classic certbot接下来,为 Certbot 可执行文件创建指向系统位置的符号链接:
ln -s /snap/bin/certbot /usr/bin/certbot接下来,运行以下命令下载并安装 Let's Encrypt SSL 证书:
certbot --nginx -d mastodon.linuxbuz.com系统会要求你提供电子邮件地址并接受服务条款:
Saving debug log to /var/log/letsencrypt/letsencrypt.log
Enter email address (used for urgent renewal and security notices)
 (Enter 'c' to cancel):
[email protected]


- - - - - - - - - - - - - - - - - - - - - - - - - - - - - - - - - - - - - - - -
Please read the Terms of Service at
https://letsencrypt.org/documents/LE-SA-v1.3-September-21-2022.pdf. You must
agree in order to register with the ACME server. Do you agree?
- - - - - - - - - - - - - - - - - - - - - - - - - - - - - - - - - - - - - - - -
(Y)es/(N)o: Y

- - - - - - - - - - - - - - - - - - - - - - - - - - - - - - - - - - - - - - - -
Would you be willing, once your first certificate is successfully issued, to
share your email address with the Electronic Frontier Foundation, a founding
partner of the Let's Encrypt project and the non-profit organization that
develops Certbot? We'd like to send you email about our work encrypting the web,
EFF news, campaigns, and ways to support digital freedom.
- - - - - - - - - - - - - - - - - - - - - - - - - - - - - - - - - - - - - - - -
(Y)es/(N)o: Y
输入 Y 并按 Enter 键,为你的域名下载并安装 SSL 证书:
Account registered.
Requesting a certificate for mastodon.linuxbuz.com

Successfully received certificate.
Certificate is saved at: /etc/letsencrypt/live/mastodon.linuxbuz.com/fullchain.pem
Key is saved at:         /etc/letsencrypt/live/mastodon.linuxbuz.com/privkey.pem
This certificate expires on 2023-02-28.
These files will be updated when the certificate renews.
Certbot has set up a scheduled task to automatically renew this certificate in the background.

Deploying certificate
Successfully deployed certificate for mastodon.linuxbuz.com to /etc/nginx/conf.d/mastodon.conf
Congratulations! You have successfully enabled HTTPS on https://mastodon.linuxbuz.com

- - - - - - - - - - - - - - - - - - - - - - - - - - - - - - - - - - - - - - - -
If you like Certbot, please consider supporting our work by:
 * Donating to ISRG / Let's Encrypt:   https://letsencrypt.org/donate
 * Donating to EFF:                    https://eff.org/donate-le
- - - - - - - - - - - - - - - - - - - - - - - - - - - - - - - - - - - - - - - -
访问 Mastodon Web 界面
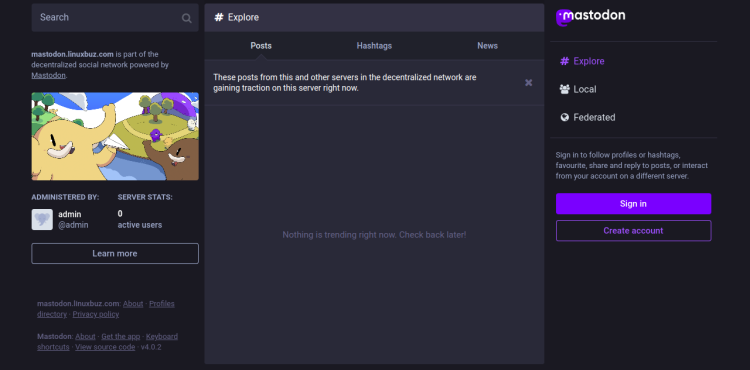
现在,打开你的 Web 浏览器并访问 URL https://mastodon.linuxbuz.com。你将被重定向到以下页面:
点击 Sign In 按钮。你应该会看到 Mastodon 登录页面:
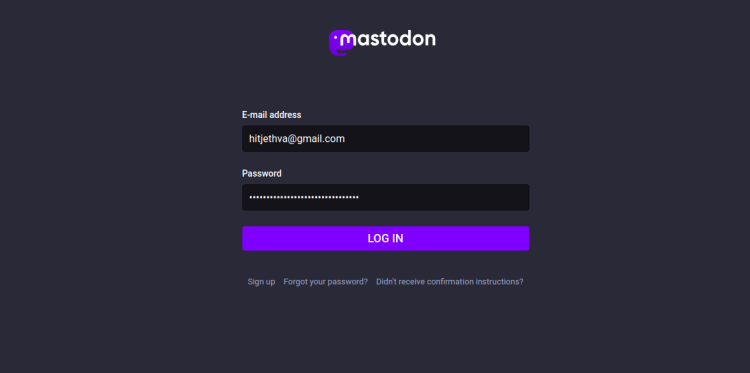
现在,输入你之前创建的管理员邮箱和密码,然后点击 Log in 按钮。你应该会在以下页面看到 Mastodon 仪表盘:

恭喜!你已成功在 Ubuntu 22.04 服务器上安装并配置了 Mastodon。现在你可以轻松地使用 Mastodon 创建属于自己的社交网络。如果你有任何疑问,欢迎随时向我提问。