
本页内容
- 准备工作
- 步骤 1 - 安装 Squid
- 步骤 2 - 配置 Squid 代理服务器 1. 配置 Squid 访问策略 2. 屏蔽网站 3. 阻止下载特定文件 4. 使用关键词屏蔽网站 5. 隐藏客户端 IP 地址 6. 更改 Squid 代理端口 7. 配置防火墙 / SELinux
- 步骤 3 - 为 Squid 设置基本认证
- 步骤 4 - 配置 Squid 代理客户端 1. 系统级代理配置 2. 浏览器中的代理设置 3. 配置 DNF 使用 Squid 代理 4. 使用 Squidclient
- 总结
- 1. 配置 Squid 访问策略
- 2. 屏蔽网站
- 3. 阻止下载特定文件
- 4. 使用关键词屏蔽网站
- 5. 隐藏客户端的 IP 地址
- 6. 更改 Squid 代理端口
- 7. 配置防火墙 / SELinux
- 1. 系统级代理配置
- 2. 浏览器中的代理设置
- 3. 配置 DNF 使用 Squid 代理
- 4. 使用 Squidclient
代理服务器位于两个网络之间,充当终端用户与互联网资源之间的网关。通过代理服务器,终端用户能够过滤访问。他们可以控制并监控网络流量,用于多种目的,包括隐私、安全和缓存。
Squid 被用作一种分布式缓存机制,通过保存从不同请求获取的数据,在发起类似请求时提高流量速度。如果缓存服务器没有缓存的数据,则会将请求转发到存储该数据的 Web 服务器。
在本教程中,你将学习如何在 Rocky / Alma Linux 9 服务器上安装并配置 Squid 代理服务器。
准备工作
- 一台运行 Rocky Linux 9 或 Alma Linux 9 的服务器。
- 一个具有 sudo 权限的非 root 用户。
- 确保一切都是最新的。$ sudo dnf update
- 安装基础工具软件包。其中一些可能已经安装。$ sudo dnf install wget curl nano unzip yum-utils -y
一台运行 Rocky Linux 9 或 Alma Linux 9 的服务器。
一个具有 sudo 权限的非 root 用户。
确保一切都是最新的。
$ sudo dnf update
安装基础工具软件包。其中一些可能已经安装。
$ sudo dnf install wget curl nano unzip yum-utils -y
步骤 1 - 安装 Squid
安装 Squid 需要 Epel 仓库。安装 Epel 仓库。
$ sudo dnf install epel-release
安装 Squid 代理。
$ sudo dnf install squid
验证安装。
$ squid --version
Squid Cache: Version 5.2
Service Name: squid

This binary uses OpenSSL 3.0.1 14 Dec 2021..........
启用并启动 Squid 服务。
$ sudo systemctl enable squid --now
检查服务状态。
$ sudo systemctl status squid
? squid.service - Squid caching proxy
     Loaded: loaded (/usr/lib/systemd/system/squid.service; enabled; vendor preset: disabled)
     Active: active (running) since Wed 2022-09-28 11:52:24 UTC; 2min ago
       Docs: man:squid(8)
    Process: 94622 ExecStartPre=/usr/libexec/squid/cache_swap.sh (code=exited, status=0/SUCCESS)
   Main PID: 94624 (squid)
      Tasks: 3 (limit: 5915)
     Memory: 16.3M
        CPU: 4.207s
     CGroup: /system.slice/squid.service
             ??94624 /usr/sbin/squid --foreground -f /etc/squid/squid.conf
             ??94626 "(squid-1)" --kid squid-1 --foreground -f /etc/squid/squid.conf
             ??94627 "(logfile-daemon)" /var/log/squid/access.log

Sep 28 11:52:24 squidproxy systemd[1]: Starting Squid caching proxy...
Sep 28 11:52:24 squidproxy squid[94624]: Squid Parent: will start 1 kids
Sep 28 11:52:24 squidproxy squid[94624]: Squid Parent: (squid-1) process 94626 started
Sep 28 11:52:24 squidproxy systemd[1]: Started Squid caching proxy.
步骤 2 - 配置 Squid 代理服务器
Squid 将其配置存储在文件 /etc/squid/squid.conf 中。查看去掉注释后的文件内容。
$ sudo grep -vE "^#|^$" /etc/squid/squid.conf
上述命令会过滤掉所有以 # 开头的语句(这些语句代表注释)。你将看到如下输出。
acl localnet src 0.0.0.1-0.255.255.255  # RFC 1122 "this" network (LAN)
acl localnet src 10.0.0.0/8             # RFC 1918 local private network (LAN)
acl localnet src 100.64.0.0/10          # RFC 6598 shared address space (CGN)
acl localnet src 169.254.0.0/16         # RFC 3927 link-local (directly plugged) machines
acl localnet src 172.16.0.0/12          # RFC 1918 local private network (LAN)
acl localnet src 192.168.0.0/16         # RFC 1918 local private network (LAN)
acl localnet src fc00::/7               # RFC 4193 local private network range
acl localnet src fe80::/10              # RFC 4291 link-local (directly plugged) machines
acl SSL_ports port 443
acl Safe_ports port 80          # http
acl Safe_ports port 21          # ftp
acl Safe_ports port 443         # https
acl Safe_ports port 70          # gopher
acl Safe_ports port 210         # wais
acl Safe_ports port 1025-65535  # unregistered ports
acl Safe_ports port 280         # http-mgmt
acl Safe_ports port 488         # gss-http
acl Safe_ports port 591         # filemaker
acl Safe_ports port 777         # multiling http
http_access deny !Safe_ports
http_access deny CONNECT !SSL_ports
http_access allow localhost manager
http_access deny manager
http_access allow localnet
http_access allow localhost
http_access deny all
http_port 3128
coredump_dir /var/spool/squid
refresh_pattern ^ftp:           1440    20%     10080
refresh_pattern ^gopher:        1440    0%      1440
refresh_pattern -i (/cgi-bin/|\?) 0     0%      0
refresh_pattern .               0       20%     4320
编辑配置的第一步是备份现有配置。
$ sudo cp /etc/squid/squid.conf{,.bak}
打开文件进行编辑。
$ sudo nano /etc/squid/squid.conf
1. 配置 Squid 访问策略
访问控制列表(ACL)定义了允许在你的本地网络上将 Squid 用作代理的用户。
让我们通过定义如下规则,添加子网 192.168.204.0/24 中的主机。
acl newlocalnet src 192.168.205.0/24
这会创建一个名为 newlocalnet 的新 ACL,包含该子网中的主机。
要允许访问此 ACL,请在 http_access deny all 这一行下方添加以下行。
http_access allow newlocalnet
Squid 从上到下读取配置文件。
2. 屏蔽网站
创建一个文件用于存储要屏蔽的域名。
$ sudo nano /etc/squid/blocked-sites
添加要屏蔽的网站。例如,
example.com
example.net
example.org
按 Ctrl + X 并在提示时输入 Y 保存文件。
打开 squid 配置文件。
$ sudo nano /etc/squid/squid.conf
添加以下行。
acl blocked_sites dstdomain "/etc/squid/blocked-sites"
http_access deny blocked_sites
3. 阻止下载特定文件
你还可以阻止下载具有特定扩展名的文件。创建一个文件用于存储你想屏蔽的扩展名。
$ sudo nano /etc/squid/blocked-filextensions
按指定格式粘贴以下文件扩展名。
\.exe(\?.*)?$
\.bat(\?.*)?$
\.tar(\?.*)?$
\.mp3(\?.*)?$
\.mp4(\?.*)?$
按 Ctrl + X 并在提示时输入 Y 保存文件。
在 squid 配置文件中粘贴以下代码。
acl blockfiles urlpath_regex -i "/etc/squid/blocked-filextensions"
http_access deny blockfiles
4. 使用关键词屏蔽网站
创建一个用于存储要屏蔽关键词的配置文件。
$ sudo nano /etc/squid/banned-keywords
粘贴以下关键词。
porn
gamble
ads
movie
按 Ctrl + X 并在提示时输入 Y 保存文件。
在 Squid 配置文件中进行如下修改。
acl keyword-ban url_regex "/etc/squid/banned-keywords"
http_access deny keyword-ban
5. 隐藏客户端的 IP 地址
你可以通过在 Squid 配置文件中添加以下行,在不暴露客户端 IP 地址的情况下使流量匿名。
# Anonymize Traffic
via off
forwarded_for off
request_header_access Allow allow all
request_header_access Authorization allow all
request_header_access WWW-Authenticate allow all
request_header_access Proxy-Authorization allow all
request_header_access Proxy-Authenticate allow all
request_header_access Cache-Control allow all
request_header_access Content-Encoding allow all
request_header_access Content-Length allow all
request_header_access Content-Type allow all
request_header_access Date allow all
request_header_access Expires allow all
request_header_access Host allow all
request_header_access If-Modified-Since allow all
request_header_access Last-Modified allow all
request_header_access Location allow all
request_header_access Pragma allow all
request_header_access Accept allow all
request_header_access Accept-Charset allow all
request_header_access Accept-Encoding allow all
request_header_access Accept-Language allow all
request_header_access Content-Language allow all
request_header_access Mime-Version allow all
request_header_access Retry-After allow all
request_header_access Title allow all
request_header_access Connection allow all
request_header_access Proxy-Connection allow all
request_header_access User-Agent allow all
request_header_access Cookie allow all
request_header_access All deny all
6. 更改 Squid 代理端口
默认情况下,Squid 代理服务器监听端口 3128。要更改它,你需要在 squid 配置文件中注释掉 http_port 3128 这一行,并按如下方式修改。
# Squid normally listens to port 3128
# http_port 3128
http_port 7035
按 Ctrl + X 并在提示时输入 Y 保存文件。
验证配置。
$ sudo squid -k parse
你将看到如下输出。
2022/10/04 12:29:25| Startup: Initializing Authentication Schemes ...
2022/10/04 12:29:25| Startup: Initialized Authentication Scheme 'basic'
2022/10/04 12:29:25| Startup: Initialized Authentication Scheme 'digest'
2022/10/04 12:29:25| Startup: Initialized Authentication Scheme 'negotiate'
2022/10/04 12:29:25| Startup: Initialized Authentication Scheme 'ntlm'
2022/10/04 12:29:25| Startup: Initialized Authentication.
2022/10/04 12:29:25| Processing Configuration File: /etc/squid/squid.conf (depth 0)
2022/10/04 12:29:25| Processing: acl localnet src 0.0.0.1-0.255.255.255 # RFC 1122 "this" network (LAN)
2022/10/04 12:29:25| Processing: acl localnet src 10.0.0.0/8            # RFC 1918 local private network (LAN)
................
2022/10/04 12:29:25| Processing: acl Safe_ports port 777                # multiling http
2022/10/04 12:29:25| Processing: http_access deny !Safe_ports
2022/10/04 12:29:25| Processing: http_access deny CONNECT !SSL_ports
2022/10/04 12:29:25| Processing: http_access allow localhost manager
2022/10/04 12:29:25| Processing: http_access deny manager
2022/10/04 12:29:25| Processing: http_access allow localnet
2022/10/04 12:29:25| Processing: http_access allow localhost
2022/10/04 12:29:25| Processing: http_access deny all
2022/10/04 12:29:25| Processing: http_port 3128
2022/10/04 12:29:25| Processing: coredump_dir /var/spool/squid
2022/10/04 12:29:25| Processing: refresh_pattern ^ftp:          1440    20%     10080
2022/10/04 12:29:25| Processing: refresh_pattern ^gopher:       1440    0%      1440
2022/10/04 12:29:25| Processing: refresh_pattern -i (/cgi-bin/|\?) 0    0%      0
2022/10/04 12:29:25| Processing: refresh_pattern .              0       20%     4320
2022/10/04 12:29:25| Initializing https:// proxy context
2022/10/04 12:29:25| Requiring client certificates.
重启 Squid 服务器。
$ sudo systemctl restart squid
验证 Squid 是否正在监听设定的端口。
$ sudo ss -altnp | grep 8085
LISTEN 0      4096               *:7035            *:*    users:(("squid",pid=94626,fd=11))
7. 配置防火墙 / SELinux
如果你使用的是默认端口,请使用以下命令通过防火墙允许它。
$ sudo firewall-cmd --add-service=squid --permanent
$ sudo firewall-cmd --reload
如果你启用了自定义端口,请改用以下命令。将 [port_number] 替换为你的自定义端口号。
sudo firewall-cmd --permanent --add-port=[port_number]/tcp
sudo firewall-cmd --reload
你还需要使用 SELinux 启用自定义端口。
sudo semanage port -a -t squid_port_t -p tcp [port_number]
步骤 3 - 为 Squid 设置基本认证
要将 Squid 配置为接受认证,我们需要使用 htpasswd 工具。安装 Apache 工具包。
$ sudo dnf install httpd-tools
使用以下命令创建用户名和密码对。
$ sudo htpasswd -c /etc/squid/squid_passwd username
系统会提示你为该用户创建密码。
将该文件的所有权更改为 Squid 用户。
$ sudo chown squid /etc/squid/squid_passwd
Squid 通过认证辅助程序(authentication helper)进行认证。我们将使用 ncsa_auth 辅助程序。查看 ncsa_auth 文件的位置。
$ sudo rpm -ql squid | grep ncsa_auth
/usr/lib64/squid/basic_ncsa_auth
/usr/share/man/man8/basic_ncsa_auth.8.gz
第一个结果就是该文件的位置。
在 Squid 配置中粘贴以下行。
auth_param basic program /usr/lib64/squid/basic_ncsa_auth /etc/squid/squid_passwd
acl ncsa_users proxy_auth REQUIRED
http_access allow ncsa_users
重启 Squid 以启用认证。
$ sudo systemctl restart squid
步骤 4 - 配置 Squid 代理客户端
你需要客户端连接到 Squid 代理服务器。连接服务器有三种方式:
- 系统级代理配置
- 将 Squid 服务器用作网关
- 使用 Web 浏览器作为客户端
1. 系统级代理配置
你可以通过创建一个定义代理配置的文件 /etc/profile.d/squid.sh,将 Squid 代理配置为在整个系统范围内工作。
$ sudo nano /etc/profile.d/squid.sh
粘贴以下行。
PROXY_URL="192.168.205.10:7035"
HTTP_PROXY=$PROXY_URL
HTTPS_PROXY=$PROXY_URL
FTP_PROXY=$PROXY_URL
http_proxy=$PROXY_URL
https_proxy=$PROXY_URL
ftp_proxy=$PROXY_URL
export HTTP_PROXY HTTPS_PROXY FTP_PROXY http_proxy https_proxy ftp_proxy
按 Ctrl + X 并在提示时输入 Y 保存文件。然后使文件生效(source)。
$ source /etc/profile.d/squid.sh
通过运行 wget 命令验证配置。
$ wget google.com
--2022-10-04 12:15:59--  http://google.com/
Connecting to 192.168.205.10:7035... connected.
Proxy request sent, awaiting response... 301 Moved Permanently
Location: http://www.google.com/ [following]
--2022-10-04 12:15:59--  http://www.google.com/
Reusing existing connection to 192.168.205.10:7035.
Proxy request sent, awaiting response... 200 OK
Length: unspecified [text/html]
Saving to: ‘index.html.1’

index.html.1       [ <=>             ]  14.14K  --.-KB/s    in 0s

2022-10-04 12:15:59 (68.1 MB/s) - ‘index.html.1’ saved [14479]
要使用用户名和密码来使用它,请使用以下命令。
$ wget google.com --proxy-user=YOUR-USERNAME-HERE --proxy-password=YOUR-PASSWORD-HERE
你可以查看 Squid 服务器日志。
1664885759.296      0 192.168.205.10 TCP_MEM_HIT/301 750 GET http://google.com/ - HIER_NONE/- text/html
1664885759.351     54 192.168.205.10 TCP_MISS/200 15113 GET http://www.google.com/ - HIER_DIRECT/216.58.208.100 text/html
2. 浏览器中的代理设置
你可以轻松地将 Squid 代理配置为在 Firefox 或 Chrome 浏览器中工作。但默认方法不支持用户名和密码。你需要使用浏览器中的第三方扩展来使用带认证的 Squid 代理。Firefox 浏览器请使用 FoxyProxy Standard,Chrome 及基于 Chrome 的浏览器请使用 Proxy SwitchOmega。
让我们在 Chrome 上使用 FoxyProxy Standard 扩展进行测试。使用上面给出的 URL 安装该扩展。打开扩展选项,你将看到如下界面。
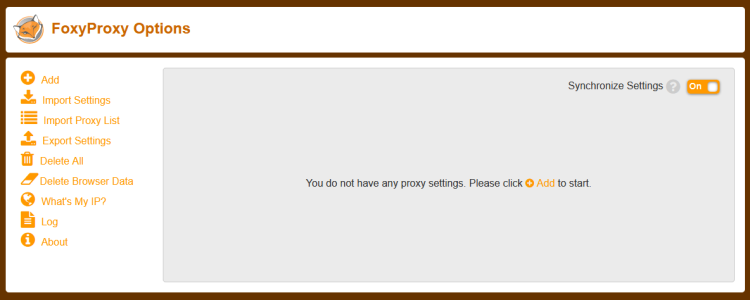
点击 Add 按钮以添加代理 URL。
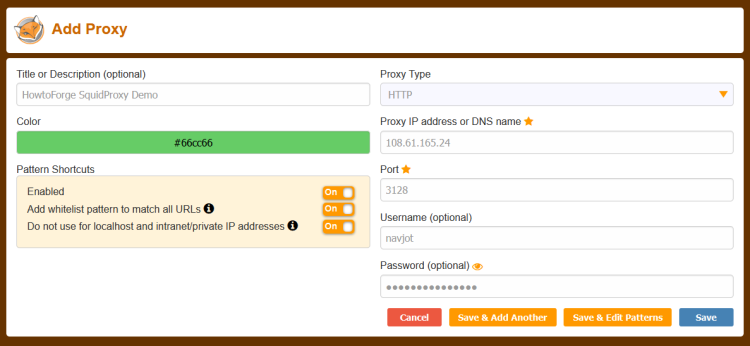
输入代理参数,包括服务名称、IP 地址、端口号、用户名和密码。启用 Do not use for localhost and intranet/private IP addresses 选项。
点击 Save 按钮继续。在下一页面的下拉菜单中选择代理名称以启用它。
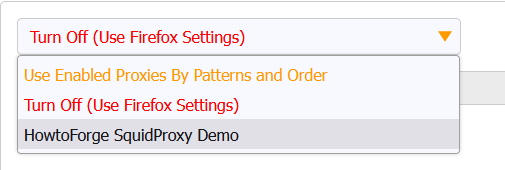
界面应如下所示。

访问 https://whatismyip.com URL 以检查代理是否正常工作。
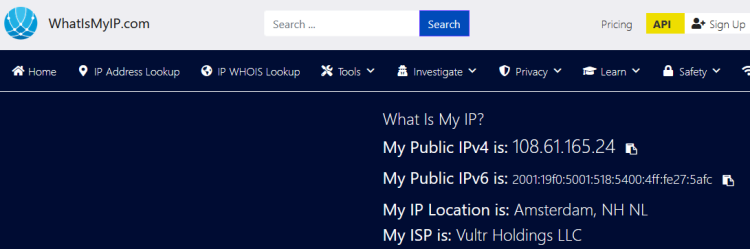
由于我们隐藏了客户端 IP,你将看到托管 Squid 代理的服务器的 IP 地址。
你也可以通过 Squid 日志进行验证。
$ sudo tail -f /var/log/squid/access.log
你将看到如下输出。
1664909025.814    251 127.0.0.1 TCP_TUNNEL/200 8662 CONNECT mirrors.rockylinux.org:443 - HIER_DIRECT/2a04:4e42:9::644 -
1664909025.819      3 127.0.0.1 TCP_MISS/200 3347 GET http://mirror.nl.stackscale.com/rocky/9.0/extras/x86_64/os/repodata/repomd.xml - HIER_DIRECT/5.57.230.252 text/xml
1664909026.218    395 127.0.0.1 TCP_TUNNEL/200 8446 CONNECT apprepo.vultr.com:443 - HIER_DIRECT/45.63.19.147 -
1664909027.084      0 223.190.89.32 TCP_DENIED/403 3974 CONNECT www.whatismyip.com:443 - HIER_NONE/- text/html
1664909442.461     73 223.190.89.32 TCP_MISS/200 2362 POST http://ocsp.godaddy.com/ - HIER_DIRECT/192.124.249.41 application/ocsp-response
1664909612.229 171207 223.190.89.32 TCP_TUNNEL/200 6174 CONNECT api.whatismyip.com:443 - HIER_DIRECT/34.98.116.180 -
1664909612.245 172627 223.190.89.32 TCP_TUNNEL/200 67818 CONNECT www.whatismyip.com:443 - HIER_DIRECT/104.21.89.158 -
1664909613.231 171384 223.190.89.32 TCP_TUNNEL/200 3712 CONNECT apiv6.whatismyip.com:443 - HIER_DIRECT/2600:1901:0:e01d:: -
1664910098.088   3098 223.190.89.32 TCP_TUNNEL/200 10403 CONNECT profile.accounts.firefox.com:443 - HIER_DIRECT/52.40.171.113 -
1664910103.232    545 223.190.89.32 TCP_TUNNEL/200 6165 CONNECT safebrowsing.googleapis.com:443 - HIER_DIRECT/172.217.168.234 -
3. 配置 DNF 使用 Squid 代理
DNF 仓库可以配置为使用 Squid 代理。打开 DNF 配置文件。
$ sudo nano /etc/dnf/dnf.conf
在文件末尾粘贴以下行。
proxy=http://192.168.205.12:8085/
proxy_username=username
proxy_password=password
按 Ctrl + X 并在提示时输入 Y 保存文件。
通过更新系统或安装任意软件包来验证更改。
$ sudo dnf update
查看日志。
http://mirror.nl.stackscale.com/rocky/9.0/AppStream/x86_64/os/Packages/t/telnet-0.17-85.el9.x86_64.rpm - HIER_DIRECT/5.57.230.252 application/x-redhat-package-manager
1664896976.909      3 192.168.205.12 TCP_MISS/200 24764 GET http://mirror.nl.stackscale.com/rocky/9.0/AppStream/x86_64/os/Packages/p/perl-HTTP-Date-6.05-7.el9.noarch.rpm - HIER_DIRECT/5.57.230.252 application/x-redhat-package-manager
1664896976.920      8 192.168.205.12 TCP_MISS/200 98591 GET http://mirror.nl.stackscale.com/rocky/9.0/AppStream/x86_64/os/Packages/p/perl-HTTP-Message-6.29-3.el9.noarch.rpm - HIER_DIRECT/5.57.230.252 application/x-redhat-package-manager
1664896976.932      9 192.168.205.12 TCP_MISS/200 32361 GET http://mirror.nl.stackscale.com/rocky/9.0/AppStream/x86_64/os/Packages/p/perl-I18N-Langinfo-0.19-479.el9.x86_64.rpm - HIER_DIRECT/5.57.230.252 application/x-redhat-package-manager
1664896977.024    340 192.168.205.12 TCP_MISS/200 44730 GET http://epel.mirror.constant.com/9/Everything/x86_64/Packages/h/hiredis-1.0.2-1.el9.x86_64.rpm - HIER_DIRECT/108.61.5.85 application/x-redhat-package-manager
1664896977.237    555 192.168.205.12 TCP_MISS/200 272291 GET http://epel.mirror.constant.com/9/Everything/x86_64/Packages/c/coturn-4.6.0-1.el9.x86_64.rpm - HIER_DIRECT/108.61.5.85 application/x-redhat-package-manager
4. 使用 Squidclient
另外,你也可以使用自带的 squidclient 命令进行测试。它会输出对 Web 请求的响应,类似于 wget 或 curl。但与 wget 和 curl 不同,squidclient 会自动连接到 Squid 的默认代理设置,即 localhost:3128。
运行以下命令进行测试。
$ squidclient https://google.com
你将看到如下输出。
HTTP/1.1 301 Moved Permanently
Location: https://www.google.com/
Content-Type: text/html; charset=UTF-8
Date: Tue, 04 Oct 2022 16:35:35 GMT
Expires: Tue, 04 Oct 2022 16:35:35 GMT
Cache-Control: private, max-age=2592000
Server: gws
Content-Length: 220
X-XSS-Protection: 0
X-Frame-Options: SAMEORIGIN
Set-Cookie: CONSENT=PENDING+669; expires=Thu, 03-Oct-2024 16:35:35 GMT; path=/; domain=.google.com; Secure
P3P: CP="This is not a P3P policy! See g.co/p3phelp for more info."
Alt-Svc: h3=":443"; ma=2592000,h3-29=":443"; ma=2592000,h3-Q050=":443"; ma=2592000,h3-Q046=":443"; ma=2592000,h3-Q043=":443"; ma=2592000,quic=":443"; ma=2592000; v="46,43"
X-Cache: MISS from squidproxy
X-Cache-Lookup: MISS from squidproxy:3128
Via: 1.1 squidproxy (squid/5.2)
Connection: close
要使用 IP 地址和认证参数运行该命令,请运行以下命令。
$ squidclient -l 192.168.205.12 -p 7035 -u username -w password https://google.com
总结
至此,关于在 Rocky Linux / Alma Linux 9 服务器上安装并配置 Squid 代理服务器的教程就结束了。如果你有任何问题,请在下方评论中留言。