
本教程适用于以下操作系统版本
- AlmaLinux 9
- AlmaLinux 8
本页内容
- 前提条件
- 安装所需依赖项
- 安装 Netdata
- 配置防火墙
- 将 Nginx 配置为 Netdata 的 reverse proxy
- 访问 Netdata dashboard
- 结论
Netdata 是一款免费、开源且实时的服务器监控工具,可可视化并监控实时数据,例如 CPU 使用率、RAM 使用率、负载、SWAP 使用率、带宽使用率、磁盘使用率等。它帮助系统管理员概览系统或应用程序中正在发生的情况以及刚刚发生的情况。它可以安装在任何物理服务器、虚拟机、容器和 IoT 设备上。它提供交互式 Web 界面来查看服务器指标,并支持各种数据存储以实现持久化存储。
在本教程中,我们将向您展示如何在 Alma Linux 8 上安装 Netdata 监控工具。
前提条件
- 一台运行 Alma Linux 8 的服务器。
- 一个指向您服务器 IP 的有效域名。
- 服务器上已配置 root 密码。
安装所需依赖项
首先,您需要安装 EPEL 仓库以及安装 Netdata 所需的其他依赖项。您可以通过运行以下命令来安装所有这些:
dnf install epel-release -y
dnf install git libuuid-devel autoconf automake pkgconfig zlib-devel curl findutils libmnl gcc make -y
所有软件包安装完成后,您可以继续下一步。
安装 Netdata
默认情况下,Netdata 不包含在 Alma Linux 默认仓库中。因此您需要从源码安装它。
首先,使用以下命令从 Git 仓库下载最新版本的 Netdata:
git clone --recurse-submodules https://github.com/netdata/netdata.git --depth=100下载完成后,切换到 netdata 目录并使用以下命令安装所有所需的依赖项:
cd netdata
./packaging/installer/install-required-packages.sh --non-interactive --dont-wait netdata
接下来,使用以下命令安装其他软件包:
dnf --enablerepo=powertools install libuv-devel接下来,运行 Netdata 安装脚本以开始安装。
./netdata-installer.sh您将看到以下输出:
 --- real-time performance monitoring, done right! ---

  You are about to build and install netdata to your system.

  The build process will use /tmp for
  any temporary files. You can override this by setting $TMPDIR to a
  writable directory where you can execute files.

  It will be installed at these locations:

   - the daemon     at /usr/sbin/netdata
   - config files   in /etc/netdata
   - web files      in /usr/share/netdata
   - plugins        in /usr/libexec/netdata
   - cache files    in /var/cache/netdata
   - db files       in /var/lib/netdata
   - log files      in /var/log/netdata
   - pid file       at /var/run/netdata.pid
   - logrotate file at /etc/logrotate.d/netdata

  This installer allows you to change the installation path.
  Press Control-C and run the same command with --help for help.


  NOTE:
  Anonymous usage stats will be collected and sent to Netdata.
  To opt-out, pass --disable-telemetry option to the installer or export
  the environment variable DISABLE_TELEMETRY to a non-zero or non-empty value
  (e.g: export DISABLE_TELEMETRY=1).

Press ENTER to build and install netdata to your system >
按 Enter 键将 Netdata 安装到您的系统。Netdata 安装完成后,您将看到以下输出:
Setting netdata.tarball.checksum to 'new_installation'

 --- We are done! ---

  ^
  |.-.   .-.   .-.   .-.   .-.   .  netdata  .-.   .-.   .-.   .-.   .-.   .-
  |   '-'   '-'   '-'   '-'   '-'               '-'   '-'   '-'   '-'   '-'
  +----+-----+-----+-----+-----+-----+-----+-----+-----+-----+-----+-----+--->

 --- is installed and running now! ---
  enjoy real-time performance and health monitoring...
systemctl start netdata
systemctl enable netdata
现在您可以使用以下命令检查 Netdata 的状态。
systemctl status netdata您将看到以下输出:
? netdata.service - Real time performance monitoring
   Loaded: loaded (/usr/lib/systemd/system/netdata.service; enabled; vendor preset: disabled)
   Active: active (running) since Sat 2022-03-19 04:22:22 UTC; 4min 16s ago
 Main PID: 58935 (netdata)
    Tasks: 50 (limit: 11412)
   Memory: 103.1M
   CGroup: /system.slice/netdata.service
           ??58935 /usr/sbin/netdata -P /var/run/netdata/netdata.pid -D
           ??58938 /usr/sbin/netdata --special-spawn-server
           ??59063 /usr/libexec/netdata/plugins.d/apps.plugin 1
           ??59064 /usr/libexec/netdata/plugins.d/ebpf.plugin 1
           ??59065 /usr/libexec/netdata/plugins.d/go.d.plugin 1

Mar 19 04:22:22 linux systemd[1]: Starting Real time performance monitoring...
Mar 19 04:22:22 linux systemd[1]: Started Real time performance monitoring.
Mar 19 04:22:22 linux netdata[58935]: CONFIG: cannot load cloud config '/var/lib/netdata/cloud.d/cloud.conf'. Running with internal defaults.
Mar 19 04:22:22 linux netdata[58935]: 2022-03-19 04:22:22: netdata INFO  : MAIN : CONFIG: cannot load cloud config '/var/lib/netdata/cloud.d/>
Mar 19 04:22:22 linux netdata[58935]: 2022-03-19 04:22:22: netdata INFO  : MAIN : Found 0 legacy dbengines, setting multidb diskspace to 256MB
Mar 19 04:22:22 linux netdata[58935]: 2022-03-19 04:22:22: netdata INFO  : MAIN : Created file '/var/lib/netdata/dbengine_multihost_size' to >
Mar 19 04:22:22 linux netdata[58935]: Found 0 legacy dbengines, setting multidb diskspace to 256MB
Mar 19 04:22:22 linux netdata[58935]: Created file '/var/lib/netdata/dbengine_multihost_size' to store the computed value
Mar 19 04:22:23 linux ebpf.plugin[59064]: Does not have a configuration file inside `/etc/netdata/ebpf.d.conf. It will try to load stock file.
Mar 19 04:22:23 linux ebpf.plugin[59064]: Cannot read process groups configuration file '/etc/netdata/apps_groups.conf'. Will try '/usr/lib/n>
此时,Netdata 正在运行并监听 port 19999。您可以使用以下命令检查:
ss -antpl | grep netdata您将看到以下输出:
LISTEN 0      128        127.0.0.1:8125       0.0.0.0:*    users:(("netdata",pid=58935,fd=29))
LISTEN 0      128          0.0.0.0:19999      0.0.0.0:*    users:(("netdata",pid=58935,fd=6))
LISTEN 0      128            [::1]:8125          [::]:*    users:(("netdata",pid=58935,fd=28))
LISTEN 0      128             [::]:19999         [::]:*    users:(("netdata",pid=58935,fd=7))
完成后,您可以继续下一步。
配置防火墙
如果您的系统上使用 firewalld 防火墙,则需要允许端口 19999 和 80 通过 firewalld。您可以使用以下命令放行它们:
firewall-cmd --permanent --add-port=19999/tcp
firewall-cmd --permanent --add-port=80/tcp
接下来,重新加载 firewalld 守护进程以应用更改:
firewall-cmd --reload完成后,您可以继续下一步。
将 Nginx 配置为 Netdata 的 reverse proxy
安装并配置 Nginx 作为 reverse proxy 来访问 Netdata 始终是个好主意。首先,使用以下命令安装 Nginx 服务器:
dnf install nginx httpd-tools -y接下来,使用以下命令生成密码文件:
htpasswd -c /etc/nginx/.htpasswd netadmin如下所示设置您的 admin 密码:
New password:
Re-type new password:
Adding password for user netadmin
接下来,使用以下命令创建 Nginx 虚拟主机配置文件:
nano /etc/nginx/conf.d/netdata.conf添加以下行:
upstream backend {
server 127.0.0.1:19999;
keepalive 64;
}

server {
listen 80;
server_name netdata.example.com;

    location / {

    proxy_set_header X-Forwarded-Host $host;
    proxy_set_header X-Forwarded-Server $host;
    proxy_set_header X-Forwarded-For $proxy_add_x_forwarded_for;
    proxy_pass http://backend;
    proxy_http_version 1.1;
    proxy_pass_request_headers on;
    proxy_set_header Connection "keep-alive";
    proxy_store off;
    auth_basic "Private Property";
    auth_basic_user_file /etc/nginx/.htpasswd;
}
}
保存并关闭文件,然后验证 Nginx 是否存在语法配置错误:
nginx -t如果一切正常,您将看到以下输出:
nginx: the configuration file /etc/nginx/nginx.conf syntax is ok
nginx: configuration file /etc/nginx/nginx.conf test is successful
接下来,重启 Nginx 服务以应用配置更改:
systemctl restart nginx您也可以使用以下命令检查 Nginx 状态:
systemctl status nginx您应该会看到以下输出:
? nginx.service - The nginx HTTP and reverse proxy server
   Loaded: loaded (/usr/lib/systemd/system/nginx.service; disabled; vendor preset: disabled)
   Active: active (running) since Sat 2022-03-19 04:28:44 UTC; 4s ago
  Process: 61706 ExecStart=/usr/sbin/nginx (code=exited, status=0/SUCCESS)
  Process: 61705 ExecStartPre=/usr/sbin/nginx -t (code=exited, status=0/SUCCESS)
  Process: 61703 ExecStartPre=/usr/bin/rm -f /run/nginx.pid (code=exited, status=0/SUCCESS)
 Main PID: 61708 (nginx)
    Tasks: 2 (limit: 11412)
   Memory: 3.7M
   CGroup: /system.slice/nginx.service
           ??61708 nginx: master process /usr/sbin/nginx
           ??61709 nginx: worker process

Mar 19 04:28:44 linux systemd[1]: Starting The nginx HTTP and reverse proxy server...
Mar 19 04:28:44 linux nginx[61705]: nginx: the configuration file /etc/nginx/nginx.conf syntax is ok
Mar 19 04:28:44 linux nginx[61705]: nginx: configuration file /etc/nginx/nginx.conf test is successful
Mar 19 04:28:44 linux systemd[1]: nginx.service: Failed to parse PID from file /run/nginx.pid: Invalid argument
Mar 19 04:28:44 linux systemd[1]: Started The nginx HTTP and reverse proxy server.
完成后,您可以继续下一步。
访问 Netdata dashboard
现在,打开您的 Web 浏览器并使用 URL http://your-server-ip 访问 Netdata dashboard。您应该会看到 Netdata 登录页面:
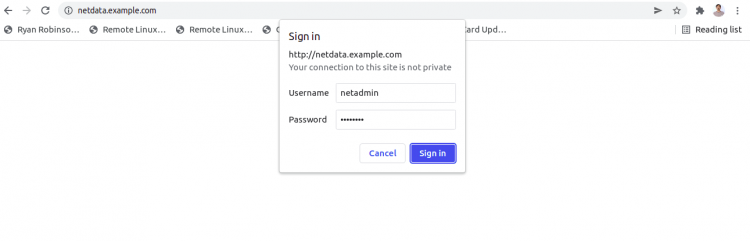
输入您的 admin 用户名、密码并点击 Sign in 按钮。您应该在以下页面看到 Netdata dashboard:
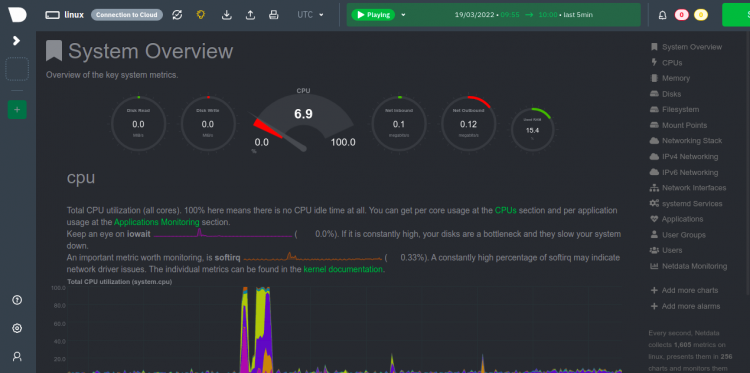
结论
恭喜!您已成功在 Alma Linux 8 上安装了 Netdata 监控工具。现在您可以从 Netdata dashboard 开始实时监控您的服务器指标。如有任何问题,请随时问我。