
本教程适用于以下操作系统版本
- Ubuntu 22.04(Jammy Jellyfish)
- Ubuntu 20.04(Focal Fossa)
- Ubuntu 18.04(Bionic Beaver)
本页内容
- 先决条件
- 开始之前
- 在 Ubuntu 22.04 上安装 Matrix Synapse
- 配置 Matrix Synapse
- 将 Nginx 配置为 Matrix Synapse 的反向代理
- 创建超级用户账户
- 使用 Let's Encrypt 保护 Matrix Synapse
- 访问 Matrix Synapse
- 总结
Matrix 是一款免费、开源且基于 Web 的解决方案,用于消息传递和 VoIP 服务。它是一个开放的 VoIP 标准协议,允许您通过 IP 语音和聊天与其他服务提供商上的用户进行通信。它提供 RESTful HTTP JSON API,用于构建分布式、联邦式的聊天服务器,不存在单一的控制或故障点,并提供了所有 API 参考。它使用 Python 编写,允许您创建自己的家庭服务器并存储所有用户的个人信息和聊天记录。
在本文中,我们将向您展示如何在 Ubuntu 22.04 上安装 Matrix Synapse。
先决条件
- 一台运行 Ubuntu 22.04 的服务器。
- 一个已指向您服务器 IP 的有效域名。
- 服务器上已配置 root 密码。
开始之前
首先,您需要将系统软件包更新到最新版本。可以使用以下命令完成:
apt update -y所有软件包索引更新完成后,使用以下命令安装其他必需的依赖项:
apt install curl wget gnupg2 apt-transport-https -y所有依赖项安装完成后,您可以继续进行下一步。
在 Ubuntu 22.04 上安装 Matrix Synapse
默认情况下,Matrix Synapse 软件包未包含在 Ubuntu 22.04 的默认软件源中。因此,您需要将 Matrix Synapse 官方软件源添加到 APT。
首先,使用以下命令下载并添加 Matrix Synapse 的 GPG 密钥:
wget -qO /usr/share/keyrings/matrix-org-archive-keyring.gpg https://packages.matrix.org/debian/matrix-org-archive-keyring.gpg接下来,使用以下命令将 Matrix Synapse 软件源添加到 APT:
echo "deb [signed-by=/usr/share/keyrings/matrix-org-archive-keyring.gpg] https://packages.matrix.org/debian/ $(lsb_release -cs) main" | tee /etc/apt/sources.list.d/matrix-org.list接下来,更新软件源并使用以下命令安装 Matrix Synapse 软件包:
apt-get update -y
apt-get install matrix-synapse-py3 -y
安装过程中,系统会要求您定义域名,如下所示:
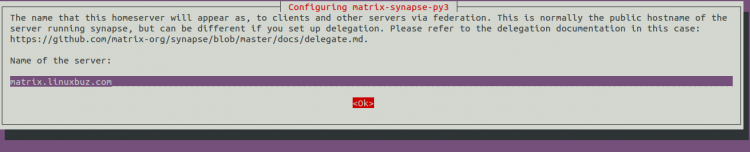
输入您的域名并按 Enter 键。系统会要求您是否上报匿名统计数据:
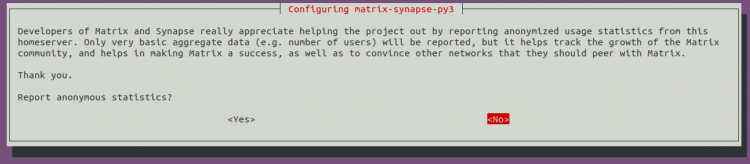
选择 Yes 并按 Enter 键继续。
安装完成后,使用以下命令启动 Matrix 服务并将其设置为开机自启:
systemctl start matrix-synapse
systemctl enable matrix-synapse
您也可以使用以下命令检查 Matrix Synapse 的状态:
systemctl status matrix-synapse您将看到以下输出:
? matrix-synapse.service - Synapse Matrix homeserver
     Loaded: loaded (/lib/systemd/system/matrix-synapse.service; enabled; vendor preset: enabled)
     Active: active (running) since Sat 2022-06-04 08:01:22 UTC; 3s ago
    Process: 1916 ExecStartPre=/opt/venvs/matrix-synapse/bin/python -m synapse.app.homeserver --config-path=/etc/matrix-synapse/homeserver.ya>
   Main PID: 1923 (python)
      Tasks: 8 (limit: 9460)
     Memory: 78.6M
        CPU: 4.911s
     CGroup: /system.slice/matrix-synapse.service
             ??1923 /opt/venvs/matrix-synapse/bin/python -m synapse.app.homeserver --config-path=/etc/matrix-synapse/homeserver.yaml --config>

Jun 04 08:01:17 ubuntu2204 systemd[1]: Starting Synapse Matrix homeserver...
Jun 04 08:01:22 ubuntu2204 matrix-synapse[1923]: This server is configured to use 'matrix.org' as its trusted key server via the
Jun 04 08:01:22 ubuntu2204 matrix-synapse[1923]: 'trusted_key_servers' config option. 'matrix.org' is a good choice for a key
Jun 04 08:01:22 ubuntu2204 matrix-synapse[1923]: server since it is long-lived, stable and trusted. However, some admins may
Jun 04 08:01:22 ubuntu2204 matrix-synapse[1923]: wish to use another server for this purpose.
Jun 04 08:01:22 ubuntu2204 matrix-synapse[1923]: To suppress this warning and continue using 'matrix.org', admins should set
Jun 04 08:01:22 ubuntu2204 matrix-synapse[1923]: 'suppress_key_server_warning' to 'true' in homeserver.yaml.
Jun 04 08:01:22 ubuntu2204 matrix-synapse[1923]: --------------------------------------------------------------------------------
Jun 04 08:01:22 ubuntu2204 matrix-synapse[1923]: Config is missing macaroon_secret_key
此时,Matrix Synapse 服务已启动并监听 8008 端口。可以使用以下命令进行验证:
ss -antpl | grep python您将看到以下输出:
LISTEN 0      50         127.0.0.1:8008      0.0.0.0:*    users:(("python",pid=1950,fd=12))
LISTEN 0      50             [::1]:8008         [::]:*    users:(("python",pid=1950,fd=11))
配置 Matrix Synapse
安装 Matrix Synapse 后,您需要对其进行配置。首先,使用以下命令创建一个密钥:
cat /dev/urandom | tr -dc 'a-zA-Z0-9' | fold -w 32 | head -n 1您将看到以下输出:
R3jvgiDYyhh5XgduDPsgtwxPDiar8q2s
接下来,编辑 Matrix Synapse 的默认配置文件:
nano /etc/matrix-synapse/homeserver.yaml如下所示,设置您的 bind-address、禁用注册并定义您的密钥:
    bind_addresses: ['127.0.0.1']
    enable_registration: false
    registration_shared_secret: "R3jvgiDYyhh5XgduDPsgtwxPDiar8q2s"
保存并关闭文件,然后重启 Matrix Synapse 服务以使更改生效:
systemctl restart matrix-synapse将 Nginx 配置为 Matrix Synapse 的反向代理
将 Nginx 配置为 Matrix Synapse 的反向代理是一个好主意。首先,使用以下命令安装 Nginx Web 服务器软件包:
apt-get install nginx -yNginx 安装完成后,创建一个 Nginx 虚拟主机配置文件:
nano /etc/nginx/conf.d/matrix.conf添加以下配置:
server {
listen 80;
server_name matrix.linuxbuz.com;
location / {
proxy_pass http://localhost:8008;
proxy_set_header X-Forwarded-For $remote_addr;
}
}
保存并关闭文件,然后使用以下命令验证 Nginx 配置:
nginx -t您将看到以下输出:
nginx: the configuration file /etc/nginx/nginx.conf syntax is ok
nginx: configuration file /etc/nginx/nginx.conf test is successful
接下来,重启 Nginx 服务以使更改生效:
systemctl restart nginx您也可以使用以下命令检查 Nginx 服务的状态:
systemctl status nginx您应该会看到以下输出:
? nginx.service - A high performance web server and a reverse proxy server
     Loaded: loaded (/lib/systemd/system/nginx.service; enabled; vendor preset: enabled)
     Active: active (running) since Sat 2022-06-04 08:06:22 UTC; 26s ago
       Docs: man:nginx(8)
    Process: 2433 ExecStartPre=/usr/sbin/nginx -t -q -g daemon on; master_process on; (code=exited, status=0/SUCCESS)
    Process: 2434 ExecStart=/usr/sbin/nginx -g daemon on; master_process on; (code=exited, status=0/SUCCESS)
   Main PID: 2436 (nginx)
      Tasks: 5 (limit: 9460)
     Memory: 4.8M
        CPU: 58ms
     CGroup: /system.slice/nginx.service
             ??2436 "nginx: master process /usr/sbin/nginx -g daemon on; master_process on;"
             ??2437 "nginx: worker process" "" "" "" "" "" "" "" "" "" "" "" "" "" "" "" "" "" "" "" "" "" "" "" "" "" "" ""
             ??2438 "nginx: worker process" "" "" "" "" "" "" "" "" "" "" "" "" "" "" "" "" "" "" "" "" "" "" "" "" "" "" ""
             ??2439 "nginx: worker process" "" "" "" "" "" "" "" "" "" "" "" "" "" "" "" "" "" "" "" "" "" "" "" "" "" "" ""
             ??2440 "nginx: worker process" "" "" "" "" "" "" "" "" "" "" "" "" "" "" "" "" "" "" "" "" "" "" "" "" "" "" ""

Jun 04 08:06:22 ubuntu2204 systemd[1]: Starting A high performance web server and a reverse proxy server...
Jun 04 08:06:22 ubuntu2204 systemd[1]: Started A high performance web server and a reverse proxy server.
创建超级用户账户
接下来,您需要创建一个管理员用户账户并设置密码,以便访问 Matrix Synapse。
register_new_matrix_user -c /etc/matrix-synapse/homeserver.yaml http://localhost:8008输入您的管理员用户账户并设置密码,如下所示:
New user localpart [root]: matrixadmin
Password:
Confirm password:
Make admin [no]: yes
Sending registration request...
Success!
使用 Let's Encrypt 保护 Matrix Synapse
还建议使用 Let's Encrypt SSL 来保护 Matrix Synapse。首先,使用以下命令安装 Certbot 客户端软件包:
apt-get install certbot python3-certbot-nginx -yCertbot 软件包安装完成后,运行以下命令安装 Let's Encrypt SSL:
certbot系统会要求您提供电子邮件地址并同意服务条款:
Saving debug log to /var/log/letsencrypt/letsencrypt.log
Enter email address (used for urgent renewal and security notices)
 (Enter 'c' to cancel):
[email protected]


- - - - - - - - - - - - - - - - - - - - - - - - - - - - - - - - - - - - - - - -
Please read the Terms of Service at
https://letsencrypt.org/documents/LE-SA-v1.2-November-15-2017.pdf. You must
agree in order to register with the ACME server. Do you agree?
- - - - - - - - - - - - - - - - - - - - - - - - - - - - - - - - - - - - - - - -
(Y)es/(N)o: Y

- - - - - - - - - - - - - - - - - - - - - - - - - - - - - - - - - - - - - - - -
Would you be willing, once your first certificate is successfully issued, to
share your email address with the Electronic Frontier Foundation, a founding
partner of the Let's Encrypt project and the non-profit organization that
develops Certbot? We'd like to send you email about our work encrypting the web,
EFF news, campaigns, and ways to support digital freedom.
- - - - - - - - - - - - - - - - - - - - - - - - - - - - - - - - - - - - - - - -
(Y)es/(N)o: Y
Account registered.
系统会要求您选择要安装 SSL 的网站:
Which names would you like to activate HTTPS for?
- - - - - - - - - - - - - - - - - - - - - - - - - - - - - - - - - - - - - - - -
1: matrix.linuxbuz.com
- - - - - - - - - - - - - - - - - - - - - - - - - - - - - - - - - - - - - - - -
Select the appropriate numbers separated by commas and/or spaces, or leave input
blank to select all options shown (Enter 'c' to cancel): 1
输入 1 并按 Enter 键,将 Let's Encrypt SSL 安装到您的网站。
Requesting a certificate for matrix.linuxbuz.com

Successfully received certificate.
Certificate is saved at: /etc/letsencrypt/live/matrix.linuxbuz.com/fullchain.pem
Key is saved at:         /etc/letsencrypt/live/matrix.linuxbuz.com/privkey.pem
This certificate expires on 2022-09-02.
These files will be updated when the certificate renews.
Certbot has set up a scheduled task to automatically renew this certificate in the background.

Deploying certificate
Successfully deployed certificate for matrix.linuxbuz.com to /etc/nginx/conf.d/matrix.conf
Congratulations! You have successfully enabled HTTPS on https://matrix.linuxbuz.com
We were unable to subscribe you the EFF mailing list because your e-mail address appears to be invalid. You can try again later by visiting https://act.eff.org.

- - - - - - - - - - - - - - - - - - - - - - - - - - - - - - - - - - - - - - - -
If you like Certbot, please consider supporting our work by:
 * Donating to ISRG / Let's Encrypt:   https://letsencrypt.org/donate
 * Donating to EFF:                    https://eff.org/donate-le
- - - - - - - - - - - - - - - - - - - - - - - - - - - - - - - - - - - - - - - -
访问 Matrix Synapse
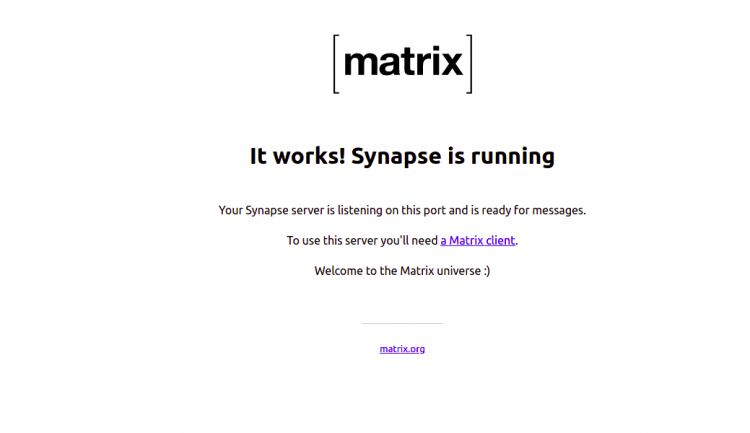
您现在可以在 Web 浏览器中使用 URL https://matrix.linuxbuz.com 验证 Matrix Synapse 的安装。您应该会看到以下界面:
您也可以使用基于 Web 的 Riot 客户端 https://riot.im/app/#/login 来验证您的 Matrix Synapse。您应该会看到以下界面:
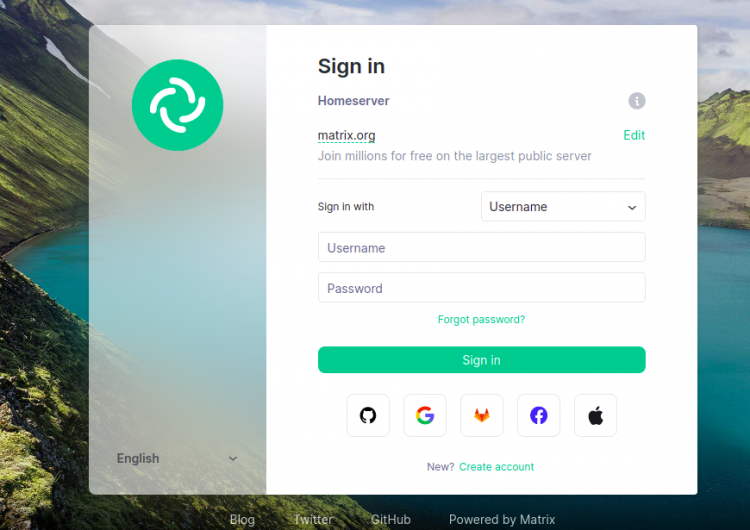
点击 Edit 按钮。您应该会看到以下界面:
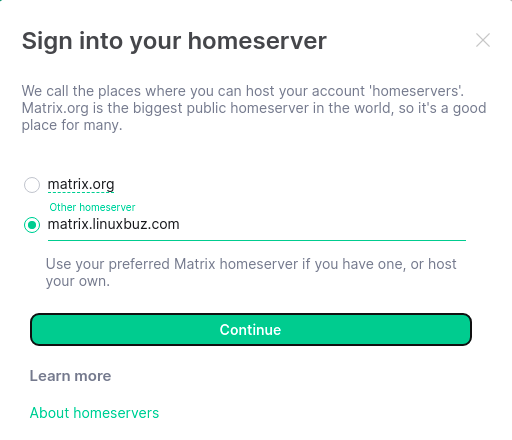
输入您的 Matrix 服务器 URL 并点击 Continue 按钮。您应该会看到 Matrix 登录页面:
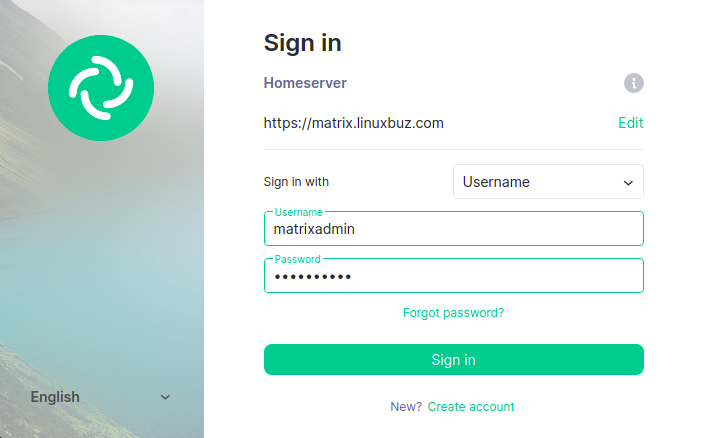
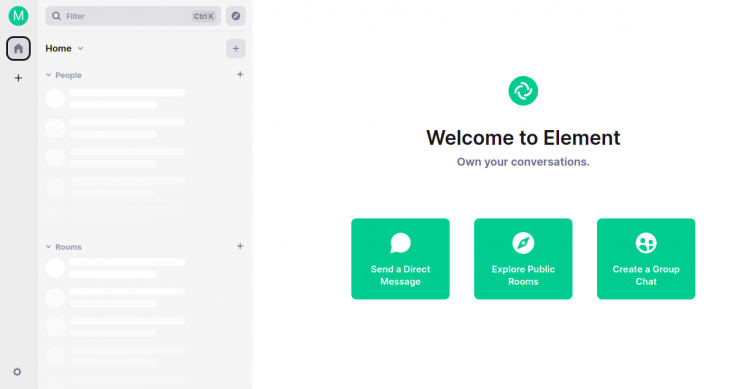
输入您的管理员用户名和密码,然后点击 Sign in 按钮。连接到 Matrix Synapse 服务器后,您应该会看到以下界面:
总结
在本文中,您学习了如何在 Ubuntu 22.04 服务器上安装以 Nginx 作为反向代理的 Matrix Synapse。您还使用基于 Web 的 Riot 客户端验证了 Matrix Synapse。现在您可以使用 Matrix Synapse 搭建自己的 VoIP 服务器了。